이 버전에는 잘못된 편집 사항이 있을 수 있습니다. 최신 확인된 스냅샷으로 전환하십시오.
필요한 것
-
이 단계는 번역되지 않았습니다. 번역을 도와주십시오
-
Heat an iOpener and apply it to the volume button side of the phone for about two minutes.
-
-
이 단계는 번역되지 않았습니다. 번역을 도와주십시오
-
Once the back panel is hot to the touch, apply a suction cup near the center of the phone, and as close as possible to the edge of the panel.
-
Lift on the suction cup to create a small gap underneath the rear glass, and insert an opening pick into the gap.
-
-
이 단계는 번역되지 않았습니다. 번역을 도와주십시오
-
Slide the pick along the side of the phone to cut the adhesive securing the rear panel.
-
-
-
이 단계는 번역되지 않았습니다. 번역을 도와주십시오
-
Repeat the heating and cutting procedure for the remaining three sides of the phone.
-
Leave an opening pick under each edge to prevent the adhesive from resealing.
-
-
이 단계는 번역되지 않았습니다. 번역을 도와주십시오
-
Use an opening pick to slice through any remaining adhesive.
-
Remove the rear glass.
-
-
이 단계는 번역되지 않았습니다. 번역을 도와주십시오
-
First use tweezers to peel away any remaining adhesive from both the back cover and the phone's chassis.
-
Then, clean the adhesion areas with high concentration isopropyl alcohol (at least 90%) and a lint-free cloth. Swipe in one direction only, not back and forth. This will help prep the surface for the new adhesive.
-
Be sure to turn on your phone and test your repair before installing new adhesive and resealing the phone.
-
Replacement adhesive comes in a pre-cut sheet to match the exact contours of the back cover. The sheet is asymmetrical, so make sure the screw holes in the adhesive sheet line up with the screws on the frame before applying the adhesive.
-
After installing the rear cover, apply strong, steady pressure to your phone for several minutes to help the adhesive form a good bond, such as by placing it under a stack of heavy books.
-
-
이 단계는 번역되지 않았습니다. 번역을 도와주십시오
-
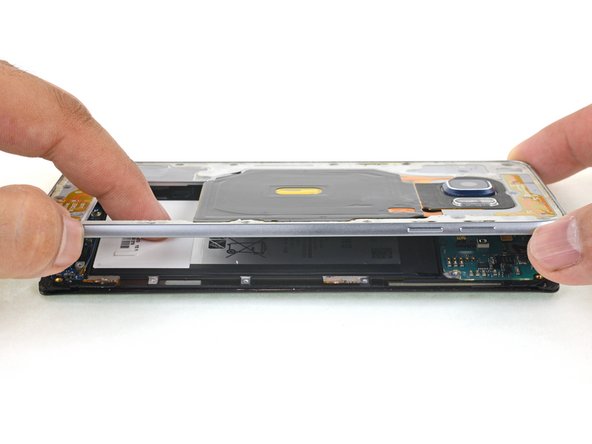
Press down on the back of the battery while you lift up on the edges of the midframe to separate the midframe from the rest of the phone.
-


다른 3명이 해당 안내서를 완성하였습니다.
