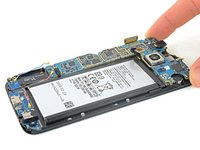
주요 콘텐츠로 건너뛰기

Samsung Galaxy S6 Motherboard Assembly Replacement

단지 전제 조건
이 안내서는 다른 가이드의 선행 작업으로 사용하기 위한 것입니다. 그 자체로는 불완전합니다.

필요한 것

  1. Samsung Galaxy S6 Motherboard Assembly Replacement, Motherboard Assembly: 1 단계, 이미지 1/3 Samsung Galaxy S6 Motherboard Assembly Replacement, Motherboard Assembly: 1 단계, 이미지 2/3 Samsung Galaxy S6 Motherboard Assembly Replacement, Motherboard Assembly: 1 단계, 이미지 3/3
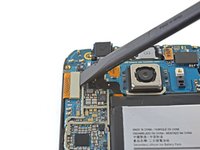
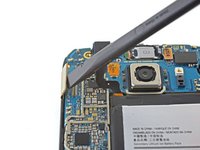
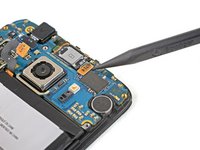
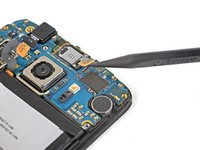
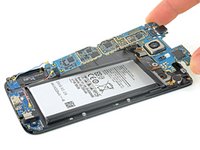
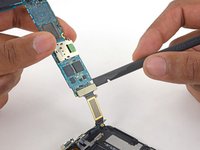
    • Use the pointed edge of a spudger to disconnect the Bluetooth and Wi-Fi antenna cable connectors from their sockets on the motherboard.

  2. Samsung Galaxy S6 Motherboard Assembly Replacement: 2 단계, 이미지 1/2 Samsung Galaxy S6 Motherboard Assembly Replacement: 2 단계, 이미지 2/2
    • Use the flat end of the spudger to disconnect the home button connector.

  3. Samsung Galaxy S6 Motherboard Assembly Replacement: 3 단계, 이미지 1/2 Samsung Galaxy S6 Motherboard Assembly Replacement: 3 단계, 이미지 2/2
    • Use the flat end of a spudger to disconnect the display assembly cable from the motherboard.

  4. Samsung Galaxy S6 Motherboard Assembly Replacement: 4 단계, 이미지 1/2 Samsung Galaxy S6 Motherboard Assembly Replacement: 4 단계, 이미지 2/2
    • Disconnect the earpiece speaker assembly cable connector from the motherboard.

  5. Samsung Galaxy S6 Motherboard Assembly Replacement: 5 단계, 이미지 1/2 Samsung Galaxy S6 Motherboard Assembly Replacement: 5 단계, 이미지 2/2
    • Lift the camera-side end of the motherboard to separate it from the display frame.

    • You may need to move some of the ribbon cables out of the way while you lift the motherboard. If the board is hard to lift, check that it is fully disconnected and not caught on any ribbon cables.

    • Do not fully remove the motherboard yet—it is still attached to the daughterboard via a ribbon cable on the underside of the motherboard.

  6. Samsung Galaxy S6 Motherboard Assembly Replacement: 6 단계, 이미지 1/2 Samsung Galaxy S6 Motherboard Assembly Replacement: 6 단계, 이미지 2/2
    • Use the flat end of a spudger to disconnect the daughterboard ribbon cable connector from its socket on the underside of the motherboard.

결론

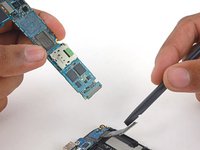
To reassemble your device, follow these instructions in reverse order. When reinstalling the rear glass, refer to the rear glass adhesive replacement guide.

다른 3명이 해당 안내서를 완성하였습니다.

Evan Noronha

회원 가입일: 02/05/15

223,424 평판

안내서 168개 작성하였습니다

댓글 0개

댓글 쓰기

조회 통계:

24 시간 전: 0

7일 전: 0

30일 전: 0

전체 시간: 881