소개
For the official iFixit guide to repair your Galaxy S7 display, click here. The guide you are currently viewing is duplicate content, archived here for historical purposes only.
필요한 것
-
-
Heat the back of the phone to melt the adhesive holding the back plate on. I use an electronic heating pad, set to 60° Celsius. You can also use a heat gun, but I do not like using them. Be extra careful if using a heat gun, as they are easier to burn yourself with, and holding one over a phone for even just a little too long can damage it.
-
-
-
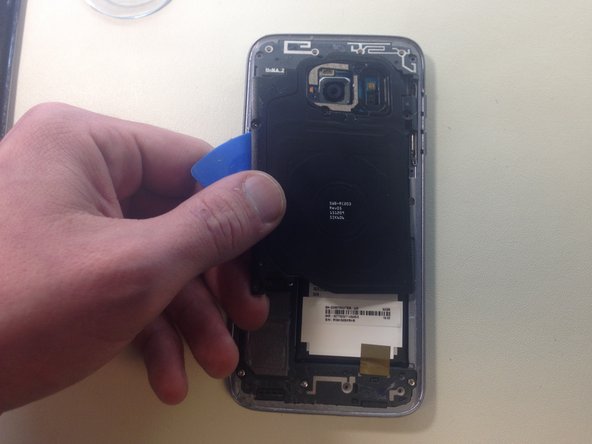
Use a suction cup on the bottom half of the back plate to begin to lift the bottom edge of the plate up, being careful not to apply to much pressure.
-
Once you have enough of the back plate lifted to fit a guitar pick, insert one underneath. Slide the guitar pick around the entire edge of the phone to break the adhesive.
-
Remove the back plate.
-
-
-
Using a Phillips #00 screw driver bit, remove the 11 screws holding the plastic covers, loudspeaker, and NFC antenna on.
-
Using a guitar pick to break some light adhesive, remove the top two plastic plates, and the NFC antenna.
-
NOTE: If the adhesive is too strong, try applying more heat.
-
Remove the loudspeaker assembly. You may have to peel up a small piece of gold/copper tape holding the assembly to the battery.
-
-
-
Using the flat end of a spudger, disconnect the battery from the logic board.
-
-
-
-
Disconnect all other flex cables connected to the top of the logic board using the flat end of a plastic spudger.
-
-
-
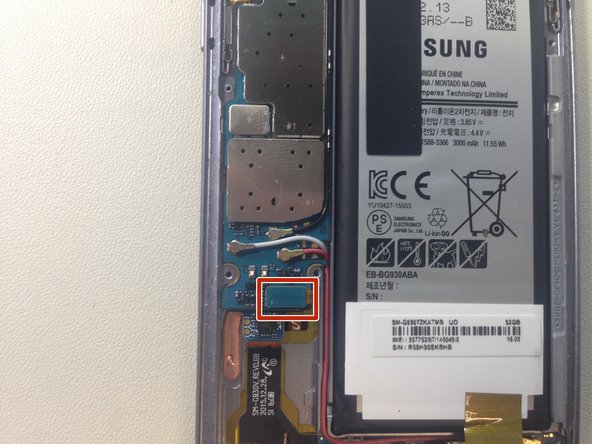
Using the pointed end of a plastic spudger, disconnect the white and red antenna cables from the logic board.
-
Using a SIM card removal tool, eject the SIM Card/SD Card tray (Image 2 of this step. This tray is attached to the back of the logic board. Removing the logic board before doing this may damage it.)
-
-
-
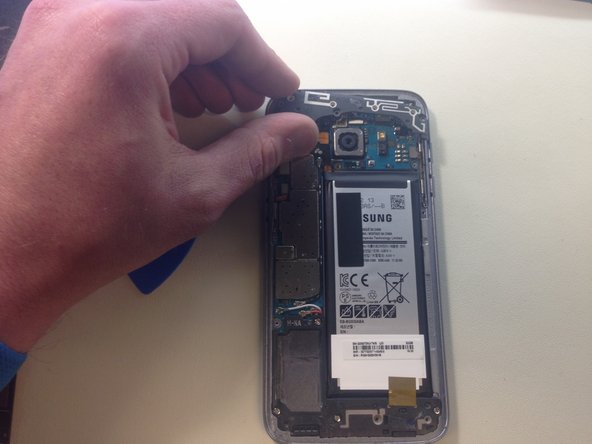
Gently lift the logic board up from the top of the phone towards the battery. DO NOT completely remove the logic board yet.
-
NOTE: As you lift the logic board out, the front facing camera may fall out of the phone. If it does, set it to the side, on an anti-static mat.
-
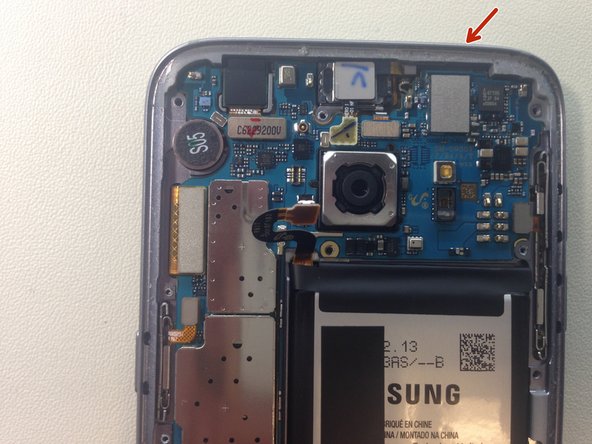
Using the flat end of a spudger, disconnect the USB daughter board connector from the back of the logic board.
-
Remove the logic board, placing it to the side on an anti-static surface.
-
-
-
Insert a guitar pick between the screen and the bezel of the phone. You may have to apply heat to loosen up the adhesive before this step.
-
If necessary, use a small suction cup to slightly lift the screen so you can insert the guitar pick.
-
Gently rotate the guitar pick around the outside of the phone to break the adhesive holding the screen on.
-
Be extremely careful around the sides and bottom of the phone. If done incorrectly, you may damage the screen flex cable, or the softkey flex cables.
-
Also be careful around the LCD. Make sure the guitar pick slides BEHIND the LCD, not in front of it, and that you have the guitar pick as flat as possible.
-
Remove the screen.
-
-
-
You can also start little bit with the razor blade so you can then fit a business card in or plastic card
-
-
-
Slide a card in between the frame and display and go down slowly
Is it still water resistant after repair
depends on ur adhesive
-
-
-
the job is done check make sure everything is working before putting back cover back on and you are all done
-


To reassemble your device, follow these instructions in reverse order.
To reassemble your device, follow these instructions in reverse order.
다른 50명이 해당 안내서를 완성하였습니다.

댓글 36개
Can just the glass be replaced do is it fused together somehow?
it could if you get the lcd out with broken glass out one piece then using heat plate separate the glass very thin so it be hard to save lcd
Brian -
The Eternal question: is it still waterproof after screen replacement?
no it wont because you will break the seal that originally came from samsung
Brian -
Is it still water resistant
no it wont be water resistance any more
Brian -
Appreciate the effort, but this guide is severely lacking. There is little to no guidance about it.
sorry this my first guide and i did it so other repair people get idea because ifixit at the time had no guides at all so that is why i did a quick one as i was repairing the phone
Brian -
Samsung Galaxy does not use an LCD its an OLED
thank you for sharing your info oled but if you on ebay or anywhere they sell as lcd but thank you again for correcting me but you should correct the other people too 1 million sellers that referred as lcd
Brian -
I accidently cut the ribbon cable to the digitizer. ...ouch. Do you sell the digitizer assembly for the Galaxy S7 edge as well as the sealant for the back of the phone like you do above for the regular Galaxy S7 for 169.95 as well as the rear cover adhesive for the S7 edge...probably same adhesive. I read many article and if I had followed your article I would not have cut the ribbon cable....Good article. Thank you, rexblisard@yahoo.com
rexblisard - 답글
you welcome and sorry i dont sell parts i just do repairs
Brian -
Did it work fine after that?
yes it did no complaints from the customer
Brian -
Omg. just say thx for the effort and the guide...he wasted hes time..if this guide doesn't help you..then take ur phone to a repair shop..if u already repaired ANY waterproof mobiles..u would know how to open it and deal with it..and this guide would only help to identify components and avoid posible mistakes like cutting a ribbon or damaging something inside...
I really thank you for your time....i just got mad when i saw ppls coments...
thank you for understanding
Brian -
Why take the back all apart if only wanting to change the screen???? Can't I just take the screen off an put new one on??? Really don't see the point of taking back off and a few boards as well ?
because the cable connects in the back so if you don't open the back you can not plug the lcd cable with the motherboard
Brian -
Lol the one guide on iFixit where OP doesn't completely hold your hand and everyone gets all upset.
I think it was a dope guide. Helped me catch all the tiny ribbon cable connections - I totally would've missed one without this.
Although, yeah, it seems like you really only need to disconnect the display cable from the daughterboard to get the display off.
thank you i hope it was some help
Brian -
i apologize for asking a repeat question but I do not see answers - Is it possible to replace just the glass for this phone? i have cracked glass and a working digitizer. another electronics outlet sold me a glass replacement kit but no instructions. All the vieos i’ve been watching and the forums/guides I’ve read all discuss replacing the entire front(digitizer/glass).
is it possible to replace just the glass? if so, can it be done without removing all the parts from the back? since technically I won't need to plug in to the motherboard?
Its possible but very hard to do i tried few times just changing the glass i end up breaking the screen but on youtube you have some people that are able remove just the glass with bussiness cards.. chances are 20% can get just the glass out withought breaking lcd unless you have freezing mashine thats a different story..good luck
I’m not sure what everyone is complaining about… this seems like a great tutorial and you show exactly what to remove. My first time taking a phone apart and this is incredibly helpful Thank-you for taking time to post!
thank you appreciate your feedback
Brian -