주요 콘텐츠로 건너뛰기

Samsung Galaxy Tab 3 10.1 Speaker & Auxiliary Port Replacement

필요한 것

  1. Samsung Galaxy Tab 3 10.1 Speaker & Auxiliary Port Replacement, Rear Case: 1 단계, 이미지 1/2 Samsung Galaxy Tab 3 10.1 Speaker & Auxiliary Port Replacement, Rear Case: 1 단계, 이미지 2/2
    • Insert an opening pick between the rear case and the plastic rim.

    • You may need to add multiple picks to detach the clips.

    • Slide the pick along the edge of the rear case until you release the plastic clips attaching the rear case to the display.

    • Continue to slide the pick around the edge of the rear case until all clips are released.

  2. Samsung Galaxy Tab 3 10.1 Speaker & Auxiliary Port Replacement: 2 단계, 이미지 1/2 Samsung Galaxy Tab 3 10.1 Speaker & Auxiliary Port Replacement: 2 단계, 이미지 2/2
    • Lift the case up to remove it.

  3. Samsung Galaxy Tab 3 10.1 Speaker & Auxiliary Port Replacement, Battery: 3 단계, 이미지 1/3 Samsung Galaxy Tab 3 10.1 Speaker & Auxiliary Port Replacement, Battery: 3 단계, 이미지 2/3 Samsung Galaxy Tab 3 10.1 Speaker & Auxiliary Port Replacement, Battery: 3 단계, 이미지 3/3
    • Use the flat end of a nlyon spudger to pry up the black plastic tabs securing the two ZIF connectors.

  4. Samsung Galaxy Tab 3 10.1 Speaker & Auxiliary Port Replacement: 4 단계, 이미지 1/2 Samsung Galaxy Tab 3 10.1 Speaker & Auxiliary Port Replacement: 4 단계, 이미지 2/2
    • Use the flat end of a nylon spudger to pry up the brown plastic tab securing the orange ribbon cable.

  5. Samsung Galaxy Tab 3 10.1 Speaker & Auxiliary Port Replacement: 5 단계, 이미지 1/3 Samsung Galaxy Tab 3 10.1 Speaker & Auxiliary Port Replacement: 5 단계, 이미지 2/3 Samsung Galaxy Tab 3 10.1 Speaker & Auxiliary Port Replacement: 5 단계, 이미지 3/3
    • Remove all three ribbon cables by gently pulling the cables away from the ZIF connectors.

  6. Samsung Galaxy Tab 3 10.1 Speaker & Auxiliary Port Replacement: 6 단계, 이미지 1/1
    • Use a Phillips #000 screwdriver to remove the ten 3mm screws securing the battery to the chassis.

  7. Samsung Galaxy Tab 3 10.1 Speaker & Auxiliary Port Replacement: 7 단계, 이미지 1/2 Samsung Galaxy Tab 3 10.1 Speaker & Auxiliary Port Replacement: 7 단계, 이미지 2/2
    • Use the pointed end of a nylon spudger to pry the two battery connections away from the motherboard.

  8. Samsung Galaxy Tab 3 10.1 Speaker & Auxiliary Port Replacement: 8 단계, 이미지 1/2 Samsung Galaxy Tab 3 10.1 Speaker & Auxiliary Port Replacement: 8 단계, 이미지 2/2
    • Lift with a nylon spudger to remove the battery.

  9. Samsung Galaxy Tab 3 10.1 Speaker & Auxiliary Port Replacement, Motherboard: 9 단계, 이미지 1/2 Samsung Galaxy Tab 3 10.1 Speaker & Auxiliary Port Replacement, Motherboard: 9 단계, 이미지 2/2
    • Insert an opening pick between the plastic frame and the screen.

    • Slide the opening pick around the perimeter of the screen.

    • You will hear clicking noises as each plastic clip is released from the display chassis.

  10. Samsung Galaxy Tab 3 10.1 Speaker & Auxiliary Port Replacement: 10 단계, 이미지 1/1
    • Lift the plastic frame to remove.

    • Avoid the three delicate ribbon cables.

  11. Samsung Galaxy Tab 3 10.1 Speaker & Auxiliary Port Replacement: 11 단계, 이미지 1/1
    • Use a Phillips #000 screwdriver to remove the 3mm screw attaching the motherboard to the display chassis.

  12. Samsung Galaxy Tab 3 10.1 Speaker & Auxiliary Port Replacement: 12 단계, 이미지 1/3 Samsung Galaxy Tab 3 10.1 Speaker & Auxiliary Port Replacement: 12 단계, 이미지 2/3 Samsung Galaxy Tab 3 10.1 Speaker & Auxiliary Port Replacement: 12 단계, 이미지 3/3
    • Use a nylon spudger to flip up the eight press-fit connectors from the motherboard.

    • The vibration motor is missing from these photos.

  13. Samsung Galaxy Tab 3 10.1 Speaker & Auxiliary Port Replacement: 13 단계, 이미지 1/2 Samsung Galaxy Tab 3 10.1 Speaker & Auxiliary Port Replacement: 13 단계, 이미지 2/2
    이 단계에 사용된 도구:
    Tweezers
    $4.99
    구매
    • Use nylon-tipped tweezers to remove the motherboard.

  14. Samsung Galaxy Tab 3 10.1 Speaker & Auxiliary Port Replacement, Speaker & Auxiliary Port: 14 단계, 이미지 1/2 Samsung Galaxy Tab 3 10.1 Speaker & Auxiliary Port Replacement, Speaker & Auxiliary Port: 14 단계, 이미지 2/2
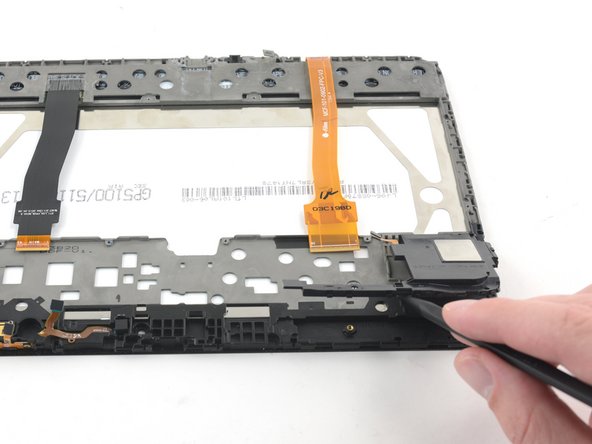
    • Using the pointed end of a nylon spudger, pry upwards between the screen chassis and the auxiliary port.

    • The speaker is permanently connected to the auxiliary port and will need to be removed from the device as a single unit.

  15. Samsung Galaxy Tab 3 10.1 Speaker & Auxiliary Port Replacement: 15 단계, 이미지 1/2 Samsung Galaxy Tab 3 10.1 Speaker & Auxiliary Port Replacement: 15 단계, 이미지 2/2
    • Use the flat end of a spudger to pry upwards between the speaker and the display chassis.

    • Remove the speaker and auxiliary port assembly.

  16. Samsung Galaxy Tab 3 10.1 Speaker & Auxiliary Port Replacement: 16 단계, 이미지 1/2 Samsung Galaxy Tab 3 10.1 Speaker & Auxiliary Port Replacement: 16 단계, 이미지 2/2
    • Use the pointed end of a spudger to pry upwards between the other speaker unit and the display chassis.

결론

To reassemble your device, follow these instructions in reverse order.

다른 한 분이 해당 안내서를 완성하였습니다.

Corey Brown

회원 가입일: 06/24/16

8,688 평판

안내서 11개 작성하였습니다

댓글 0개

댓글 쓰기

조회 통계:

24 시간 전: 0

7일 전: 3

30일 전: 16

전체 시간: 1,372