주요 콘텐츠로 건너뛰기

Samsung Galaxy Tab 4 8.0 Verizon Rear Facing Camera Replacement

필요한 것

  1. Samsung Galaxy Tab 4 8.0 Verizon Rear Facing Camera Replacement, Rear Case: 1 단계, 이미지 1/3 Samsung Galaxy Tab 4 8.0 Verizon Rear Facing Camera Replacement, Rear Case: 1 단계, 이미지 2/3 Samsung Galaxy Tab 4 8.0 Verizon Rear Facing Camera Replacement, Rear Case: 1 단계, 이미지 3/3
    • Before disassembling your Samsung Galaxy Tab 4 8.0, be sure it is powered off and you remove the SIM and Micro SD cards.

    • At the top of the tablet, nudge the blue plastic opening tool between the back plastic casing and the front panel's metal rim.

    • Do not use excessive force when prying the clips, fastening the casing together, open because they can easily break.

  2. Samsung Galaxy Tab 4 8.0 Verizon Rear Facing Camera Replacement: 2 단계, 이미지 1/2 Samsung Galaxy Tab 4 8.0 Verizon Rear Facing Camera Replacement: 2 단계, 이미지 2/2
    • Continue prying the blue plastic opening tool along the perimeter of the tablet to separate the back plastic casing from the front assembly panel.

    • As right-handers, we found it easiest to move clockwise and use more pressure around the corners to facilitate the process.

    • You might hear several popping noises caused by the plastic clips coming undone.

  3. Samsung Galaxy Tab 4 8.0 Verizon Rear Facing Camera Replacement: 3 단계, 이미지 1/2 Samsung Galaxy Tab 4 8.0 Verizon Rear Facing Camera Replacement: 3 단계, 이미지 2/2
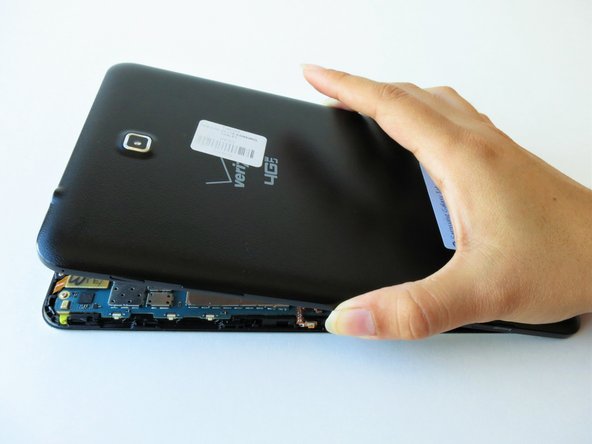
    • To avoid damaging the screen, gently set the tablet with the LCD screen faced down.

    • Firmly grasp the back plastic casing and lift it away from the front assembly panel.

  4. Samsung Galaxy Tab 4 8.0 Verizon Rear Facing Camera Replacement, Rear Facing Camera: 4 단계, 이미지 1/2 Samsung Galaxy Tab 4 8.0 Verizon Rear Facing Camera Replacement, Rear Facing Camera: 4 단계, 이미지 2/2
    • The back camera will be located near the top of the tablet in the center above the battery.

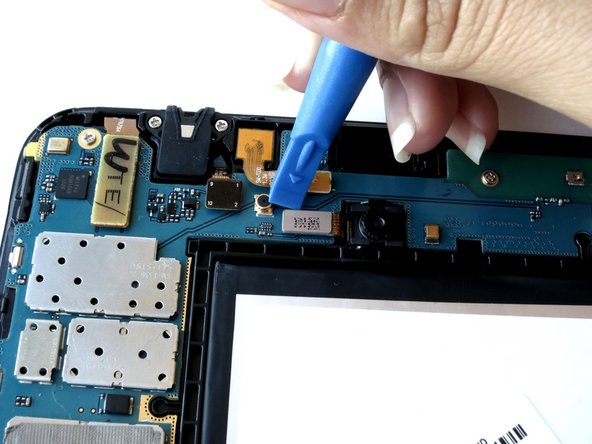
    • Carefully insert the flat end of the blue plastic opening tool under the metal rectangular end of the back camera’s cable connector.

  5. Samsung Galaxy Tab 4 8.0 Verizon Rear Facing Camera Replacement: 5 단계, 이미지 1/1
    • Slightly apply pressure and move the blue plastic opening tool downwards to pop the back camera’s metallic rectangular connector from its socket on the logic board.

  6. Samsung Galaxy Tab 4 8.0 Verizon Rear Facing Camera Replacement: 6 단계, 이미지 1/2 Samsung Galaxy Tab 4 8.0 Verizon Rear Facing Camera Replacement: 6 단계, 이미지 2/2
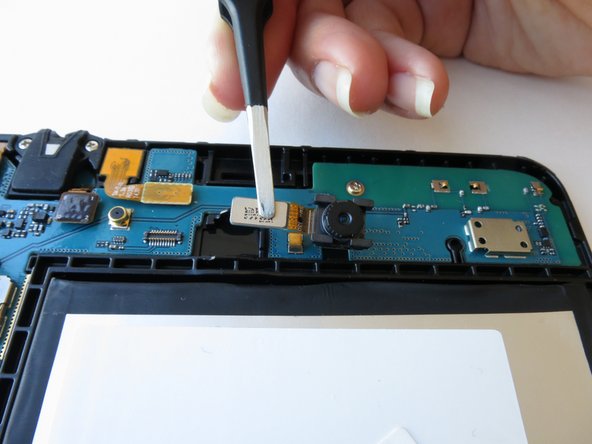
    • Squeeze the metallic rectangular piece with the tweezers to gently lift it from it's pit.

결론

To reassemble your device, follow these instructions in reverse order.

다른 2명이 해당 안내서를 완성하였습니다.

Yuly Flores

회원 가입일: 09/14/15

747 평판

안내서 1개 작성함

CSU Fullerton, Team 1-3, Bruce Fall 2015 CSU Fullerton, Team 1-3, Bruce Fall 2015 회원

CSUF-BRUCE-F15S1G3

4 회원들

안내서 12개 작성하였습니다

댓글 0개

댓글 쓰기

조회 통계:

24 시간 전: 0

7일 전: 0

30일 전: 1

전체 시간: 911