소개
A battery, after a certain period of time, will begin to lose its life span after a charging period. This guide highlights how to remove the back cover of the tablet in order to get to the battery as a means to replace it.
필요한 것
-
-
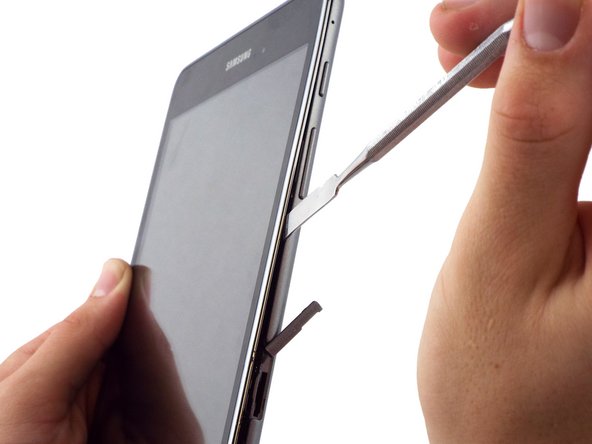
At the top portion of the memory card slot, use the small metal spudger to create separation between the back cover and the rest of the device.
-
-
-
Use the intermediate metal spudger in place of the small metal spudger to remove the back cover. This is done by sliding the intermediate metal spudger around the perimeter of the device, beginning at the top portion of the memory card slot.
-
The second picture shows the internal portion of the device once the back cover is removed.
-
-
-
-
Disconnect the electrical connector from the motherboard using the bent precision tweezers.
-


To reassemble your device, follow these instructions in reverse order.
To reassemble your device, follow these instructions in reverse order.
다른 87명이 해당 안내서를 완성하였습니다.
팀

USF Tampa, Team 17-4, Blackwell Winter 2016 USF Tampa, Team 17-4, Blackwell Winter 2016 회원
USFT-BLACKWELL-W16S17G4
4 회원들
안내서 11개 작성하였습니다
댓글 31개
Thank you so much !
please help us
The Tab A of my son we dont know what happen they shut down we can not open it.
but the charger is ok but we try to chargers the device is not open it.
The Tab A is 7 mounths using only thats why we are worried what happen.
Please help thanks,
My 10.1" died suddenly - never dropped, shocked - worked fine in the morning, wouldn't come on two hours later. Won't take a charge or show ANY sign of life. 53 weeks old and maybe 10 hour use a week. I can't seem to open it without making a mess out of it. I was impressed by the product when it was working - certainly NOT impressed anymore. A very shiny and expensive paperweight.
Long time since you posted this, but clean out the micro USB charge port. Use a toothpick gently, and vacuum. A lot of lint and dirt gets in and stops a proper connection
i looked everywhere online for a simple guide with pics for tab a and all i found was tab 2 and up so THANK YOU SO MUCH !!!!!!
cc rancour - 답글