주요 콘텐츠로 건너뛰기

Samsung Galaxy Tab E 8.0 Screen Replacement

필요한 것

  1. Samsung Galaxy Tab E 8.0 Screen Replacement, Back Panel: 1 단계, 이미지 1/2 Samsung Galaxy Tab E 8.0 Screen Replacement, Back Panel: 1 단계, 이미지 2/2
    • Use the iFixit Opening Tool to pry off the back case, moving the tool around the screen.

    • Make sure the device is off and the SD card is removed before taking off the back casing.

    deffently got to apply heat to that front screen due to the adessive bewhind or mostlikly crack the screen

    Trent Weaver - 답글

  2. Samsung Galaxy Tab E 8.0 Screen Replacement, Back Camera: 2 단계, 이미지 1/2 Samsung Galaxy Tab E 8.0 Screen Replacement, Back Camera: 2 단계, 이미지 2/2
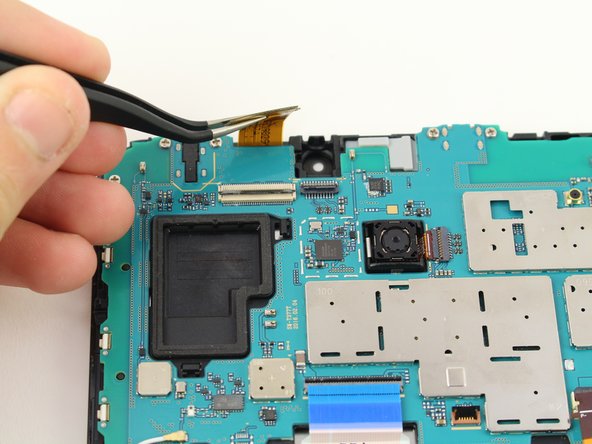
    • Use the tweezers to lift the switch connecting the back camera to the motherboard.

    • Use your hand to remove the back camera from the motherboard.

  3. Samsung Galaxy Tab E 8.0 Screen Replacement, Front Camera: 3 단계, 이미지 1/3 Samsung Galaxy Tab E 8.0 Screen Replacement, Front Camera: 3 단계, 이미지 2/3 Samsung Galaxy Tab E 8.0 Screen Replacement, Front Camera: 3 단계, 이미지 3/3
    • Use the tweezers to lift the switch connecting the front camera to the motherboard.

    • Remove the front camera from the motherboard by lifting with the tweezers.

  4. Samsung Galaxy Tab E 8.0 Screen Replacement, Motherboard: 4 단계, 이미지 1/2 Samsung Galaxy Tab E 8.0 Screen Replacement, Motherboard: 4 단계, 이미지 2/2
    • Use the tweezers to flip the switch on the bottom of the strap that goes over the battery.

    • Release the strap from the switch by lifting the strap with your hand.

  5. Samsung Galaxy Tab E 8.0 Screen Replacement: 5 단계, 이미지 1/2 Samsung Galaxy Tab E 8.0 Screen Replacement: 5 단계, 이미지 2/2
    • Use the tweezers to flip the switch that connects the top of the strap to the motherboard.

    • Lift the top end of the strap with your hand and remove the strap completely from the device.

  6. Samsung Galaxy Tab E 8.0 Screen Replacement: 6 단계, 이미지 1/2 Samsung Galaxy Tab E 8.0 Screen Replacement: 6 단계, 이미지 2/2
    • Use the tweezers to flip the switch of the connector.

    • Lift the connector from the motherboard.

    • This connector does not come completely off, but disconnects from the motherboard.

  7. Samsung Galaxy Tab E 8.0 Screen Replacement: 7 단계, 이미지 1/2 Samsung Galaxy Tab E 8.0 Screen Replacement: 7 단계, 이미지 2/2
    • Use the tweezers to flip the switch of the blue connector on the motherboard.

    • Lift the connector from the motherboard.

    • This switch can detach from the device, but just needs to disconnect from the motherboard.

    • Ensure the blue ribbon cable is not under the motherboard upon reassembly.

  8. Samsung Galaxy Tab E 8.0 Screen Replacement: 8 단계, 이미지 1/2 Samsung Galaxy Tab E 8.0 Screen Replacement: 8 단계, 이미지 2/2
    • Use the tweezers to flip the switch of the connector that runs from the battery to the motherboard.

    • Lift the connector from the motherboard.

    • This switch can detach from the device, but just needs to disconnect from the motherboard.

  9. Samsung Galaxy Tab E 8.0 Screen Replacement: 9 단계, 이미지 1/2 Samsung Galaxy Tab E 8.0 Screen Replacement: 9 단계, 이미지 2/2
    • Use a JIS #00 screwdriver to remove the six 4.5mm screws at the top of the motherboard.

    • Lift the motherboard with your hand to detach the motherboard from the device.

    Before you pull teh motherboard out, yo need to detache the grey wire that acts as antenna.

    steve k - 답글

  10. Samsung Galaxy Tab E 8.0 Screen Replacement, Battery: 10 단계, 이미지 1/3 Samsung Galaxy Tab E 8.0 Screen Replacement, Battery: 10 단계, 이미지 2/3 Samsung Galaxy Tab E 8.0 Screen Replacement, Battery: 10 단계, 이미지 3/3
    • Use the tweezers to lift the flap on the left end of the battery and pull up with your hand to remove the battery.

    • The battery is held by an adhesive on the back, so it will take some force to remove.

  11. Samsung Galaxy Tab E 8.0 Screen Replacement, Screen: 11 단계, 이미지 1/2 Samsung Galaxy Tab E 8.0 Screen Replacement, Screen: 11 단계, 이미지 2/2
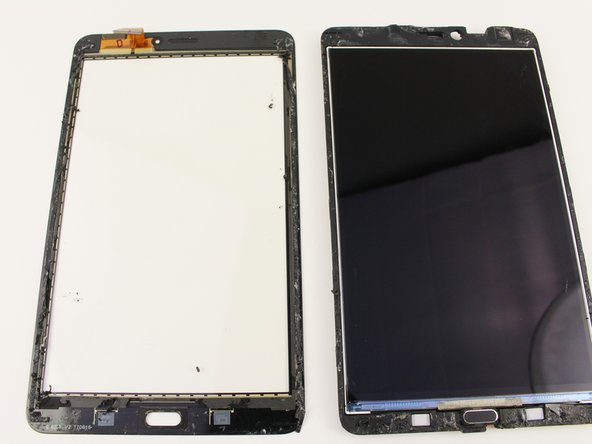
    • Use an iOpener or a heat gun/hair dryer to warm the outer 1/2 inch of the screen. It should be very warm but not too hot to touch or you may cause heat damage to components inside the device.

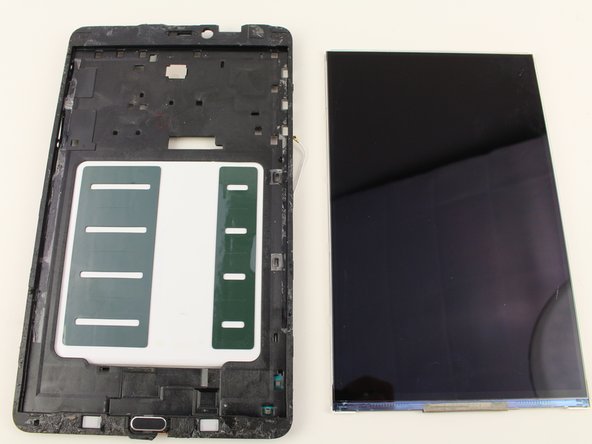
    • Use the iFixit Opening Tool to get between the plastic screen and the device to pry off the screen.

    • The metal spudger may be needed to get between the screen.

    • The metal spudger may cause more damage to the screen if used with force.

    You will need to use an iOpener or apply heat to separate the digitizer, especially if the glass is shattered. The bottom near the home button and the entire top portion has thick strips of black adhesive.

    Jeana Morales - 답글

  12. Samsung Galaxy Tab E 8.0 Screen Replacement: 12 단계, 이미지 1/2 Samsung Galaxy Tab E 8.0 Screen Replacement: 12 단계, 이미지 2/2
    • Use the metal spudger to get between the device and the internal screen.

    • Pry out the screen from the device.

결론

To reassemble your device, follow these instructions in reverse order.

다른 6명이 해당 안내서를 완성하였습니다.

Christian Bloemhof

회원 가입일: 10/08/18

1,102 평판

안내서 7개 작성하였습니다

Cal Poly, Team S13-G4, White Fall 2018 Cal Poly, Team S13-G4, White Fall 2018 회원

CPSU-WHITE-F18S13G4

4 회원들

안내서 8개 작성하였습니다

댓글 한 개

I am working on a 7” lite E. Is the procedure about the same?

George Tedrick - 답글

댓글 쓰기

조회 통계:

24 시간 전: 1

7일 전: 15

30일 전: 37

전체 시간: 8,937