주요 콘텐츠로 건너뛰기

Samsung Galaxy Watch Active2 Screen Replacement

필요한 것

  1. Samsung Galaxy Watch Active2 Screen Replacement, Turn off the watch: 1 단계, 이미지 1/2 Samsung Galaxy Watch Active2 Screen Replacement, Turn off the watch: 1 단계, 이미지 2/2
    • Turn off the Galaxy Watch Active2 by pushing and holding the bottom button for approximately 3 seconds. You should feel a short vibration.

    • When the "Power off" symbol appears, tap the center of the screen to make it shut down. You should feel a longer vibration for confirmation.

  2. Samsung Galaxy Watch Active2 Screen Replacement, Remove the rear screws: 2 단계, 이미지 1/1
    • Use a Tri-point Y00 screwdriver to remove the four 4 mm-long screws on the back of the watch.

  3. Samsung Galaxy Watch Active2 Screen Replacement, Separate the back cover from the housing: 3 단계, 이미지 1/3 Samsung Galaxy Watch Active2 Screen Replacement, Separate the back cover from the housing: 3 단계, 이미지 2/3 Samsung Galaxy Watch Active2 Screen Replacement, Separate the back cover from the housing: 3 단계, 이미지 3/3
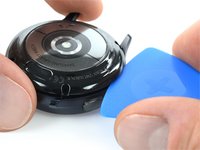
    • Use an opening pick and place it between the plastic back cover and the metal housing near the buttons.

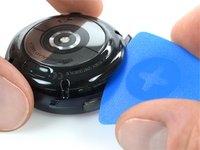
    • Push the opening pick into the gap to separate the back cover from the housing.

    • Don’t remove the back cover all the way yet. There is a cable connecting it to the motherboard.

  4. Samsung Galaxy Watch Active2 Screen Replacement, Disconnect the sensor array: 4 단계, 이미지 1/2 Samsung Galaxy Watch Active2 Screen Replacement, Disconnect the sensor array: 4 단계, 이미지 2/2
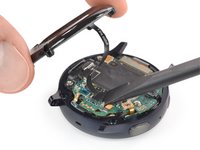
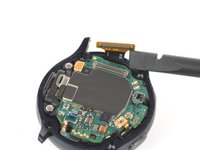
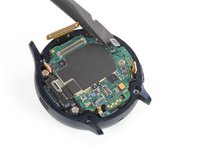
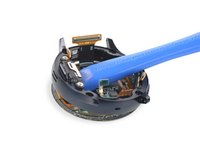
    • Carefully lift the back cover to access the sensor array connector.

    • Use a spudger to disconnect the sensor array from the motherboard.

  5. Samsung Galaxy Watch Active2 Screen Replacement, Remove the back cover: 5 단계, 이미지 1/1
    • Remove the back cover.

  6. Samsung Galaxy Watch Active2 Screen Replacement, Disconnect the display and speaker: 6 단계, 이미지 1/3 Samsung Galaxy Watch Active2 Screen Replacement, Disconnect the display and speaker: 6 단계, 이미지 2/3 Samsung Galaxy Watch Active2 Screen Replacement, Disconnect the display and speaker: 6 단계, 이미지 3/3
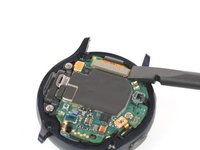
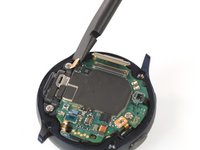
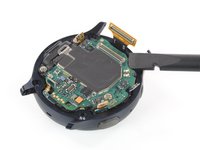
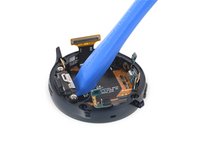
    • Use a spudger to disconnect the display assembly and the speaker.

  7. Samsung Galaxy Watch Active2 Screen Replacement, Disconnect the barometric sensor, buttons, and mic: 7 단계, 이미지 1/3 Samsung Galaxy Watch Active2 Screen Replacement, Disconnect the barometric sensor, buttons, and mic: 7 단계, 이미지 2/3 Samsung Galaxy Watch Active2 Screen Replacement, Disconnect the barometric sensor, buttons, and mic: 7 단계, 이미지 3/3
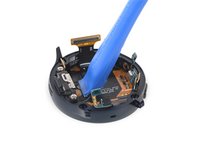
    • Use a spudger to disconnect the barometric sensor, the buttons, and the microphone.

  8. Samsung Galaxy Watch Active2 Screen Replacement, Lift the core assembly: 8 단계, 이미지 1/2 Samsung Galaxy Watch Active2 Screen Replacement, Lift the core assembly: 8 단계, 이미지 2/2
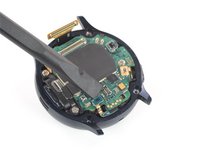
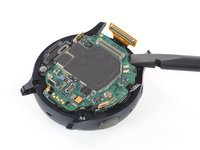
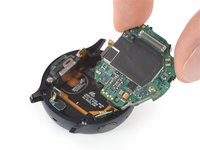
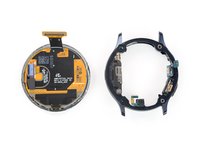
    • Place a spudger underneath the motherboard at the top right next to the display connector.

    • Slightly twist and lever the spudger to loosen the core assembly.

    • It might help to also check the comments below this and the next step if you’re having difficulties.

  9. Samsung Galaxy Watch Active2 Screen Replacement, Remove the core assembly: 9 단계, 이미지 1/3 Samsung Galaxy Watch Active2 Screen Replacement, Remove the core assembly: 9 단계, 이미지 2/3 Samsung Galaxy Watch Active2 Screen Replacement, Remove the core assembly: 9 단계, 이미지 3/3
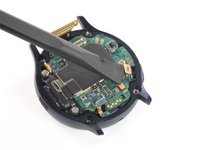
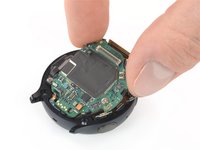
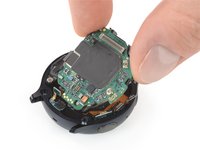
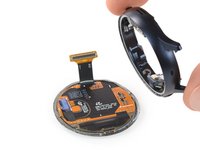
    • Grab the core assembly and carefully slide it out from under the cables.

    • Remove the core assembly.

  10. Samsung Galaxy Watch Active2 Screen Replacement, Loosen the display: 10 단계, 이미지 1/3 Samsung Galaxy Watch Active2 Screen Replacement, Loosen the display: 10 단계, 이미지 2/3 Samsung Galaxy Watch Active2 Screen Replacement, Loosen the display: 10 단계, 이미지 3/3
    • Place the edge of an opening tool under the speaker unit.

    • Lever the opening tool down to separate the display from the frame.

  11. Samsung Galaxy Watch Active2 Screen Replacement, Remove the frame: 11 단계, 이미지 1/2 Samsung Galaxy Watch Active2 Screen Replacement, Remove the frame: 11 단계, 이미지 2/2
    • Remove the frame from the display.

    • Make sure to remove any remaining adhesive from the frame with isopropyl alcohol (>90%) before applying the adhesive or installing the new display.

결론

If possible, turn on your device and test your repair before installing new adhesive and resealing.

Apply new adhesive where necessary after cleaning the relevant areas with isopropyl alcohol (>90%). You may need to remove adhesive backings from the new part before installing.

To reassemble your device, follow these instructions in reverse order.

Take your e-waste to an R2 or e-Stewards certified recycler.

Repair didn’t go as planned? Try some basic troubleshooting, or ask our Answers community for help.

다른 24명이 해당 안내서를 완성하였습니다.

Tobias Isakeit

회원 가입일: 03/31/14

117,808 평판

안내서 188개 작성하였습니다

Tobias Isakeit - Repairability Engineer Tobias Isakeit - Repairability Engineer 회원

Business

1 회원

안내서 1,083개 작성하였습니다

댓글 16개

Does anyone know where to buy the replacement screen for Active 2? Or what keywords should I search for (SKU or model)?

Angelo Sembrano - 답글

SM-R830 for the 40mm version, SM-R820 for the 44mm one. People on ebay resell them but they cost upwards of $100. I’d look into broken watches of the same type that maybe the battery is dead and they’re selling it for cheap, then do a swap job on the (hopefully) working screen.

Justin Collins -

Seconding the question on where to buy a replacement screen

Arjun Ramakrishnan - 답글

You could be lucky on rounded.com

Tobias Isakeit - 답글

What adhesive would be best to use?

Kelsey Crank - 답글

댓글 쓰기

조회 통계:

24 시간 전: 40

7일 전: 317

30일 전: 1,391

전체 시간: 82,075