주요 콘텐츠로 건너뛰기

Samsung Gear 2 Motherboard Replacement

필요한 것

  1. Samsung Gear 2 Motherboard Replacement, Front half and Back half: 1 단계, 이미지 1/2 Samsung Gear 2 Motherboard Replacement, Front half and Back half: 1 단계, 이미지 2/2
    • Before disassembling your Gear, be sure it is powered off.

    • To remove each strap, locate the metal latches on both sides of the back of the Gear.

    • Press down on the metal latch while pulling the strap away from the Gear until it is completely off.

  2. Samsung Gear 2 Motherboard Replacement: 2 단계, 이미지 1/1
    • Remove the four 4.0 mm screws on the back of the Gear using a T5 Torx Screwdriver.

  3. Samsung Gear 2 Motherboard Replacement: 3 단계, 이미지 1/3 Samsung Gear 2 Motherboard Replacement: 3 단계, 이미지 2/3 Samsung Gear 2 Motherboard Replacement: 3 단계, 이미지 3/3
    • Firmly holding the Gear, insert the flat side of the spudger at an angle to pry the back casing off of the device. Move the spudger along the sides of the Gear to completely detach the back and front components.

    • Pry the device open from the other side also if it does not fully disassemble from one side.

  4. Samsung Gear 2 Motherboard Replacement, Camera: 4 단계, 이미지 1/2 Samsung Gear 2 Motherboard Replacement, Camera: 4 단계, 이미지 2/2
    • Locate the rectangular metal connector that attaches the camera to the Gear.

    • Use tweezers to gently lift and detach the metal plate of the connector.

    • When reassembling the Gear, reattach the camera connector by carefully aligning the metal plate and its pins to its original placement. Make sure it snaps in place to avoid improper connections and possible damage.

  5. Samsung Gear 2 Motherboard Replacement: 5 단계, 이미지 1/1
    • Use tweezers to carefully lift the camera from its slot out of the case.

  6. Samsung Gear 2 Motherboard Replacement, Motherboard: 6 단계, 이미지 1/2 Samsung Gear 2 Motherboard Replacement, Motherboard: 6 단계, 이미지 2/2
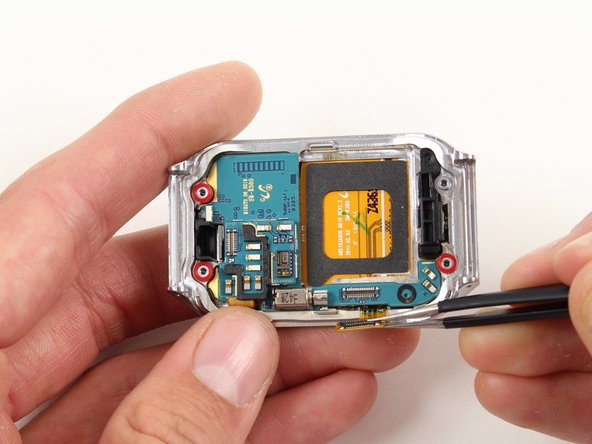
    • Use tweezers to grab and then gently lift up the metal plate of the safety belt.

    • When removing the metal plate, be sure to remove them carefully as to not rip the orange tape that is attached to them.

    • During reassembly, be sure to line up the pins of the metal plate in order to reattach correctly.

  7. Samsung Gear 2 Motherboard Replacement: 7 단계, 이미지 1/2 Samsung Gear 2 Motherboard Replacement: 7 단계, 이미지 2/2
    • Once the safety belt is removed, use tweezers to take the motherboard out of the Gear 2.

결론

To reassemble your device, follow these instructions in reverse order.

다른 7명이 해당 안내서를 완성하였습니다.

Allison Michel

회원 가입일: 04/14/14

513 평판

안내서 3개 작성하였습니다

Cal Poly, Team 13-27, Maness Spring 2014 Cal Poly, Team 13-27, Maness Spring 2014 회원

CPSU-MANESS-S14S13G27

4 회원들

안내서 6개 작성하였습니다

댓글 한 개

Can I send my gear 2 to you to repair the contacts on the back of the watch? The R380 cradle is in perfect shape the contacts on the watch has one contact worn and it will not charge help butchmcleod@hotmail.com

Butch McLeod - 답글

댓글 쓰기

조회 통계:

24 시간 전: 0

7일 전: 0

30일 전: 1

전체 시간: 3,410