주요 콘텐츠로 건너뛰기

Samsung Gear 2 Neo Display Replacement

필요한 것

  1. Samsung Gear 2 Neo Display Replacement, Battery: 1 단계, 이미지 1/1
    • Remove the wristband by sliding the metal pins located on both sides of the wrist band, and pulling the wristband off.

  2. Samsung Gear 2 Neo Display Replacement: 2 단계, 이미지 1/2 Samsung Gear 2 Neo Display Replacement: 2 단계, 이미지 2/2
    • Use a T5 Torx Screwdriver to remove the 4 (0.4 mm) screws located on the back of the watch.

  3. Samsung Gear 2 Neo Display Replacement: 3 단계, 이미지 1/1
    • Slide the opening tool in between the two halves of the case and slide along the edge of the watch while gently prying the back cover away from the face of the watch.

  4. Samsung Gear 2 Neo Display Replacement: 4 단계, 이미지 1/2 Samsung Gear 2 Neo Display Replacement: 4 단계, 이미지 2/2
    • Use a pair of tweezers to peel the battery ribbon cable off of the back cover.

    • Avoid damaging the gold terminals on the ribbon cable.

    • When reassembling, make sure that the yellow strip snaps back on to the black pin.

    • The pin is located, and marked on the picture.

    • Pull up on the tab that says, “Pull”, the battery will lift straight out.

  5. Samsung Gear 2 Neo Display Replacement, Motherboard: 5 단계, 이미지 1/1
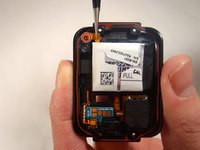
    • Using the plastic opening tool, pull up on the flex connector. It will come off the motherboard, but will stay attached to the cover like a hinge.

  6. Samsung Gear 2 Neo Display Replacement: 6 단계, 이미지 1/1
    • It is recommended to use antistatic wrist wrap whenever removing the motherboard.

    • Place the plastic opening tool underneath the motherboard at this location. Gently pry the motherboard away from the front cover. It should pop off and be free from the cover.

    • Attached to the motherboard is the infrared LED Light. To replace the IR LED, you may need to replace the entire motherboard.

  7. Samsung Gear 2 Neo Display Replacement, Display: 7 단계, 이미지 1/1
    • Use the spudger and apply pressure to the back of the AMOLED display.

    • Make sure to stay within the area marked to avoid damaging the device.

  8. Samsung Gear 2 Neo Display Replacement: 8 단계, 이미지 1/1
    • Once part of the display begins detaching from the front cover, place the spduger in between the display and the front cover.

  9. Samsung Gear 2 Neo Display Replacement: 9 단계, 이미지 1/1
    • Use the spudger to scrape off the adhesive located on the bottom side of the display, attaching the display to the front cover.

    • Be careful when doing this step as it could potentially break the display and/or the case if not followed properly.

  10. Samsung Gear 2 Neo Display Replacement: 10 단계, 이미지 1/1
    • After the adhesive has been removed, apply pressure with the spudger to the back of the AMOLED display; the display should pop right out.

결론

To reassemble your device, follow these instructions in reverse order.

다른 5명이 해당 안내서를 완성하였습니다.

Victor Yore

회원 가입일: 08/27/15

705 평판

안내서 5개 작성하였습니다

USF Tampa, Team 5-6, Blackwell Fall 2015 USF Tampa, Team 5-6, Blackwell Fall 2015 회원

USFT-BLACKWELL-F15S5G6

3 회원들

안내서 5개 작성하였습니다

댓글 0개

댓글 쓰기

조회 통계:

24 시간 전: 0

7일 전: 0

30일 전: 3

전체 시간: 6,085