주요 콘텐츠로 건너뛰기

Samsung Gear Live Motherboard Replacement

필요한 것

  1. Samsung Gear Live Motherboard Replacement, Lay the watch face-down: 1 단계, 이미지 1/1
    • Lay the watch face-down on a flat, stable surface.

  2. Samsung Gear Live Motherboard Replacement, Remove the holding pin: 2 단계, 이미지 1/1
    • Press the watchband down against the work surface.

    • Press the tip of a flathead screwdriver against the edge of the spring-loaded holding pin.

  3. Samsung Gear Live Motherboard Replacement, Remove the watchband: 3 단계, 이미지 1/1
    • With the spring-loaded pin pressed in, the watch band should release easily.

    • Gently pull the band away from the body of the watch.

    • Repeat steps 2 and 3 for the opposite side.

  4. Samsung Gear Live Motherboard Replacement, Locate the four screws: 4 단계, 이미지 1/1
    • With the watch laying face-down, locate the four screws. They are located on the back of the watch, at the four corners.

  5. Samsung Gear Live Motherboard Replacement, Remove the 4 screws: 5 단계, 이미지 1/1
    • Using a Torx-T5 screwdriver, remove each of the four 4mm screws and set them aside.

  6. Samsung Gear Live Motherboard Replacement, Pry off the back of the watch.: 6 단계, 이미지 1/1
    • Gently work the plastic opening tool under the top edge of the watch’s back cover.

  7. Samsung Gear Live Motherboard Replacement, Lift off the back cover: 7 단계, 이미지 1/2 Samsung Gear Live Motherboard Replacement, Lift off the back cover: 7 단계, 이미지 2/2
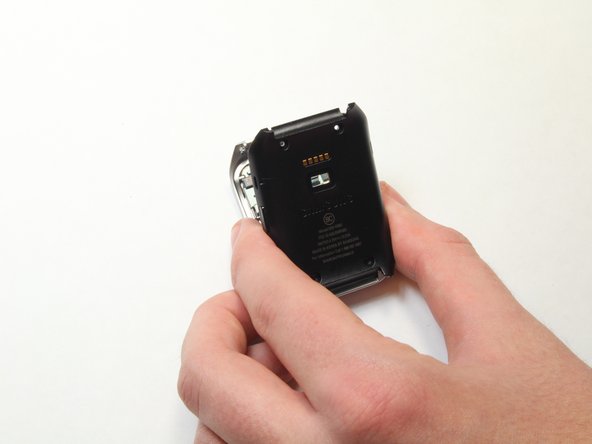
    • With the watch’s back cover pried loose, gently lift it away from the front half of the watch.

  8. Samsung Gear Live Motherboard Replacement, Set both halves of the watch aside: 8 단계, 이미지 1/1
    • Lay both halves of the watch body assembly face down (with internal components facing up).

  9. Samsung Gear Live Motherboard Replacement, Pry away the ribbon cable: 9 단계, 이미지 1/2 Samsung Gear Live Motherboard Replacement, Pry away the ribbon cable: 9 단계, 이미지 2/2
    • Locate the ribbon cable connector near the edge of the watch's case.

    • Using the plastic opening tool, gently pry the connector from the motherboard

  10. Samsung Gear Live Motherboard Replacement, Remove the red spacers: 10 단계, 이미지 1/2 Samsung Gear Live Motherboard Replacement, Remove the red spacers: 10 단계, 이미지 2/2
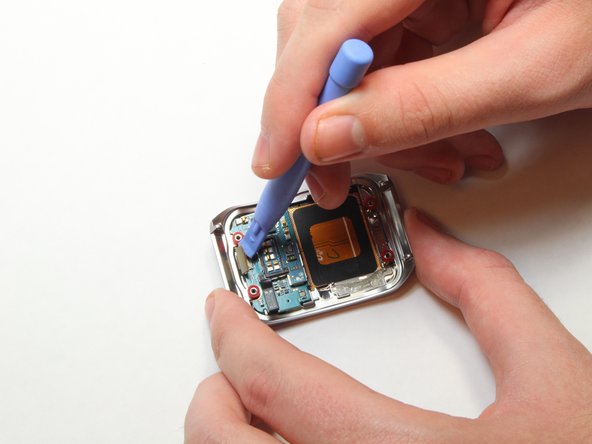
    • Using the plastic opening tool, gently pry away the red spacers.

    • Set the spacers aside.

  11. Samsung Gear Live Motherboard Replacement, Pry up the motherboard: 11 단계, 이미지 1/3 Samsung Gear Live Motherboard Replacement, Pry up the motherboard: 11 단계, 이미지 2/3 Samsung Gear Live Motherboard Replacement, Pry up the motherboard: 11 단계, 이미지 3/3
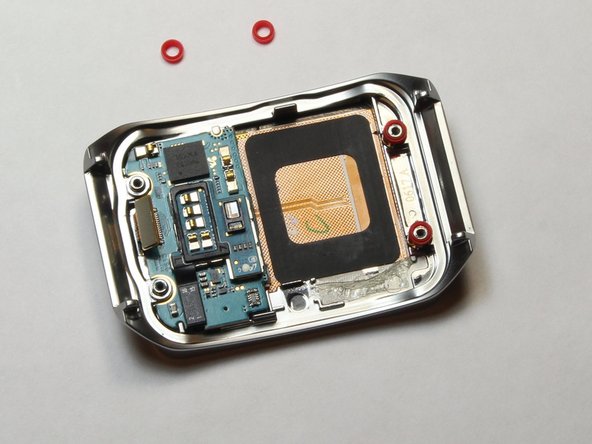
    • Insert the end of the plastic opening tool under the motherboard.

    • Gently pry up the motherboard.

결론

To reassemble your device, follow these instructions in reverse order.

다른 2명이 해당 안내서를 완성하였습니다.

Keith Cooper

회원 가입일: 09/25/14

1,241 평판

안내서 6개 작성하였습니다

USF Tampa, Team 1-7, Brown Fall 2014 USF Tampa, Team 1-7, Brown Fall 2014 회원

USFT-BROWN-F14S1G7

3 회원들

안내서 6개 작성하였습니다

댓글 0개

댓글 쓰기

조회 통계:

24 시간 전: 0

7일 전: 1

30일 전: 2

전체 시간: 838