주요 콘텐츠로 건너뛰기

Samsung Gear S Battery/ Motherboard Replacement

필요한 것

  1. Samsung Gear S Battery/ Motherboard Replacement, Display Assembly: 1 단계, 이미지 1/3 Samsung Gear S Battery/ Motherboard Replacement, Display Assembly: 1 단계, 이미지 2/3 Samsung Gear S Battery/ Motherboard Replacement, Display Assembly: 1 단계, 이미지 3/3
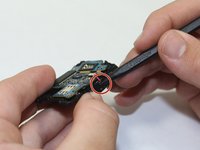
    • Remove the wrist strap by peeling back the rubber starting from one corner of the watch face. Continue peeling the rubber away from the watch face until the strap is completely off.

  2. Samsung Gear S Battery/ Motherboard Replacement: 2 단계, 이미지 1/2 Samsung Gear S Battery/ Motherboard Replacement: 2 단계, 이미지 2/2
    • Starting from an edge, wedge a metal spudger in between the screen and the chrome trim ring and pry, lifting the screen outwards.

    • Some force is needed due to adhesive seal.

  3. Samsung Gear S Battery/ Motherboard Replacement: 3 단계, 이미지 1/1
    • Use a plastic opening tool to gently pry upwards on the plastic motherboard assembly.

  4. Samsung Gear S Battery/ Motherboard Replacement: 4 단계, 이미지 1/1
    • Locate the ribbon assembly attaching the display to the motherboard.

  5. Samsung Gear S Battery/ Motherboard Replacement: 5 단계, 이미지 1/1
    • Use a plastic opening tool to detach the glass screen/ LED Display ribbon connector from the motherboard.

  6. Samsung Gear S Battery/ Motherboard Replacement: 6 단계, 이미지 1/1
    • Now the watch should be in three separate pieces.

  7. Samsung Gear S Battery/ Motherboard Replacement, Battery/ Motherboard: 7 단계, 이미지 1/1
    • Locate the tabs on the motherboard and unclasp them.

  8. Samsung Gear S Battery/ Motherboard Replacement: 8 단계, 이미지 1/2 Samsung Gear S Battery/ Motherboard Replacement: 8 단계, 이미지 2/2
    • Use the spugder to gently pry upwards on the motherboard.

    • If you keep the battery attached to the upper half of the motherboard, you will have to gently pry upwards on both the battery and the motherboard.

  9. Samsung Gear S Battery/ Motherboard Replacement: 9 단계, 이미지 1/1
    • Once the motherboard and the battery are removed, disconnect the battery at the connector.

  10. Samsung Gear S Battery/ Motherboard Replacement: 10 단계, 이미지 1/2 Samsung Gear S Battery/ Motherboard Replacement: 10 단계, 이미지 2/2
    • Use a spudger to gently pry upward on the clasp connecting the battery to the motherboard.

결론

To reassemble your device, follow these instructions in reverse order.

다른 36명이 해당 안내서를 완성하였습니다.

Luis Franco

회원 가입일: 09/03/15

1,076 평판

안내서 4개 작성하였습니다

USF Tampa, Team 12-1, Blackwell Fall 2015 USF Tampa, Team 12-1, Blackwell Fall 2015 회원

USFT-BLACKWELL-F15S12G1

4 회원들

안내서 5개 작성하였습니다

댓글 17개

Thanks for the comprehensive guide! Where can one purchase a Gear S compatible battery?

JG - 답글

Hi, did you found where to buy it?

Simone -

HI , How to by a battery?

Luigi -

I'm looking for a replacement battery.

jhdownes - 답글

댓글 쓰기

조회 통계:

24 시간 전: 2

7일 전: 10

30일 전: 40

전체 시간: 31,798