주요 콘텐츠로 건너뛰기

이 버전에는 잘못된 편집 사항이 있을 수 있습니다. 최신 확인된 스냅샷으로 전환하십시오.

필요한 것

  1. 이 단계는 번역되지 않았습니다. 번역을 도와주십시오

    : 1 단계, 이미지 1/1
    • Slide the battery cover downwards with pressure focused on the center of the cover.

    • Lift the cover off of the phone.

  2. 이 단계는 번역되지 않았습니다. 번역을 도와주십시오

    : 2 단계, 이미지 1/1
    • Grasp the bottom left and right corners of the battery and lift it from its housing.

  3. 이 단계는 번역되지 않았습니다. 번역을 도와주십시오

    : 3 단계, 이미지 1/1
    • Remove the four black 7.30 mm screws surrounding the battery housing using a Phillips #00 Screwdriver.

  4. 이 단계는 번역되지 않았습니다. 번역을 도와주십시오

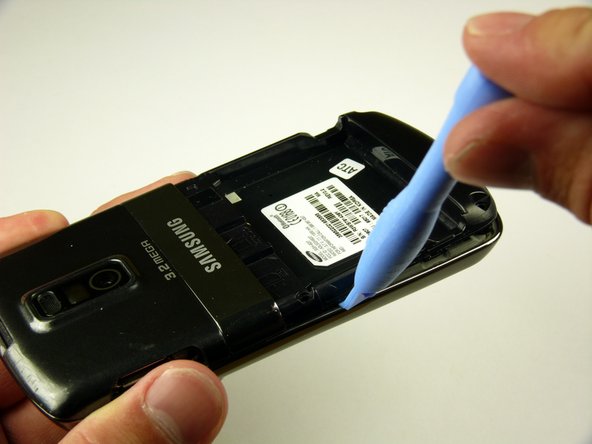
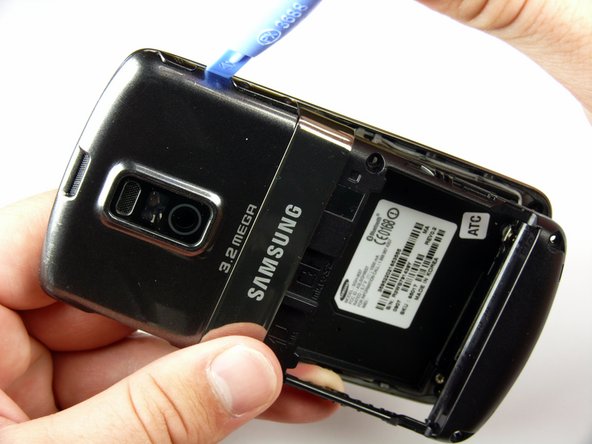
    : 4 단계, 이미지 1/3 : 4 단계, 이미지 2/3 : 4 단계, 이미지 3/3
    • The rear case is firmly attached to the phone with clips. Do not be afraid to use a little extra force.

    • Insert the Plastic Opening Tool in between the front and rear cases.

    • Pry with the Plastic Opening Tool around all edges of the phone until you free all the clips.

  5. 이 단계는 번역되지 않았습니다. 번역을 도와주십시오

    : 5 단계, 이미지 1/1
    • Lift the rear case off of the phone.

  6. 이 단계는 번역되지 않았습니다. 번역을 도와주십시오

    : 6 단계, 이미지 1/1
    • Remove the two silver 4.30 mm screws on either side of the antenna using a Phillip's #00 Screwdriver.

  7. 이 단계는 번역되지 않았습니다. 번역을 도와주십시오

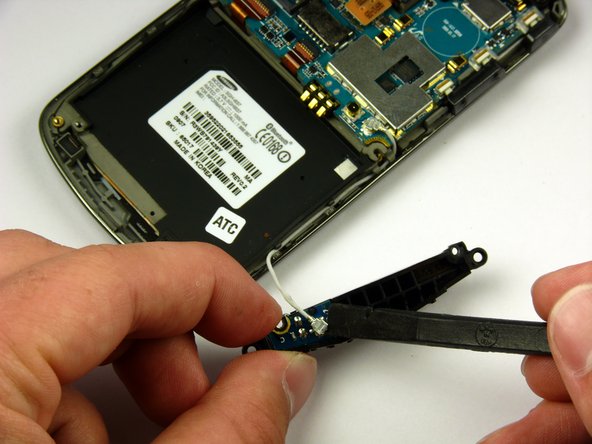
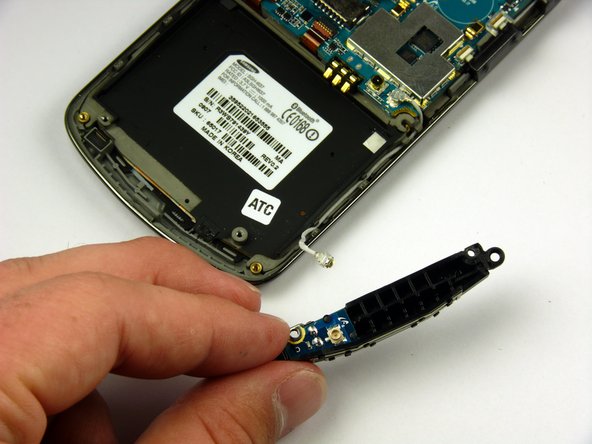
    : 7 단계, 이미지 1/3 : 7 단계, 이미지 2/3 : 7 단계, 이미지 3/3
    • There is a wire under the antenna connecting it to the Motherboard. Do not pull off the antenna just yet.

    • Use a spudger to remove the wire connector under the antenna.

결승점

Paul Piller

회원 가입일: 04/12/11

56 평판

안내서 5개 작성하였습니다

Cal Poly, Team 24-57, Amido Spring 2011 Cal Poly, Team 24-57, Amido Spring 2011 회원

CPSU-AMIDO-S11S24G57

4 회원들

안내서 7개 작성하였습니다

댓글 0개

댓글 쓰기

조회 통계:

24 시간 전: 0

7일 전: 9

30일 전: 12

전체 시간: 2,330