주요 콘텐츠로 건너뛰기

Samsung Juke SCH-u470 Keyboard Replacement

필요한 것

  1. Samsung Juke SCH-u470 Keyboard Replacement, Battery: 1 단계, 이미지 1/1
    • Press and hold down the button on the bottom side of the phone with your finger.

  2. Samsung Juke SCH-u470 Keyboard Replacement: 2 단계, 이미지 1/2 Samsung Juke SCH-u470 Keyboard Replacement: 2 단계, 이미지 2/2
    • While holding the button down, remove the back cover of the phone.

  3. Samsung Juke SCH-u470 Keyboard Replacement, Camera/Speaker: 3 단계, 이미지 1/1
    • Remove the four screws from the back of the phone using a Phillips #00 screwdriver.

  4. Samsung Juke SCH-u470 Keyboard Replacement: 4 단계, 이미지 1/1
    • Remove the two 7.3 mm screws from the camera and the speaker at the bottom back plate of the phone using a Phillips #00 screwdriver.

  5. Samsung Juke SCH-u470 Keyboard Replacement: 5 단계, 이미지 1/3 Samsung Juke SCH-u470 Keyboard Replacement: 5 단계, 이미지 2/3 Samsung Juke SCH-u470 Keyboard Replacement: 5 단계, 이미지 3/3
    • Locate the USB port (where the charger can be plugged in). Using the iFixit opening tool, open the phone cover.

    • Failure to open USB port cover at this stage may result in damaging the device.

  6. Samsung Juke SCH-u470 Keyboard Replacement: 6 단계, 이미지 1/1
    • Remove the 5.5 mm screws from both sides of the camera/speaker with a Phillips #00 screwdriver.

  7. Samsung Juke SCH-u470 Keyboard Replacement: 7 단계, 이미지 1/2 Samsung Juke SCH-u470 Keyboard Replacement: 7 단계, 이미지 2/2
    • Use the iFixit opening tool to remove the camera/speaker from the motherboard.

    • Practice caution to prevent damage to the attaching ribbon.

  8. Samsung Juke SCH-u470 Keyboard Replacement: 8 단계, 이미지 1/2 Samsung Juke SCH-u470 Keyboard Replacement: 8 단계, 이미지 2/2
    • Use the iFixit opening tool to gently pry the camera/speaker off.

  9. Samsung Juke SCH-u470 Keyboard Replacement, Motherboard: 9 단계, 이미지 1/2 Samsung Juke SCH-u470 Keyboard Replacement, Motherboard: 9 단계, 이미지 2/2
    • Use the iFixit opening tool to remove the yellow tab on the motherboard.

  10. Samsung Juke SCH-u470 Keyboard Replacement: 10 단계, 이미지 1/2 Samsung Juke SCH-u470 Keyboard Replacement: 10 단계, 이미지 2/2
    • Use the iFixit opening tool to remove the other orange tab to free the motherboard.

  11. Samsung Juke SCH-u470 Keyboard Replacement: 11 단계, 이미지 1/3 Samsung Juke SCH-u470 Keyboard Replacement: 11 단계, 이미지 2/3 Samsung Juke SCH-u470 Keyboard Replacement: 11 단계, 이미지 3/3
    • To completely remove the motherboard, use the iFixit opening tool to leverage it up, then use your fingers to pull it out.

    • Do not be alarmed if the volume and hold buttons are removed from the motherboard.

  12. Samsung Juke SCH-u470 Keyboard Replacement, Keyboard: 12 단계, 이미지 1/3 Samsung Juke SCH-u470 Keyboard Replacement, Keyboard: 12 단계, 이미지 2/3 Samsung Juke SCH-u470 Keyboard Replacement, Keyboard: 12 단계, 이미지 3/3
    • Open/swivel the phone so the back of the LCD panel is visible.

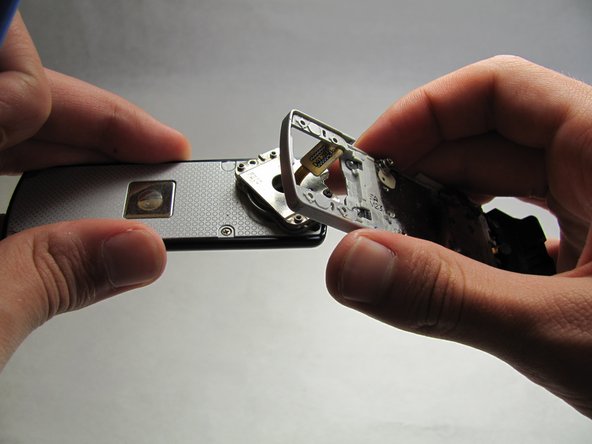
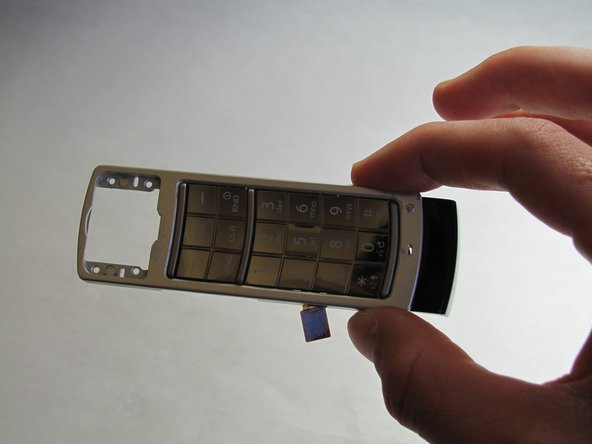
    • Use the iFixit opening tool to pry the keypad from the hinge on the back of the device.

    • A moderate amount of force may need to be applied.

결론

To reassemble your device, follow these instructions in reverse order.

다른 한 분이 해당 안내서를 완성하였습니다.

Renee Kuzniar

회원 가입일: 04/13/10

82 평판

안내서 4개 작성하였습니다

Cal Poly, Team 6-18, Maness Spring 2010 Cal Poly, Team 6-18, Maness Spring 2010 회원

CPSU-MANESS-S10S6G18

3 회원들

안내서 12개 작성하였습니다

댓글 0개

댓글 쓰기

조회 통계:

24 시간 전: 1

7일 전: 2

30일 전: 3

전체 시간: 1,902