주요 콘텐츠로 건너뛰기

Samsung NP-N210-JA02US Hard Drive Replacement

필요한 것

  1. Samsung NP-N210-JA02US Hard Drive Replacement, Battery: 1 단계, 이미지 1/2 Samsung NP-N210-JA02US Hard Drive Replacement, Battery: 1 단계, 이미지 2/2
    • Carefully slide both locking pins to the unlocked position.

  2. Samsung NP-N210-JA02US Hard Drive Replacement: 2 단계, 이미지 1/1
    • Slide the battery out of its housing.

  3. Samsung NP-N210-JA02US Hard Drive Replacement, Hard Drive Removal: 3 단계, 이미지 1/1
    • Remove the following 14 screws:

    • Thirteen 5 mm Phillips #1 screws

    • One 3.5 mm Philips #001 screw

  4. Samsung NP-N210-JA02US Hard Drive Replacement: 4 단계, 이미지 1/1
    • Carefully insert the plastic opening tool into the seam between the lower casing and the chrome bezel.

  5. Samsung NP-N210-JA02US Hard Drive Replacement: 5 단계, 이미지 1/1
    • Slide the opening tool across all sides of the lower case. Then, lift it up to remove the case and reveal the internal components.

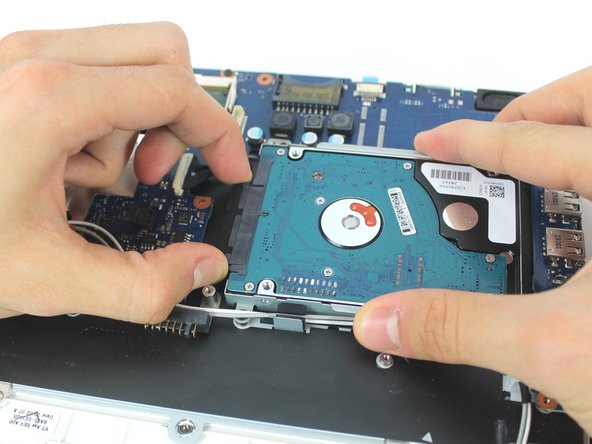
  6. Samsung NP-N210-JA02US Hard Drive Replacement: 6 단계, 이미지 1/3 Samsung NP-N210-JA02US Hard Drive Replacement: 6 단계, 이미지 2/3 Samsung NP-N210-JA02US Hard Drive Replacement: 6 단계, 이미지 3/3
    • Carefully unplug the SATA connector from the hard drive.

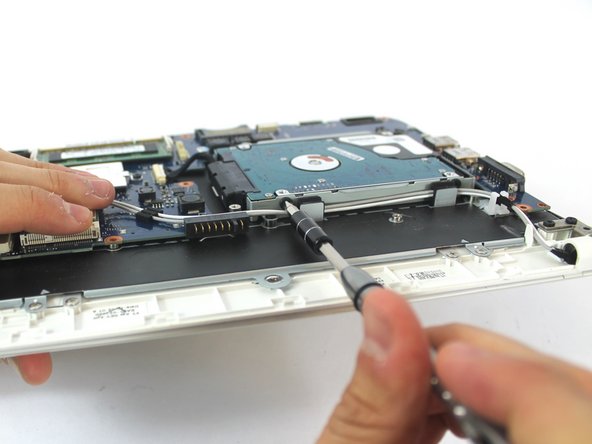
  7. Samsung NP-N210-JA02US Hard Drive Replacement: 7 단계, 이미지 1/2 Samsung NP-N210-JA02US Hard Drive Replacement: 7 단계, 이미지 2/2
    • Remove the four black 3.5 mm Philips #1 screws on the (side) of the hard drive.

  8. Samsung NP-N210-JA02US Hard Drive Replacement: 8 단계, 이미지 1/1
    • Gently lift the hard drive from its mounting bracket.

결론

To reassemble your device, follow these instructions in reverse order.

다른 9명이 해당 안내서를 완성하였습니다.

Afif Chehabaldeen

회원 가입일: 10/04/16

401 평판

안내서 4개 작성하였습니다

USF Tampa, Team 1-3, Nance Fall 2016 USF Tampa, Team 1-3, Nance Fall 2016 회원

USFT-NANCE-F16S1G3

3 회원들

안내서 4개 작성하였습니다

댓글 0개

댓글 쓰기

조회 통계:

24 시간 전: 1

7일 전: 9

30일 전: 28

전체 시간: 3,538