주요 콘텐츠로 건너뛰기

Samsung NP510R5E-A01UB Battery Replacement

필요한 것

  1. Samsung NP510R5E-A01UB Battery Replacement, Hard Drive: 1 단계, 이미지 1/1
    • Make sure the device is powered off before beginning.

    • Using the Phillips #0 screwdriver, remove the 6.5mm long screw in the area circled.

  2. Samsung NP510R5E-A01UB Battery Replacement: 2 단계, 이미지 1/1
    • With the cover removed, unscrew all four of the 4.75mm long screws using the Phillips #0 screwdriver.

  3. Samsung NP510R5E-A01UB Battery Replacement: 3 단계, 이미지 1/2 Samsung NP510R5E-A01UB Battery Replacement: 3 단계, 이미지 2/2
    • Unplug the connector from the hard drive by pulling straight out.

  4. Samsung NP510R5E-A01UB Battery Replacement, Battery: 4 단계, 이미지 1/3 Samsung NP510R5E-A01UB Battery Replacement, Battery: 4 단계, 이미지 2/3 Samsung NP510R5E-A01UB Battery Replacement, Battery: 4 단계, 이미지 3/3
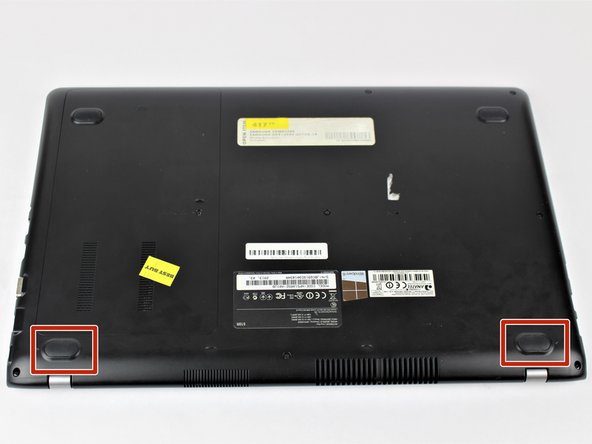
    • Remove the two rubber feet with arrows by them on the back side to uncover two screws.

    • Unscrew the four silver 4.4mm long screws near the hard drive.

    • Unscrew the remaining nine black 6.5mm long screws. Then remove the back casing using a pry tool if needed.

  5. Samsung NP510R5E-A01UB Battery Replacement: 5 단계, 이미지 1/3 Samsung NP510R5E-A01UB Battery Replacement: 5 단계, 이미지 2/3 Samsung NP510R5E-A01UB Battery Replacement: 5 단계, 이미지 3/3
    • Use the screwdriver to remove the four 3.5mm long screws holding the battery in place. Then carefully pull the battery's connector cable out to remove the battery.

결론

To reassemble your device, follow these instructions in reverse order.

다른 2명이 해당 안내서를 완성하였습니다.

Brian Briggs

회원 가입일: 02/14/18

529 평판

안내서 4개 작성하였습니다

USF Tampa, Team S6-G5, Eyestone Spring 2018 USF Tampa, Team S6-G5, Eyestone Spring 2018 회원

USFT-EYESTONE-S18S6G5

3 회원들

안내서 8개 작성하였습니다

댓글 0개

댓글 쓰기

조회 통계:

24 시간 전: 1

7일 전: 7

30일 전: 15

전체 시간: 2,404