주요 콘텐츠로 건너뛰기

Samsung NP900X4B Fan Replacement

필요한 것

  1. Samsung NP900X4B Fan Replacement, Back Panel: 1 단계, 이미지 1/2 Samsung NP900X4B Fan Replacement, Back Panel: 1 단계, 이미지 2/2
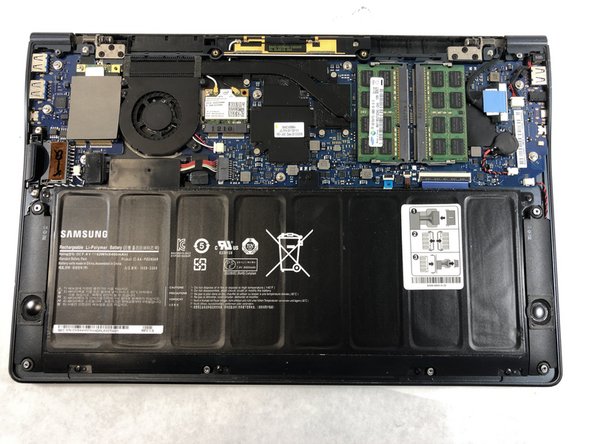
    • First turn the computer over so you are looking at the back panel.

    • Next locate all ten Phillips #0 3.5mm screws on the back panel that are securing it down.

  2. Samsung NP900X4B Fan Replacement: 2 단계, 이미지 1/1
    • Next remove all 3.5mm Phillips #0 screws shown in the previous step.

  3. Samsung NP900X4B Fan Replacement: 3 단계, 이미지 1/2 Samsung NP900X4B Fan Replacement: 3 단계, 이미지 2/2
    • After all screws are removed, lift up the back panel as shown.

  4. Samsung NP900X4B Fan Replacement, Fan: 4 단계, 이미지 1/2 Samsung NP900X4B Fan Replacement, Fan: 4 단계, 이미지 2/2
    • Next locate the two Phillips #0 2.5mm screws on both the top right and bottom left corner of the fan.

  5. Samsung NP900X4B Fan Replacement: 5 단계, 이미지 1/1
    • After locating the screws, using the Phillips #0 screwdriver, remove the screws from the fan.

  6. Samsung NP900X4B Fan Replacement: 6 단계, 이미지 1/2 Samsung NP900X4B Fan Replacement: 6 단계, 이미지 2/2
    • Use the plastic opening tool to remove the cable connector from its housing which is just to the right of the fan.

  7. Samsung NP900X4B Fan Replacement: 7 단계, 이미지 1/1
    • Once the cable has been removed from its housing you are free to remove the fan from the laptop.

    • You can either clean the fan with a computer duster or other cleaner, or replace it with a new one.

결론

To reassemble your device, follow these instructions in reverse order.

다른 한 분이 해당 안내서를 완성하였습니다.

Brian Miller

회원 가입일: 10/17/18

333 평판

안내서 2개 작성하였습니다

UMass Dartmouth, Team S4-G6, Valliere Fall 2018 UMass Dartmouth, Team S4-G6, Valliere Fall 2018 회원

UMASSD-VALLIERE-F18S4G6

5 회원들

안내서 6개 작성하였습니다

댓글 0개

댓글 쓰기

조회 통계:

24 시간 전: 0

7일 전: 1

30일 전: 6

전체 시간: 174