주요 콘텐츠로 건너뛰기

Samsung PL200 Motherboard Replacement

필요한 것

  1. Samsung PL200 Motherboard Replacement, Motherboard: 1 단계, 이미지 1/2 Samsung PL200 Motherboard Replacement, Motherboard: 1 단계, 이미지 2/2
    • Remove the two 3mm black external scews from he camera's side using the #000 Philips Screwdriver.

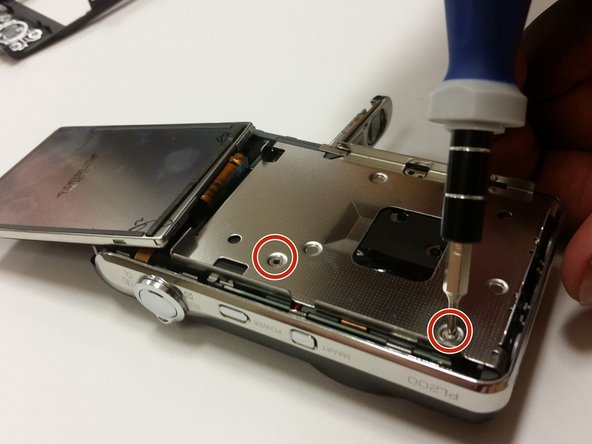
    • Remove the five 3mm silver external screws from the camera's side and bottom using the #000 Philips Screwdriver

  2. Samsung PL200 Motherboard Replacement: 2 단계, 이미지 1/3 Samsung PL200 Motherboard Replacement: 2 단계, 이미지 2/3 Samsung PL200 Motherboard Replacement: 2 단계, 이미지 3/3
    • Use the Plastic Opening Tool and your finger to pry off and remove the external cover.

  3. Samsung PL200 Motherboard Replacement: 3 단계, 이미지 1/3 Samsung PL200 Motherboard Replacement: 3 단계, 이미지 2/3 Samsung PL200 Motherboard Replacement: 3 단계, 이미지 3/3
    • Remove the 3mm screw holding the circuit board using the #000 Philips Screwdriver.

    • Remove any tape on the circuit board and screen.

    • Using Tweezers, unplug the wires from the circuit board and remove it.

  4. Samsung PL200 Motherboard Replacement: 4 단계, 이미지 1/2 Samsung PL200 Motherboard Replacement: 4 단계, 이미지 2/2
    • Flip the LCD screen forward and remove the two 3mm screws beneath it using the #000 Phillips Screwdriver.

    • Remove the metal brace using the Plastic Opening Tool.

  5. Samsung PL200 Motherboard Replacement: 5 단계, 이미지 1/2 Samsung PL200 Motherboard Replacement: 5 단계, 이미지 2/2
    • Lift the black latch where the screen plugs into the motherboard and pull the cord to remove the screen

    • Separate the screen and the metal brace from the camera body.

  6. Samsung PL200 Motherboard Replacement: 6 단계, 이미지 1/1
    • Remove the front cover of the camera using your fingers and the Plastic Opening Tool.

  7. Samsung PL200 Motherboard Replacement: 7 단계, 이미지 1/1
    • Set the screen and metal brace aside

    • Open the camera's battery cover.

  8. Samsung PL200 Motherboard Replacement: 8 단계, 이미지 1/1
    • Using the #000 Phillips Screwdriver, remove the two 3mm screws holding the motherboard in place.

    • There may be tape still on the motherboard, if so, remove it.

  9. Samsung PL200 Motherboard Replacement: 9 단계, 이미지 1/3 Samsung PL200 Motherboard Replacement: 9 단계, 이미지 2/3 Samsung PL200 Motherboard Replacement: 9 단계, 이미지 3/3
    • Use the Tweezers to remove the tape from bottom of the camera

    • Use the Tweezers to disconnect the lens unit cord that is at the bottom of the camera from the motherboard.

    • Remove the last 3mm screw that holds the motherboard in place.

  10. Samsung PL200 Motherboard Replacement: 10 단계, 이미지 1/3 Samsung PL200 Motherboard Replacement: 10 단계, 이미지 2/3 Samsung PL200 Motherboard Replacement: 10 단계, 이미지 3/3
    • Use the Tweezers to unplug the small lens unit cord from the camera frame on the back side of the camera.

    • Gently lift the lens unit from the frame.

    • Separate the lens unit, motherboard, and camera.

  11. Samsung PL200 Motherboard Replacement: 11 단계, 이미지 1/3 Samsung PL200 Motherboard Replacement: 11 단계, 이미지 2/3 Samsung PL200 Motherboard Replacement: 11 단계, 이미지 3/3
    • Use the Tweezers to remove the small cord from motherboard.

    • Use the Tweezers to remove the first large lens unit cord from the motherboard.

    • Use the Tweezers to remove the second large lens unit cord from the motherboard.

  12. Samsung PL200 Motherboard Replacement: 12 단계, 이미지 1/2 Samsung PL200 Motherboard Replacement: 12 단계, 이미지 2/2
    • Desolder the four wires from the old motherboard.

  13. Samsung PL200 Motherboard Replacement: 13 단계, 이미지 1/2 Samsung PL200 Motherboard Replacement: 13 단계, 이미지 2/2
    • Last, solder on a functional motherboard at this stage and reassemble the device.

결론

To reassemble your device, follow these instructions in reverse order.

Marcus Lee

회원 가입일: 01/29/15

101 평판

안내서 1개 작성함

Clemson, Team 15-7, Shirley Winter 2015 Clemson, Team 15-7, Shirley Winter 2015 회원

CLEM-SHIRLEY-W15S15G7

5 회원들

안내서 9개 작성하였습니다

댓글 0개

댓글 쓰기

조회 통계:

24 시간 전: 1

7일 전: 2

30일 전: 9

전체 시간: 472