주요 콘텐츠로 건너뛰기

Samsung S760 Camera Lens Replacement Guide

필요한 것

  1. Samsung S760 Camera Lens Replacement Guide, Battery: 1 단계, 이미지 1/3 Samsung S760 Camera Lens Replacement Guide, Battery: 1 단계, 이미지 2/3 Samsung S760 Camera Lens Replacement Guide, Battery: 1 단계, 이미지 3/3
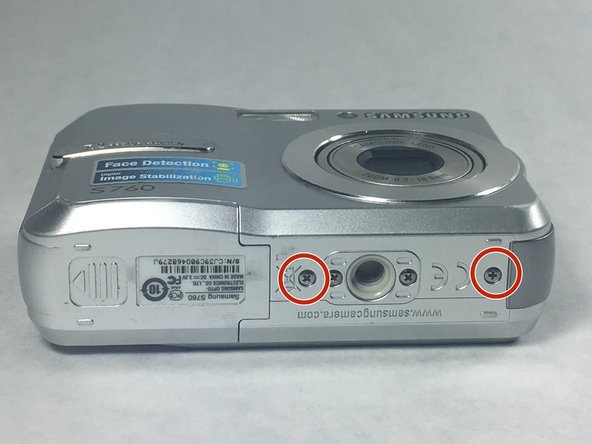
    • Placing your thumb on the battery cover, push outwards, away from the camera in the direction the arrow is pointing. If done correctly when it's completely unhooked, the latch will open.

  2. Samsung S760 Camera Lens Replacement Guide: 2 단계, 이미지 1/2 Samsung S760 Camera Lens Replacement Guide: 2 단계, 이미지 2/2
    • Tip the camera as to gently slide the batteries out of the camera.

  3. Samsung S760 Camera Lens Replacement Guide, Front and Back Case: 3 단계, 이미지 1/3 Samsung S760 Camera Lens Replacement Guide, Front and Back Case: 3 단계, 이미지 2/3 Samsung S760 Camera Lens Replacement Guide, Front and Back Case: 3 단계, 이미지 3/3
    • All screws in this camera are removed using the Phillip Screwdriver #000 bit. Also, all dimensions included refer to screw lengths.

    • Locate and remove the six 4mm screws on the sides of the camera.

  4. Samsung S760 Camera Lens Replacement Guide: 4 단계, 이미지 1/2 Samsung S760 Camera Lens Replacement Guide: 4 단계, 이미지 2/2
    • Use the plastic opening tool to pry open the back case, following alongside the edge of the case if need be.

  5. Samsung S760 Camera Lens Replacement Guide: 5 단계, 이미지 1/1
    • Once the back case is removed, use the plastic opening tool to gently pry off the front case.

  6. Samsung S760 Camera Lens Replacement Guide, Camera Lens: 6 단계, 이미지 1/1
    • Move the screen down, out of the way to remove the two 3mm screws beneath it.

  7. Samsung S760 Camera Lens Replacement Guide: 7 단계, 이미지 1/2 Samsung S760 Camera Lens Replacement Guide: 7 단계, 이미지 2/2
    • Remove the 6mm screw labeled in the picture.

    • Remove the three 3mm screws.

    • Then proceed to flip the screen to the other side to remove the other 6mm screw.

  8. Samsung S760 Camera Lens Replacement Guide: 8 단계, 이미지 1/1
    • Proceed to carefully pull the ribbon cable out by using the little circular tabs sticking out on either side.

  9. Samsung S760 Camera Lens Replacement Guide: 9 단계, 이미지 1/2 Samsung S760 Camera Lens Replacement Guide: 9 단계, 이미지 2/2
    • Proceed to slowly pry off the mother board with the plastic opening tool by removing it at the micro USB attachment.

    • Then carefully manually pry off the golden colored section near the camera wheel until all of it is off.

  10. Samsung S760 Camera Lens Replacement Guide: 10 단계, 이미지 1/2 Samsung S760 Camera Lens Replacement Guide: 10 단계, 이미지 2/2
    • Finally, remove the final 3mm screw marked in the picture.

    • Lift the camera lens out of the lens compartment.

결론

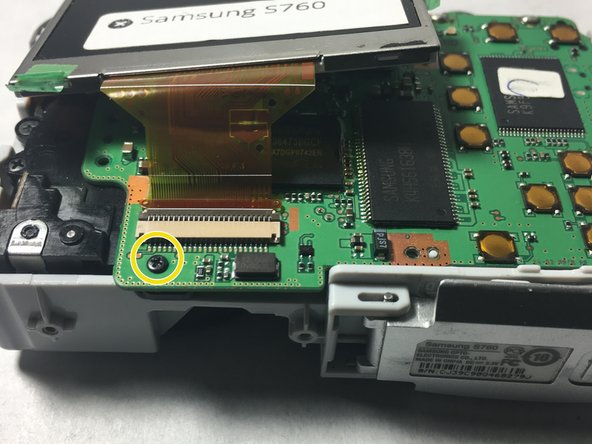
To reassemble your device, follow these instructions in reverse order.

다른 3명이 해당 안내서를 완성하였습니다.

David Sepulveda

회원 가입일: 03/06/17

446 평판

안내서 3개 작성하였습니다

UMass Dartmouth, Team S8-G1, Catania Spring 2017 UMass Dartmouth, Team S8-G1, Catania Spring 2017 회원

UMASSD-CATANIA-S17S8G1

3 회원들

안내서 11개 작성하였습니다

댓글 한 개

Brilliantly explained. Makes it look so easy… even a fool such as I could follow the instructions.

frankasensale - 답글

댓글 쓰기

조회 통계:

24 시간 전: 2

7일 전: 17

30일 전: 58

전체 시간: 1,211