이 버전에는 잘못된 편집 사항이 있을 수 있습니다. 최신 확인된 스냅샷으로 전환하십시오.
필요한 것
-
이 단계는 번역되지 않았습니다. 번역을 도와주십시오
-
Remove 4 screws from bottom of camera
-
Remove 2 screws from side of camera
-
Remove 2 screws from side of camera
-
-
이 단계는 번역되지 않았습니다. 번역을 도와주십시오
-
Squeeze area noted by blue square and pull outside shell apart from remaining camera.
-
-
이 단계는 번역되지 않았습니다. 번역을 도와주십시오
-
Remove 6 screws identified by red circles
-
Remove 3 screws identified by orange circles
-
-
-
이 단계는 번역되지 않았습니다. 번역을 도와주십시오
-
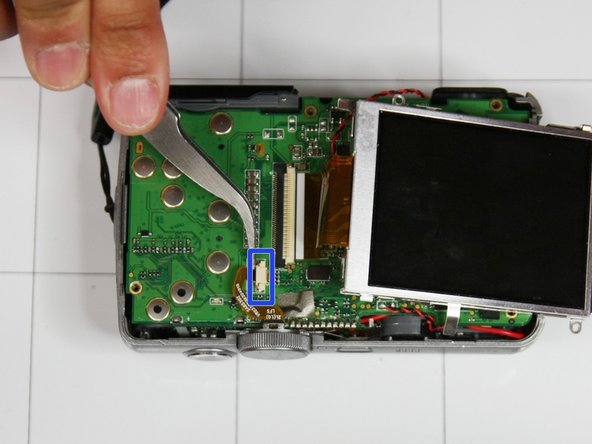
Gently remove orange circuit ribbon identified by red square
-
Gently remove narrow orange circuit ribbon identified by blue square
-
-
이 단계는 번역되지 않았습니다. 번역을 도와주십시오
-
Using a soldering iron, remove solder from wire identified by red circle
-
Using a soldering iron, remove solder from black and red wire identified by orange circle
-
Using a soldering iron, remove solder from wire identified by yellow circle
-
-
이 단계는 번역되지 않았습니다. 번역을 도와주십시오
-
Using soldering iron, melt away solder and warm up metal located at top of circuit board as shown in picture
-
Repeat step two to three times until board feels flexible to bend
-
Slowly bend circuit board upwards (towards power button) until at 90 degree angle with remaining part of camera.
-
-
이 단계는 번역되지 않았습니다. 번역을 도와주십시오
-
Remove black rubber door located on side of camera closest to lens using tweezers.
-


다른 한 분이 해당 안내서를 완성하였습니다.
팀

University of Illinois Urbana-Champaign, Team 1-4, Scrogum Spring 2014 University of Illinois Urbana-Champaign, Team 1-4, Scrogum Spring 2014 회원
UICU-SCROGUM-S14S1G4
4 회원들
안내서 10개 작성하였습니다