주요 콘텐츠로 건너뛰기

Samsung Series 5 3G Chromebook 16 GB SanDisk Replacement

필요한 것

  1. Samsung Series 5 3G Chromebook 16 GB SanDisk Replacement, Back Cover: 1 단계, 이미지 1/2 Samsung Series 5 3G Chromebook 16 GB SanDisk Replacement, Back Cover: 1 단계, 이미지 2/2
    • Place the laptop on a flat surface with the bottom side facing up.

    • Remove the rubber feet from the bottom of the panel using your fingernails.

    • Remove all the seven screws from the bottom panel.

  2. Samsung Series 5 3G Chromebook 16 GB SanDisk Replacement: 2 단계, 이미지 1/2 Samsung Series 5 3G Chromebook 16 GB SanDisk Replacement: 2 단계, 이미지 2/2
    • Loosen the back cover panel using a spudger.

  3. Samsung Series 5 3G Chromebook 16 GB SanDisk Replacement: 3 단계, 이미지 1/2 Samsung Series 5 3G Chromebook 16 GB SanDisk Replacement: 3 단계, 이미지 2/2
    • Once you work your way around, you can remove the panel.

  4. Samsung Series 5 3G Chromebook 16 GB SanDisk Replacement, 16 GB SanDisk: 4 단계, 이미지 1/3 Samsung Series 5 3G Chromebook 16 GB SanDisk Replacement, 16 GB SanDisk: 4 단계, 이미지 2/3 Samsung Series 5 3G Chromebook 16 GB SanDisk Replacement, 16 GB SanDisk: 4 단계, 이미지 3/3
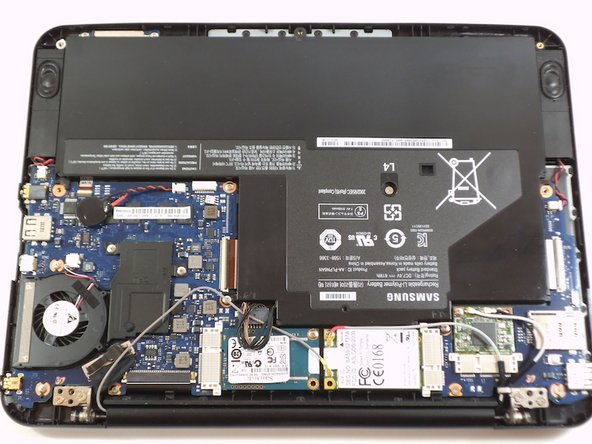
    • Remove the single screw.

    • use the plastic tool to disconnect the WWAN antennas from the board.

    • After removing its mounting screw, the 16 GB SanDisk can be removed from the motherboard.

결론

To reassemble your device, follow these instructions in reverse order.

다른 2명이 해당 안내서를 완성하였습니다.

Helder Avelino

회원 가입일: 10/22/13

938 평판

안내서 5개 작성하였습니다

University of Maryland, Team 1-7, Shastany Fall 2013 University of Maryland, Team 1-7, Shastany Fall 2013 회원

UMD-SHASTANY-F13S1G7

2 회원들

안내서 9개 작성하였습니다

댓글 0개

댓글 쓰기

조회 통계:

24 시간 전: 0

7일 전: 1

30일 전: 1

전체 시간: 1,143