주요 콘텐츠로 건너뛰기

Samsung Stratosphere Display Replacement

필요한 것

  1. Samsung Stratosphere Display Replacement, Battery: 1 단계, 이미지 1/1
    • Using your fingers, pry along the groove at the top of the phone.

    • Pull back on the rear casing until it comes free from the device.

    • The casing will make a cracking sound as it is removed.

  2. Samsung Stratosphere Display Replacement: 2 단계, 이미지 1/1
    • With your fingers, pry from the bottom of the battery to loosen it.

    • Lift away to remove the battery from the phone.

  3. Samsung Stratosphere Display Replacement, Motherboard: 3 단계, 이미지 1/1
    • Locate the red and white sim card located above the battery housing.

    • Remove the sim card by sliding it downwards from its slot with your fingers.

  4. Samsung Stratosphere Display Replacement: 4 단계, 이미지 1/1
    • Remove the seven silver 3mm screws securing the rear panel using the Phillips #000 screwdriver.

    • Once loosened, some screws may get stuck in the casing. Use tweezers to remove them.

  5. Samsung Stratosphere Display Replacement: 5 단계, 이미지 1/1
    • Pry around the rear panel with a plastic opening tool to loosen it.

    • Prying too deeply may damage delicate components inside the phone.

    • Remove the rear panel from the phone with your fingers.

  6. Samsung Stratosphere Display Replacement: 6 단계, 이미지 1/1
    • Remove the four black 3mm screws securing the motherboard with the Phillips #000 screwdriver.

  7. Samsung Stratosphere Display Replacement: 7 단계, 이미지 1/2 Samsung Stratosphere Display Replacement: 7 단계, 이미지 2/2
    • Locate the flex cable attachment at the tab with a green arrow printed on top.

    • Pry from the side the arrow is pointing with your fingers.

    • The cable will audibly snap as it is removed from its attachment.

    • Let the cable hang loosely to the side of the phone.

  8. Samsung Stratosphere Display Replacement: 8 단계, 이미지 1/1
    • Pull the motherboard up from the side opposite the loose flex cable.

    • If necessary, use a plastic opening tool to separate the motherboard from the key pad underneath.

    • Lift to remove the motherboard from the device.

  9. Samsung Stratosphere Display Replacement, Front Camera: 9 단계, 이미지 1/1
    • Insert a plastic opening tool into any side of the phone case to separate the keyboard from the rear panel.

    • Pry the keyboard away from the casing with the plastic opening tool.

    • The keyboard should come off with almost no force at all.

  10. Samsung Stratosphere Display Replacement: 10 단계, 이미지 1/1
    • Remove the 7 silver 2mm screws attaching the silver metal plate to the rear panel with the Phillips #000 Screwdriver.

  11. Samsung Stratosphere Display Replacement: 11 단계, 이미지 1/1
    • Use the plastic opening tool to carefully loosen the golden metal plate.

    • The golden metal plate is stuck to the rear panel with a strong adhesive, so a moderate amount of force may be needed.

  12. Samsung Stratosphere Display Replacement: 12 단계, 이미지 1/1
    • Lift the gold plate with your fingers, repositioning it to slide through the keyboard casing underneath.

    • Carefully take off the keyboard casing with your fingers.

    • The golden metal plate should fit through the wide slot of the casing.

  13. Samsung Stratosphere Display Replacement: 13 단계, 이미지 1/1
    • Slide the silver metal plate down and away from the to the flex cable and gold metal plate.

    • The metal plate is attached to springs that offer a small amount of resistance, so it will snap into place.

  14. Samsung Stratosphere Display Replacement: 14 단계, 이미지 1/1
    • Unscrew the 4 black 3mm screws from the rear panel with the Phillips #000 Screwdriver.

  15. Samsung Stratosphere Display Replacement: 15 단계, 이미지 1/2 Samsung Stratosphere Display Replacement: 15 단계, 이미지 2/2
    • Insert the plastic opening tool into the groove at the top of the rear panel.

    • Firmly slide the plastic opening tool all around the rear panel. The panel will audibly snap as it comes apart.

    • These 2 pieces are attached well, so a significant amount of force is needed to separate them.

  16. Samsung Stratosphere Display Replacement: 16 단계, 이미지 1/1
    • Lift the flex cable and position it so the part containing the metal plate can come free.

    • Pull the part containing the metal plate away from the rest of the rear panel.

  17. Samsung Stratosphere Display Replacement: 17 단계, 이미지 1/2 Samsung Stratosphere Display Replacement: 17 단계, 이미지 2/2
    • Use tweezers to loosen the front-facing camera from the plastic casing.

    • Pull the black rectangular piece, attached to the front facing camera, away from the rear panel.

  18. Samsung Stratosphere Display Replacement, Flex Cable: 18 단계, 이미지 1/1
    • Carefully peel the blue tape from the bottom of the flex cable and set it aside.

  19. Samsung Stratosphere Display Replacement: 19 단계, 이미지 1/2 Samsung Stratosphere Display Replacement: 19 단계, 이미지 2/2
    • Use one of the plastic opening tools to loosen the flex cable from its central housing.

    • Pull lightly on the flex cable to free it from the housing.

    • The cable may audibly snap as it is freed from its attachment.

    Picture shows a small black snap cover. This comes straight up. I then tried to pry up the cable. That doesn't happen. It slides out to the left in the picture.

    huckleberry41 - 답글

  20. Samsung Stratosphere Display Replacement: 20 단계, 이미지 1/1
    • Use tweezers to loosen the flex cable and speaker from the bottom of the phone.

    • Pull upward with the tweezers and the flex cable will come loose.

    • The flex cable will come free with the front-facing camera attached. In order to remove the front-facing camera, see our guide here.

  21. Samsung Stratosphere Display Replacement, Display: 21 단계, 이미지 1/2 Samsung Stratosphere Display Replacement, Display: 21 단계, 이미지 2/2
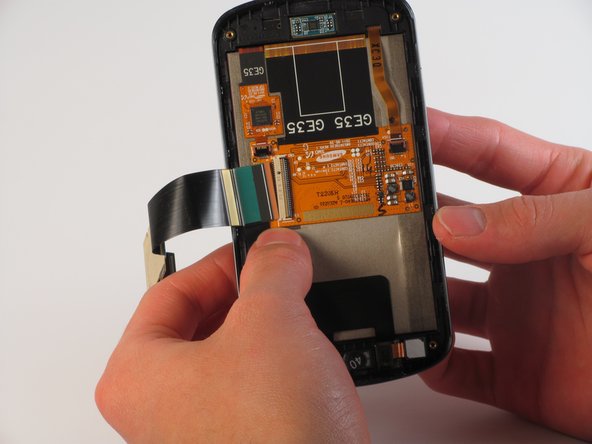
    • Locate the clamp holding the gold display cable to the back of the screen.

    • Using the plastic opener tool, lightly pry the cable attachment into an upright position.

    • The clamp attachment will snap as it is pried upright.

    • Once completed, the attachment should resemble the marked section.

    I got to this stage. Disconnected just fine. Then saw step 23 and realized this was too far. I should have stopped before Step 21. I bought a used phone with a good display, so I'm happy with the frame it is in. On my current phone, the display has gone bad - weird colors, then nothing. I'm happy just replacing the screen with case. I don't need to snap it out of the casing as in Step 23. However, now that I've unplugged this gold display cable, it's a booger bear to plug back in, but I'll get it.

    huckleberry41 - 답글

    I bought the used phone for $10. I was hoping I could just put my SIM card in and go. There were no guarantees, nor would I expect one for $10. Battery was not good. When I put in a known good battery, the phone worked but battery would not charge on this phone. But the display is great. So I chose to switch out the display.

    huckleberry41 - 답글

    I could have stopped at Step 16 for my purposes. I did when dis-mantling my defunct screen phone.

    huckleberry41 - 답글

  22. Samsung Stratosphere Display Replacement: 22 단계, 이미지 1/1
    • Using the tweezers, carefully pull the gold display cable to remove it from its attachment.

    • Be careful not to bend the display cable as this is a very sensitive part of the phone.

  23. Samsung Stratosphere Display Replacement: 23 단계, 이미지 1/2 Samsung Stratosphere Display Replacement: 23 단계, 이미지 2/2
    • Pry around the screen with a plastic opening tool to loosen it from the frame.

    • Repeat this process as necessary; a lot of adhesive holds the screen to the frame.

    • Gently push forward from the back of the display to remove the screen from the frame.

결론

To reassemble your device, follow these instructions in reverse order.

다른 13명이 해당 안내서를 완성하였습니다.

William Lai

회원 가입일: 10/27/13

217 평판

안내서 1개 작성함

Cal Poly, Team 11-32, Amido Fall 2013 Cal Poly, Team 11-32, Amido Fall 2013 회원

CPSU-AMIDO-F13S11G32

4 회원들

안내서 6개 작성하였습니다

댓글 한 개

Overall this was a great presentation. Very thorough and detailed, yet simple, with great pictures. Thank you.

huckleberry41 - 답글

댓글 쓰기

조회 통계:

24 시간 전: 0

7일 전: 1

30일 전: 5

전체 시간: 4,425