주요 콘텐츠로 건너뛰기

Samsung WB350F Screen Replacement

필요한 것

  1. Samsung WB350F Screen Replacement, Rear Case: 1 단계, 이미지 1/3 Samsung WB350F Screen Replacement, Rear Case: 1 단계, 이미지 2/3 Samsung WB350F Screen Replacement, Rear Case: 1 단계, 이미지 3/3
    • Remove the wristlet strap.

    • If you have difficulties use your plastic spudger. If you don't have a plastic spudger, you can also use a pen/pencil.

  2. Samsung WB350F Screen Replacement: 2 단계, 이미지 1/3 Samsung WB350F Screen Replacement: 2 단계, 이미지 2/3 Samsung WB350F Screen Replacement: 2 단계, 이미지 3/3
    • Remove five 3.2 mm screws with a Phillips #000 Screwdriver.

    • There is one silver screw on the bottom and two black screws on each side.

    • Keep the screws together for an easier re-assembly later.

  3. Samsung WB350F Screen Replacement: 3 단계, 이미지 1/3 Samsung WB350F Screen Replacement: 3 단계, 이미지 2/3 Samsung WB350F Screen Replacement: 3 단계, 이미지 3/3
    • Open the case of the camera using your plastic opening tool.

    • Start on each end, working the tool into the opening and popping the casing up. Then work your way down the longer sides (top and bottom).

    • If you don’t have plastic opening tools, any flat plastic object, like a used gift card, can be used as an improvised alternative.

  4. Samsung WB350F Screen Replacement: 4 단계, 이미지 1/1
    • Remove the plastic casing, exposing the inner workings of the camera.

  5. Samsung WB350F Screen Replacement, Screen: 5 단계, 이미지 1/2 Samsung WB350F Screen Replacement, Screen: 5 단계, 이미지 2/2
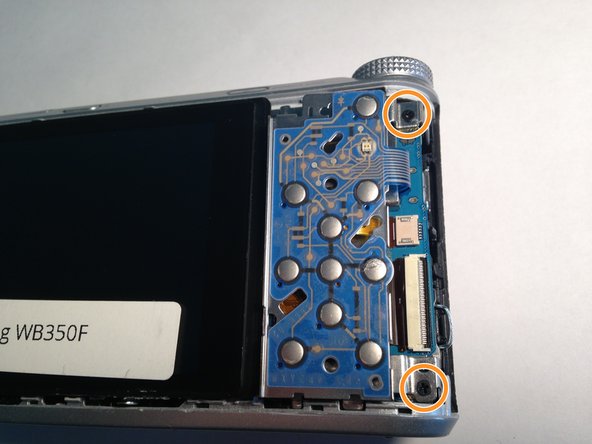
    • Using your Phillips #000 Screwdriver, remove one 3.2 mm screw above the menu buttons panel.

    • Next, remove the two 3.2 mm Phillips #000 screws to the left of the menu buttons panel.

  6. Samsung WB350F Screen Replacement: 6 단계, 이미지 1/1
    • Move the menu button panel to the right as well as the screen.

    • Be careful because each are connected to the camera by a ribbon.

  7. Samsung WB350F Screen Replacement: 7 단계, 이미지 1/1
    • Remove two more 3.2 mm screws on the silver panel using your Phillips #000 Screwdriver.

  8. Samsung WB350F Screen Replacement: 8 단계, 이미지 1/2 Samsung WB350F Screen Replacement: 8 단계, 이미지 2/2
    • Remove the silver panel.

  9. Samsung WB350F Screen Replacement: 9 단계, 이미지 1/2 Samsung WB350F Screen Replacement: 9 단계, 이미지 2/2
    • Flip the screen back over.

    • Using the plastic open tool, flip open the black retaining plastic piece holding the larger ribbon in place.

  10. Samsung WB350F Screen Replacement: 10 단계, 이미지 1/2 Samsung WB350F Screen Replacement: 10 단계, 이미지 2/2
    • Carefully detach both ribbons by gently pulling one at a time.

    • The thinner ribbon isn't secured with a connector and you are able to pull it straight out.

    • Be sure to pull gently as you do not want to break either ribbon.

결론

To reassemble your device, follow these instructions in reverse order.

다른 3명이 해당 안내서를 완성하였습니다.

Casey Bernier

회원 가입일: 03/04/16

131 평판

안내서 1개 작성함

UMass Dartmouth, Team 6-2, Bhusal Spring 2016 UMass Dartmouth, Team 6-2, Bhusal Spring 2016 회원

UMASSD-BHUSAL-S16S6G2

4 회원들

안내서 8개 작성하였습니다

댓글 한 개

Broke my screen, bought a new one on the internet (ebay) and used this tutorial for replacement.

Good photos and every step is clear to follow

Gerald Heidrich - 답글

댓글 쓰기

조회 통계:

24 시간 전: 0

7일 전: 1

30일 전: 10

전체 시간: 1,383