주요 콘텐츠로 건너뛰기

Sandisk Sansa m230 Series mp3 player Battery Spring Contacts Replacement

필요한 것

  1. Sandisk Sansa m230 Series mp3 player Battery Spring Contacts Replacement, Sandisk Sansa m230 Series mp3 player Teardown: 1 단계, 이미지 1/1
    • Remove the battery compartment cover.

    • Remove the battery.

  2. Sandisk Sansa m230 Series mp3 player Battery Spring Contacts Replacement: 2 단계, 이미지 1/1
    • Locate and remove the screw next to the battery compartment lid.

  3. Sandisk Sansa m230 Series mp3 player Battery Spring Contacts Replacement: 3 단계, 이미지 1/1
    • Locate the interlocking pegs along the seam of the device's casings.

    • Gently pry the pegs apart one at a time, working your way around the case.

    • Be careful when prying apart the pegs: they are made of plastic and may break.

  4. Sandisk Sansa m230 Series mp3 player Battery Spring Contacts Replacement: 4 단계, 이미지 1/1
    • The battery contact springs may prevent the case from separating.

    • Push the battery contact springs down through the hole in the case.

  5. Sandisk Sansa m230 Series mp3 player Battery Spring Contacts Replacement: 5 단계, 이미지 1/1
    • The casing protecting the USB and headphone jacks must be removed.

    • Locate and gently pry apart the two interlocking clips holding it in place.

    • The outer casings may now be removed and the MP3 player should separate.

  6. Sandisk Sansa m230 Series mp3 player Battery Spring Contacts Replacement: 6 단계, 이미지 1/1
    • You now have access to all components found on the inside of the device!

  7. Sandisk Sansa m230 Series mp3 player Battery Spring Contacts Replacement, Battery Spring Contacts: 7 단계, 이미지 1/2 Sandisk Sansa m230 Series mp3 player Battery Spring Contacts Replacement, Battery Spring Contacts: 7 단계, 이미지 2/2
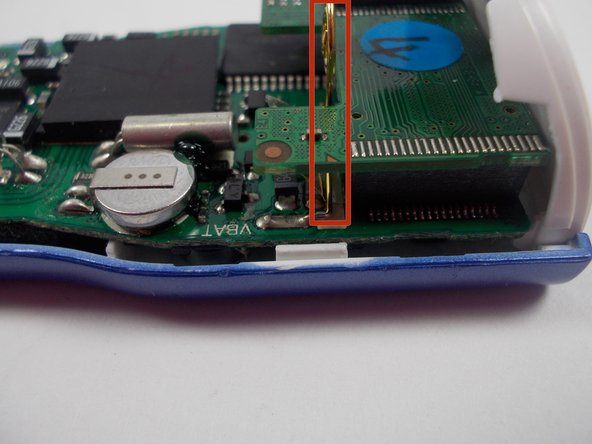
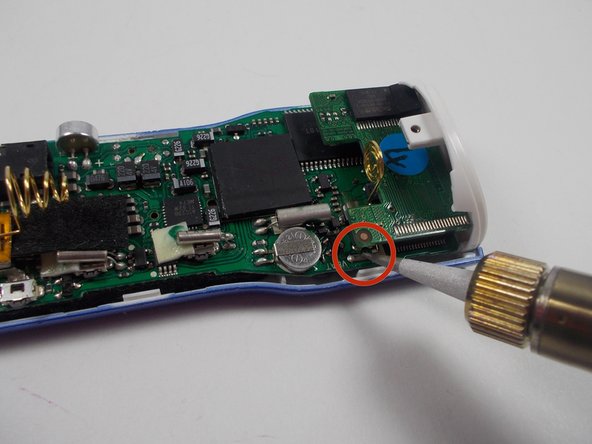
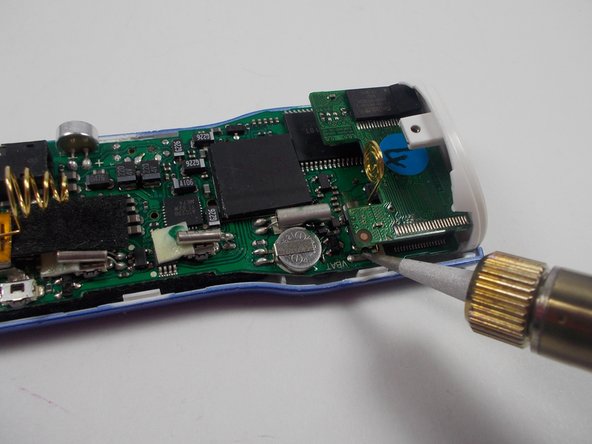
    • Locate both battery spring contacts, if necessary, on the motherboard.

  8. Sandisk Sansa m230 Series mp3 player Battery Spring Contacts Replacement: 8 단계, 이미지 1/2 Sandisk Sansa m230 Series mp3 player Battery Spring Contacts Replacement: 8 단계, 이미지 2/2
    • Apply heated soldering iron to points where the contacts are soldered to the motherboard.

  9. Sandisk Sansa m230 Series mp3 player Battery Spring Contacts Replacement: 9 단계, 이미지 1/1
    • Soldering irons, when heated, are very hot and can potentially burn the user.

    • Be sure to always elevate the hot end of the soldering iron on a metal stand to prevent incidental burns.

  10. Sandisk Sansa m230 Series mp3 player Battery Spring Contacts Replacement: 10 단계, 이미지 1/1
    • With solder melted, remove battery spring contacts from the motherboard.

  11. Sandisk Sansa m230 Series mp3 player Battery Spring Contacts Replacement: 11 단계, 이미지 1/1
    • Replace spring contacts with new ones.

  12. Sandisk Sansa m230 Series mp3 player Battery Spring Contacts Replacement: 12 단계, 이미지 1/1
    • There may be some solder in the way of the spring contacts' metal contacts. If this occurs simply melt the solder to create room for the contacts.

  13. Sandisk Sansa m230 Series mp3 player Battery Spring Contacts Replacement: 13 단계, 이미지 1/2 Sandisk Sansa m230 Series mp3 player Battery Spring Contacts Replacement: 13 단계, 이미지 2/2
    • With the new battery spring contacts in place, use the soldering iron to apply new solder to the connection points.

    • Be sure to allow the new solder to cool and harden.

결론

To reassemble your device, follow these instructions in reverse order.

James Thorne

회원 가입일: 11/05/13

638 평판

안내서 6개 작성하였습니다

UMass Dartmouth, Team 1-8, Shastany Fall 2013 UMass Dartmouth, Team 1-8, Shastany Fall 2013 회원

UMASSD-SHASTANY-F13S1G8

3 회원들

안내서 6개 작성하였습니다

댓글 0개

댓글 쓰기

조회 통계:

24 시간 전: 0

7일 전: 0

30일 전: 1

전체 시간: 699