주요 콘텐츠로 건너뛰기

Sewing a Leather Patch

필요한 것

  1. Sewing a Leather Patch, Sewing a Leather Patch: 1 단계, 이미지 1/1
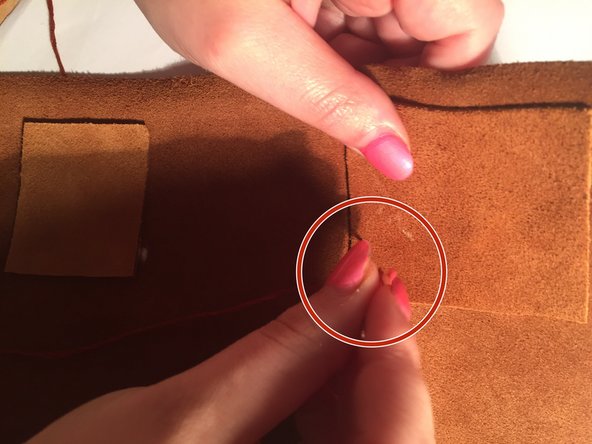
    • Turn the leather to the part that is not visible when using or wearing.

    • Make sure that the tear is in visible sight for the repair.

  2. Sewing a Leather Patch: 2 단계, 이미지 1/3 Sewing a Leather Patch: 2 단계, 이미지 2/3 Sewing a Leather Patch: 2 단계, 이미지 3/3
    • Use "Duck" invisible scotch tape to tape over the tear. This tape will hold the tear closed.

    • The piece of tape should be slightly bigger than the tear.

    • Make sure that the tape is not too sticky so that it does not damage the leather.

    • Pressing your finger on the sticky part of the tape will help make the tape less sticky.

  3. Sewing a Leather Patch: 3 단계, 이미지 1/2 Sewing a Leather Patch: 3 단계, 이미지 2/2
    • Cut a piece of leather for the patch that is slightly larger than the tear. The tear in this procedure was 1" long so the piece of leather that was cut was 1 and a 1/2" on each side.

    • Michael's craft store has a wide variety of genuine leather samples that you can choose from.

  4. Sewing a Leather Patch: 4 단계, 이미지 1/3 Sewing a Leather Patch: 4 단계, 이미지 2/3 Sewing a Leather Patch: 4 단계, 이미지 3/3
    • Put a thin layer of fabric glue and the patch and lightly touch it on the tear.

    • Put the fabric glue in every section of the leather square so that it is secure over the tear.

    • In this procedure, Aleene’s “No Sew” fabric glue was used and it worked really well.

    • Even though it is only supposed to be a light touch, the patch has to be secure.

  5. Sewing a Leather Patch: 5 단계, 이미지 1/1
    • Turn the leather jacket back to its original side and put a little dab of it in between the hole. Also, squeeze the tear together gently to make sure that the glue is holding it closed. After this, wait for two hours for glue to completely dry.

    • Use a toothpick for an easier way to keep the glue only in the tear. The glue could make a mess on the leather if the toothpick is not used.

    • Make sure you wait the complete 2 hours of drying time for the best results

  6. Sewing a Leather Patch: 6 단계, 이미지 1/1
    • After the glue has dried, remove the tape over the tear completely and be careful.

    • Some of the fibers in the leather may come off on the piece of tape when it is removed. This is okay, but try to make it a very minimal amount.

  7. Sewing a Leather Patch: 7 단계, 이미지 1/2 Sewing a Leather Patch: 7 단계, 이미지 2/2
    • Turn the leather jacket inside out again and sew the patch of leather you put over the tear to the inside of the jacket. After this is done, the repair is complete.

    • If you have leftover glue around the tear, then this would be the time that leather cleaner would be used. Making your own leather cleaner can be done using warm water and "Dawn" original dish soap.

    • Make sure you use a sturdy needle because leather is a very thick fabric. "Singer" makes needles that will fit this criteria. Also, make sure that the hole on top of the needle is big enough for the thread.

결론

Leather is a difficult fabric to deal with and a tear can cost you an expensive repair. This repair is a fairly easy way to fix a repair that will save you time and money as well as add years to your leather item.

다른 2명이 해당 안내서를 완성하였습니다.

Nichole Navaretta

회원 가입일: 01/24/17

241 평판

안내서 1개 작성함

USF Sarasota-Manatee, Team 1-1, Stewart Spring 2017 USF Sarasota-Manatee, Team 1-1, Stewart Spring 2017 회원

USFSM-STEWART-S17S1G1

19 회원들

안내서 19개 작성하였습니다

댓글 한 개

The leather stitching is an art of perfection that is quite simply explained in this article. I also mastered that skill , so can surely guide anyone better with practice.

jesscia carvin - 답글

댓글 쓰기

조회 통계:

24 시간 전: 1

7일 전: 5

30일 전: 28

전체 시간: 4,063