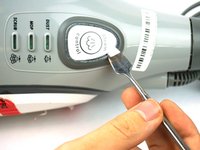
주요 콘텐츠로 건너뛰기

필요한 것

해당 분해도는 수리 안내서가 아닙니다. Shark Professional Steam Pocket Mop 수리는 자사의 서비스 설명서를 사용하세요.

  1. Shark Professional Steam Pocket Mop Front Panel Disassembly, Shark Professional Steam Pocket Mop Front Panel Disassembly: 1 단계, 이미지 2개 중 1개 Shark Professional Steam Pocket Mop Front Panel Disassembly, Shark Professional Steam Pocket Mop Front Panel Disassembly: 1 단계, 이미지 2개 중 2개
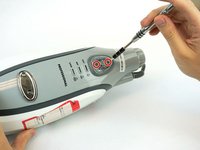
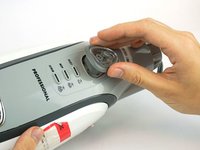
    • Unwrap the power cord from the handle.

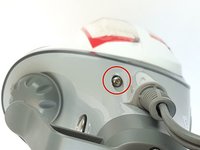
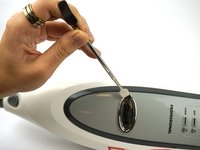
    • Remove the 56.0 mm Phillips head #2 screw located above the water tank cap.

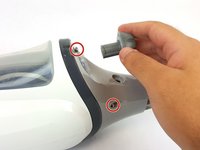
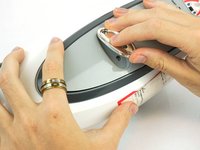
    • Pull the handle to separate it from the body.

  2. Shark Professional Steam Pocket Mop Front Panel Disassembly: 2 단계, 이미지 3개 중 1개 Shark Professional Steam Pocket Mop Front Panel Disassembly: 2 단계, 이미지 3개 중 2개 Shark Professional Steam Pocket Mop Front Panel Disassembly: 2 단계, 이미지 3개 중 3개
    • Remove the three 12.0 mm Phillips head #2 screws where the handle connects to the body.

    • Remove the plastic cap.

  3. Shark Professional Steam Pocket Mop Front Panel Disassembly: 3 단계, 이미지 2개 중 1개 Shark Professional Steam Pocket Mop Front Panel Disassembly: 3 단계, 이미지 2개 중 2개
    • Remove the three 16.0 mm T10 Torx screws near the top of the body and remove the water tank cap.

    • The third screw is directly on other side of the bottom screw in the photo.

  4. Shark Professional Steam Pocket Mop Front Panel Disassembly: 4 단계, 이미지 3개 중 1개 Shark Professional Steam Pocket Mop Front Panel Disassembly: 4 단계, 이미지 3개 중 2개 Shark Professional Steam Pocket Mop Front Panel Disassembly: 4 단계, 이미지 3개 중 3개
    • Remove steam control button cover with a metal spudger.

    • Remove the two 12.0 mm Phillips head #2 screws underneath.

    • Remove the plastic rim with clear plastic cover.

  5. Shark Professional Steam Pocket Mop Front Panel Disassembly: 5 단계, 이미지 3개 중 1개 Shark Professional Steam Pocket Mop Front Panel Disassembly: 5 단계, 이미지 3개 중 2개 Shark Professional Steam Pocket Mop Front Panel Disassembly: 5 단계, 이미지 3개 중 3개
    • Remove the Shark logo decal on the front of body using a metal spudger.

    • Remove the two 12.0 mm Phillips head #2 screws underneath.

    • Pull out the plastic cover to remove.

  6. Shark Professional Steam Pocket Mop Front Panel Disassembly: 6 단계, 이미지 1개 중 1개
    • Pop off the grey front plate to expose the control panel and screws necessary to open mop body.

작성자

2다른 기여자 명과 함께

Brett Wilson

회원 가입일: 02/12/18

1,019 평판

안내서 6개를 작성함

USF Tampa, Team S15-G1, Boczar Spring 2018 USF Tampa, Team S15-G1, Boczar Spring 2018 회원

USFT-BOCZAR-S18S15G1

4 회원들

안내서 14개를 작성함

1가이드 댓글

Here is a video to help with dismantling if you'd like to see the possible original guide first posted on YouTube by George Robles September 16, 2015 years before.

https://youtu.be/18mMbbMjqzs

No one knew or posted before me because I looked everywhere and why I created the video.

But I am curious where you got your information from if it was not my video.

George Robles - 답글

댓글 쓰기

조회 통계:

지난 24시간: 2

지난 7일: 13

지난 30일: 85

전체 시간: 5,135