주요 콘텐츠로 건너뛰기

Shark Rotator Powered Lift-Away Headlight Replacement

필요한 것

동영상 개요

  1. Shark Rotator Powered Lift-Away Headlight Replacement, Shark Rotator Powered Lift-Away Head Nozzle Disassembly: 1 단계, 이미지 1/2 Shark Rotator Powered Lift-Away Headlight Replacement, Shark Rotator Powered Lift-Away Head Nozzle Disassembly: 1 단계, 이미지 2/2
    • Push the lift away button and pull the handle up to separate the body from the wand section.

  2. Shark Rotator Powered Lift-Away Headlight Replacement: 2 단계, 이미지 1/1
    • Push lift away button on the wand then lift up on the top section to separate.

  3. Shark Rotator Powered Lift-Away Headlight Replacement: 3 단계, 이미지 1/2 Shark Rotator Powered Lift-Away Headlight Replacement: 3 단계, 이미지 2/2
    • Tilt the wand shaft backwards for convenient.

  4. Shark Rotator Powered Lift-Away Headlight Replacement: 4 단계, 이미지 1/2 Shark Rotator Powered Lift-Away Headlight Replacement: 4 단계, 이미지 2/2
    • Lay the head nozzle piece upside down.

    • Rotate the three gray taps to the unlock position.

  5. Shark Rotator Powered Lift-Away Headlight Replacement: 5 단계, 이미지 1/1
    • With your fingers, pry and pull the brush cage open.

  6. Shark Rotator Powered Lift-Away Headlight Replacement: 6 단계, 이미지 1/2 Shark Rotator Powered Lift-Away Headlight Replacement: 6 단계, 이미지 2/2
    • Remove the 13 screws (circled in yellow) using a phillips screwdriver.

    • Be sure to keep track of which screws go into which hole.

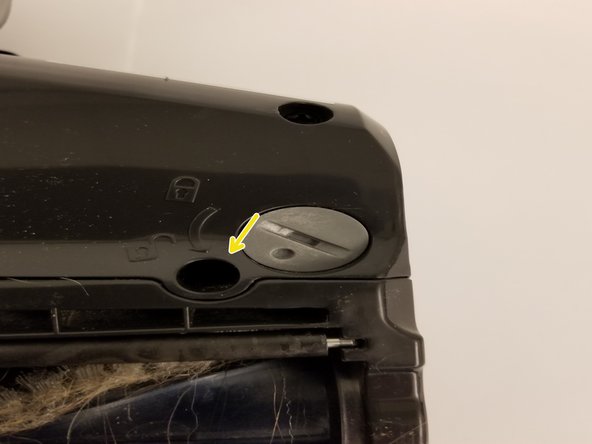
    • Remove the one screw (circled in red) that has a Torx head (might be Phillips head on some models).

    • The Torx screw is hidden under a rubber gasket. Carefully, lift up the gasket without damaging it to access this screw.

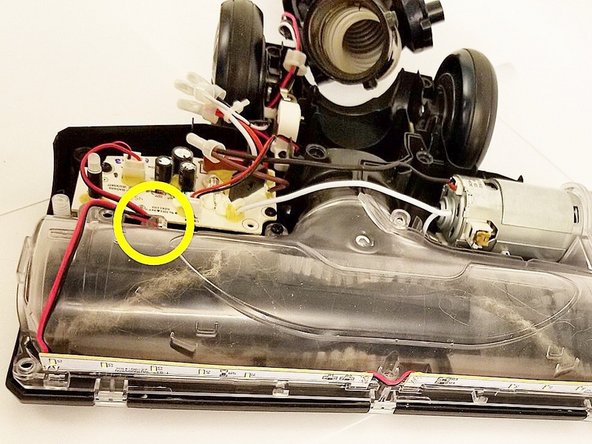
    • Remove the horizontal screw (circled in orange) that attaches the gray side panel (necessary to remove the white cap on the roller brush in step 8)

  7. Shark Rotator Powered Lift-Away Headlight Replacement: 7 단계, 이미지 1/1
    • Lift up the top cover now that all of the screws have been removed.

  8. Shark Rotator Powered Lift-Away Headlight Replacement, Headlights: 8 단계, 이미지 1/1
    • Detach the headlight’s red and black wires from plastic clip as shown.

  9. Shark Rotator Powered Lift-Away Headlight Replacement: 9 단계, 이미지 1/1
    • Follow the headlight’s red and black wires to the circuit board.

  10. Shark Rotator Powered Lift-Away Headlight Replacement: 10 단계, 이미지 1/1
    • Unclip the 2-pin electrical connector by pressing the tab then lift up.

  11. Shark Rotator Powered Lift-Away Headlight Replacement: 11 단계, 이미지 1/2 Shark Rotator Powered Lift-Away Headlight Replacement: 11 단계, 이미지 2/2
    • Carefully lift the headlights and its wires from the vacuum assembly.

결론

To reassemble your device, follow these instructions in reverse order.

다른 한 분이 해당 안내서를 완성하였습니다.

Diego Ruvalcaba

회원 가입일: 09/27/17

129 평판

안내서 1개 작성함

Cal Poly, Team S9-G3, Banghart Fall 2017 Cal Poly, Team S9-G3, Banghart Fall 2017 회원

CPSU-BANGHART-F17S9G3

4 회원들

안내서 12개 작성하였습니다

댓글 3개

Shark sent a brand new replacement nozzle to me (covered in their 5yr warranty) but head lights STILL DO NOT WORK - which makes me wonder where else the issue could be because the above “fix” would not have fixed my vacuum head lights.

Ginger Myrick - 답글

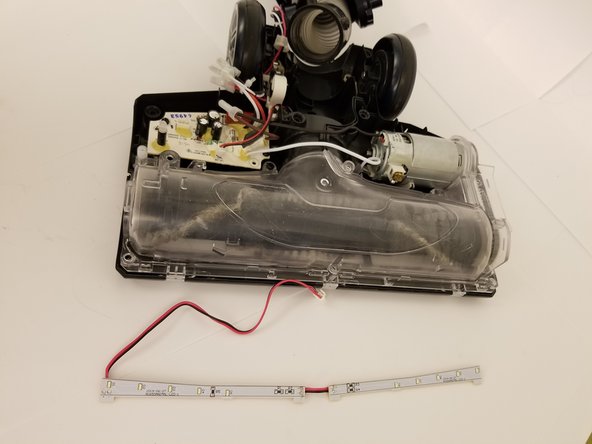
These steps are great, but how do you ACTUALLY replace the led light strip itself? Do u need a special strip? Just any led strip? U left a few more steps out. Is like to replace mine instead of buying a whole new vacuum head.

Lisa Janette - 답글

Protip: Print out a copy of the first photo for step 6 as large as will fit on the page. Tape it to a piece of foam board and poke the screws into it as you remove them. This makes it easy to remember which screw came from where.

Dave Thayer - 답글

댓글 쓰기

조회 통계:

24 시간 전: 1

7일 전: 10

30일 전: 45

전체 시간: 5,325