주요 콘텐츠로 건너뛰기

Shark Ultimate Professional Circuit Board Replacement

필요한 것

  1. Shark Ultimate Professional Circuit Board Replacement, Circuit Board: 1 단계, 이미지 1/3 Shark Ultimate Professional Circuit Board Replacement, Circuit Board: 1 단계, 이미지 2/3 Shark Ultimate Professional Circuit Board Replacement, Circuit Board: 1 단계, 이미지 3/3
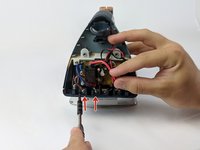
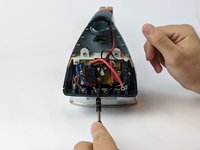
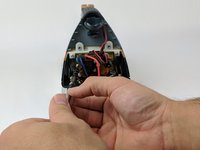
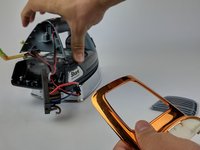
    • Use the Philips head #0 screwdriver to remove the two 11.49mm screws at the back of the iron.

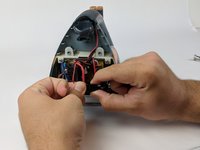
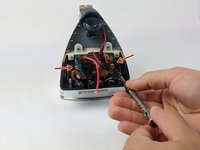
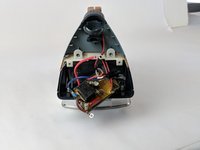
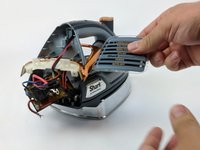
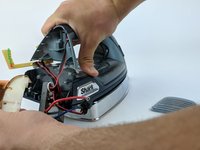
    • Remove the back cover piece.

    • Make sure the iron is unplugged and cooled off.

  2. Shark Ultimate Professional Circuit Board Replacement: 2 단계, 이미지 1/2 Shark Ultimate Professional Circuit Board Replacement: 2 단계, 이미지 2/2
    • Use the Philips head #0 screwdriver to remove the two 11.77mm screws holding the white clamp to the iron.

    • Use the Philips head #0 screwdriver to remove the two 6.58mm screws holding the black wires to the body of the iron.

    • Removing the left black wire will also free the red wire, attached by the same screw.

  3. Shark Ultimate Professional Circuit Board Replacement: 3 단계, 이미지 1/1
    • Pull the split end of the power cord upward through the ball joint.

    • Set aside the power cord.

  4. Shark Ultimate Professional Circuit Board Replacement: 4 단계, 이미지 1/3 Shark Ultimate Professional Circuit Board Replacement: 4 단계, 이미지 2/3 Shark Ultimate Professional Circuit Board Replacement: 4 단계, 이미지 3/3
    • Use the Philips head #0 screwdriver to remove the remaining 6.58mm screws that hold the wires on the bottom (brown and blue).

    • Remove from left to right

    • Unclip the black adapter piece on the bottom right.

    • Wires order (from left to right): Brown, Blue, Red, Black

  5. Shark Ultimate Professional Circuit Board Replacement: 5 단계, 이미지 1/2 Shark Ultimate Professional Circuit Board Replacement: 5 단계, 이미지 2/2
    • Use the Philips head #0 screwdriver to remove the two 9.75mm screws (left and right) affixed to the circuit board.

  6. Shark Ultimate Professional Circuit Board Replacement: 6 단계, 이미지 1/2 Shark Ultimate Professional Circuit Board Replacement: 6 단계, 이미지 2/2
    • Use the Philips head #0 screwdriver to remove the two 9.82mm screws (left and right) from the white border on top of the circuit board.

    • Gently pull the circuit board from affixed position.

    • The circuit board will not be completely separated at this point.

  7. Shark Ultimate Professional Circuit Board Replacement: 7 단계, 이미지 1/3 Shark Ultimate Professional Circuit Board Replacement: 7 단계, 이미지 2/3 Shark Ultimate Professional Circuit Board Replacement: 7 단계, 이미지 3/3
    • Remove the mode display piece and set aside.

    • Lift the handle and wiggle the plastic trim and the orange-chrome bezel out from under the handle.

  8. Shark Ultimate Professional Circuit Board Replacement: 8 단계, 이미지 1/1
    • Remove the connecting wire from the connected adapter in the handle by pulling lightly.

    • Set aside the circuit board.

결론

To reassemble your device, follow these instructions in reverse order.

다른 5명이 해당 안내서를 완성하였습니다.

Drew Carff

회원 가입일: 10/23/17

868 평판

안내서 5개 작성하였습니다

USF Tampa, Team S1-G4, Leahy Fall 2017 USF Tampa, Team S1-G4, Leahy Fall 2017 회원

USFT-LEAHY-F17S1G4

3 회원들

안내서 10개 작성하였습니다

댓글 4개

My shark 1505C does not have philips screws on the back. They are security torx and I cannot find a tool to open it.

Where can I buy a main board for this iron ?

Thanks

NevG.

nevstarg - 답글

where do I buy it's circuit board?

egovieira - 답글

Where can u buy the circuit board professional 1800 version?

Astinder Singhera - 답글

How much does the circuit board cost? and where can i purchase it?

D.A. Willis - 답글

댓글 쓰기

조회 통계:

24 시간 전: 1

7일 전: 8

30일 전: 32

전체 시간: 3,073