주요 콘텐츠로 건너뛰기

Single USB Car Charger Negative Contacts Replacement

필요한 것

  1. Single USB Car Charger Negative Contacts Replacement, Negative Contacts: 1 단계, 이미지 1/3 Single USB Car Charger Negative Contacts Replacement, Negative Contacts: 1 단계, 이미지 2/3 Single USB Car Charger Negative Contacts Replacement, Negative Contacts: 1 단계, 이미지 3/3
    • Remove the two 5 mm Phillips screws with a Phillips #1 screwdriver.

    • Remove the cover.

  2. Single USB Car Charger Negative Contacts Replacement: 2 단계, 이미지 1/3 Single USB Car Charger Negative Contacts Replacement: 2 단계, 이미지 2/3 Single USB Car Charger Negative Contacts Replacement: 2 단계, 이미지 3/3
    • Unscrew the metal ring, this can be done by hand.

    • Remove the diode.

  3. Single USB Car Charger Negative Contacts Replacement: 3 단계, 이미지 1/2 Single USB Car Charger Negative Contacts Replacement: 3 단계, 이미지 2/2
    • Gently pull apart the car charger case along the sides. This will reveal the circuit board.

  4. Single USB Car Charger Negative Contacts Replacement: 4 단계, 이미지 1/2 Single USB Car Charger Negative Contacts Replacement: 4 단계, 이미지 2/2
    • Since everything has been glued or soldered onto the circuit board, you can gently remove the circuit board from the case by lifting it by the USB port's end.

    • This is what you should see on the top side (opposite side of the circuit board).

    • Gently lift the negative contacts from the USB port.

  5. Single USB Car Charger Negative Contacts Replacement: 5 단계, 이미지 1/2 Single USB Car Charger Negative Contacts Replacement: 5 단계, 이미지 2/2
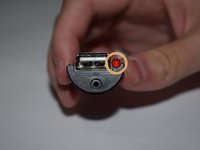
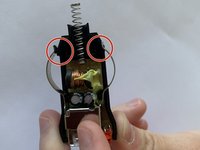
    • Replace your negative contacts, or bend them back into their correct shape. Resembling a half oval shape as shown.

    • To begin reassembling the car charger first, lay the circuit board side into the bottom half of the car charger's case.

    • Make sure to align the light with its correct spot. It should be in the small, half-circle indent.

  6. Single USB Car Charger Negative Contacts Replacement: 6 단계, 이미지 1/3 Single USB Car Charger Negative Contacts Replacement: 6 단계, 이미지 2/3 Single USB Car Charger Negative Contacts Replacement: 6 단계, 이미지 3/3
    • On the top of the rectangle part of the negative contacts, there is a tiny latch, be sure to place this on top of the USB port when replacing your contacts.

    • Gently place the negative contacts on top of the USB port.

    • The negative contacts are going to over-extend their correct slots, once you have the latch aligned on top of the USB port, carefully push in the sides of the contacts and lay them into their correct slots.

    • DO NOT force the negative contacts down. This could break the plastic or the metal.

  7. Single USB Car Charger Negative Contacts Replacement: 7 단계, 이미지 1/1
    • Now place the two halves of the car charger's case back together and close it tight.

    • From here reassemble your device using steps 2 and 1 in reverse order starting with Step 2.

결론

To reassemble your device, go back to step 2 then step 1, and follow them in reverse order.

다른 한 분이 해당 안내서를 완성하였습니다.

댓글 0개

댓글 쓰기

조회 통계:

24 시간 전: 2

7일 전: 10

30일 전: 35

전체 시간: 840