소개
Sometimes when you operate your SodaStream, the drink does not come out fizzy enough, or you can hear gas escaping on the inside. This may be an issue with the internal air hose. This is a small piece that is part of the inner machine setup. The hose is what helps the carbonation process, it connects the carbonation bottle with the nozzle on the main loader tab, and if it is damaged in any way you may not be able to use your device. In this guide, you will see how the hose can be disconnected and replaced if the need arises.
필요한 것
-
-
Remove the soda bottle and the CO₂ canister from the machine.
-
-
-
Remove the four 17.8 mm screws from the bottom metal base using a Phillips #1 screwdriver.
-
-
-
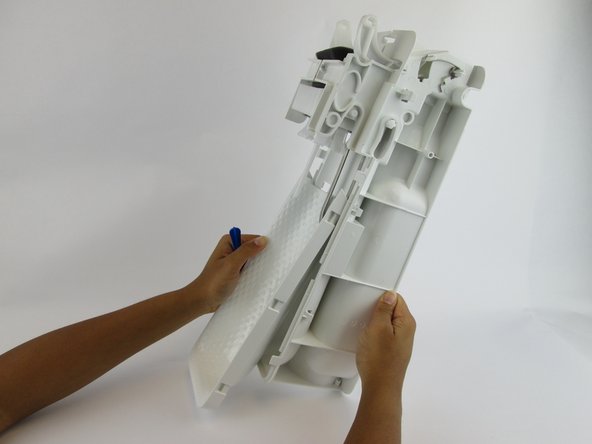
Pull the outer cover away from the front of the device.
We are working on that for the last two hours without succcess. The boytom seems to slide out, but the top is totally stuck.
Hey Robert Coles, I figured it out. It wants to slide out backwards. You’ll notice the bottom wants to come out but the top is stuck. There is a sturdy plastic catch at the top, I managed to dislodge it by inserting a flathead screwdriver and giving it a little twist while pulling the housing away at the same time. I hope this helps! -jt
I have the same problem.
I’m stuck here too. I’ve pulled a lot of things apart but this has got the better of me. I can’t even get the bottom to slide. I love the way his hands are delicately poised to gently lift the back off. I’ve tried pulling so hard I’m frightened of breaking it. Pity. Such a good, well thought out manual otherwise. Stuck on step 3
used two thin wood skewers to break the hold on the top. Slid them in each about 1/2” from the enter. finally released.
Brian’s comment is excellent. The only additional piece of information is that the skewers should be inserted from the back. The catch is in the middle near the back. I inserted from the front which was wrong, but still worked. I left a couple of very fine marks that I think would not happen if inserted from the back.
This step was unnecessary. I was able to slide off the front panel without pulling the outer cover off.
Same for me. Jump to step4/5 first to see if it's even necessary.
jwitt72 -
there might be different variations within the same “model”. in my case (source), i realized that there is a tab at the top of of the housing. i pulled upwards the top of the housing, and was able to slide the housing backwards. there were 2 pairs of tracks on the sides of the housing that i thought they might have latches, but they were only guides to slide the housing. i do not how to share pictures here to show my steps
This step was a real bugger. What helped was sliding a medium putty knife between the top and inner piece. The plastic snap is very near the back. They are right above the small “point” in the centre of the mechanism below it. Takes patience and let the plastic give way in time. I thought for sure I was going to bust it, and then it finally slid out like magic.
This step is only useful if you need to retension the two springs that lift the head and releases the pressure so that you don't have to lift it manually to get the bottle out.
till_vidar - 답글
There are definitely different model variations. The outer metal case on my 2013 is split at the bottom as in this guide. The plastic case on my 16/17 is different an has the catch at the top rear as discussed in this thread. A gentle push up with my thumbs was enough to release it.
There is no need for steps 1, 2 and 3. Start at 4, and just remove the two screws from the front square that you push down. Use a tool to firmly pull the cover off and go ahead and replace the battery. Put back the cover, the two screws and you are done!
MarianaFre - 답글
-
-
-
Remove the two 18.2 mm screws from the bottom of the front cover using a Phillips #1 screwdriver.
-
-
-
Firmly pull the front cover off.
The plastic spudgers that are supplied for mobile phone or tablet screen removal are perfect for this job. Use 2 - 1 on each side.
Once the 18.2 mm screws are removed, I just pulled the black plastic outer cover a couple mm away from the white plastic internal block on each side to release 4 of the 6 plastic catches, and then rotated upward to release the last 2 plastic catches.
Note for the SodaStream Source model that doesn't have a battery: The contents of the electrical unit will come off along with the cover itself. The connecting wires are short and won't allow removing the cover as shown here. Disassemble carefully so as to not damage the wires.
This model looks slightly different than the one shown in this guide: there are three horizontally placed buttons along the top edge, used to select the degree of carbonation and to start the process. -
-
-
Push the brass bar, located in the top of the device, out of the carbonating block.
We could,remove this covee, without sliding the assembly out ofbthe case. There was NO gold bar in the system…
-
-
-
Slide the yellow battery cover up and away to remove it from the device.
Careful! I had springs and retainers go flying on this step
Yep…same here. Took me a good minute to figure out where they came from!?
Fun fact: The lights on the SodaStream are simply a timer. They are in no way linked to a pressure gauge. If you want more bubbles it doesn't mean you have to press on the activation mechanism harder. you can press gently and just wait longer. This way the water will not spill out over the top and leak all over the table. Ignore the lights and just wait for the safety release valve to activate as you are filling the bottle. that's how you know you have reached the limit.
-
-
-
-
Remove the plastic piece, located near the front of the carbonating block, from both sides of the device using a plastic opening tool or nylon spudger.
-
-
-
Remove the plastic oval and the spring within it.
Do not have this piece on mine?
nor do I. They must have made some changes.
Scott -
This piece exists on my 2013 metal chassis version, but not on my 2016/17 plastic chassis.
-
-
-
Remove the three 17.9 mm screws located on the right side.
Should this be four screws? I followed all directions (I think) and had one extra screw to remove, just above the bottle mount, before I could split the two halves apart
Yes I had a 4th screw at this step too. Going backwards the missing fourth screw in the instruction messed me up and I had to redo it!
Yes the 4th screw still isn't mentioned - and just below it is the rare-earth magnet that can fall out when the halves are separated. This magnet activates the LEDs when the carbonating block is pushed down - no magnet, no lights.
-
-
-
Grip the right and left sides of the device and pull it into two identical halves.
what happens to the middle white piece?
Yeah there's a step missing here…between 17 & 18
Is it better to lay it on its side?
I hope someone will document the missing step of what it looks like if you separate the halves without having all the parts fall out.
What does it look like and where do they go? Kinda' important for reassembly.
I've added a photo to this step showing just this, fingers crossed it gets approved
Liz - would you post a link to your pic here so we can see it even though it's not approved yet?
Joe -
Re: "missing step"
On the newer models, (at least 2016/17) the valve is attached to the left side and it's two Phillips head screws must be removed.
These instructions are correct for earlier models where the valve is in the middle, so there is no missing step.
Thanks to this guide, I’ve taken a part my SodaStream Source a few times now. Like others have mentioned, during reassembly, this step tripped me up every time. It’s definitely missing details about the part orientation. I took some additional photos in efforts to help others. Please find the album here.
Thanks Mitch!! That's exactly what I needed! been pulling my hair out trying to figure out how that white piece went back in.
You’re very welcome! I’m so glad it helped you out!
Mitch -
-
-
-
Pull the foam pad up and remove it from the front side of the carbonation component.
Any source for spare parts known? Ebay and Amazon does not help here!
The part on mine that was broken is the plastic cap/nut that connects the black hose to the canister holder.
Going to try and superglue it. Wonder if there's a source for this nut?
I wish it was that simple. The hose has a brass ferrule crimped on it, and the nut cannot be replaced without being able to remove and crimp a new ferrule to the (new?) hose. I have found a listing (eBay Europe?) for a split brass nut that allows replacement, but...
-
-
-
Pull the loader tab out of the nozzle.
-
-
-
Use pliers to unscrew the gold cap piece from both ends of the tube
Where would you get this part?
did you find it? im looking aswell..
See below...
Could someone explain those two valves (plastic and brass) and what they do? I know one is a pressure relief valve but the other one?
One side is the release when you remove the bottle, the other is the one that holds back pressure untill its as pressurized ae possible, then according to the manual for the genesis, its supposed to make a loud buzzing sound, that is the sound of the overpressure relief valve relieving the pressure. Unfortunately mine appeared to have something half-cocked in the bottom, turns out there is a very thin tin or metalized plastic dome that is VERY easy to destroy... Think very thin tinfoil like... Now my Genesis is screwed till i can find a replacement part.. the only video ive seen on youtube regarding this piece, originally had a 14 mm nut on it, on mine, its just a round dimpled nut, and it feels glued or something, don't want to further damage the device, so i'm continuing to look for a replacement part...
UPDATE: I was Infact able to jam and alan key that was slightly too large into the bottom, on mine, the black part. this black part WAS glued or melted to the white part it was threaded to and had to carefully be held as gently, but functionally as possible in order to turn out the black part. This is the part that used to have the foil (was told on that youtube video it was 'dome' shaped) but it turned out to be, from as well as i can see, to be a circle of foil compressed into a round plastic part which had a central circular opening, and this did have a couple of numbers printed on this plastic disc surrounding the foil circle. It had in silver ink 2103 at the top (12 o'clock spot), then a small silver circle on both left and right sides (9 and 3 o'clock respectively) then 074B (6 o'clock). Will update with any news...
I got mine from amazon: https://www.amazon.de/dp/B0CGWW6LQP?ref=...
-
-
-
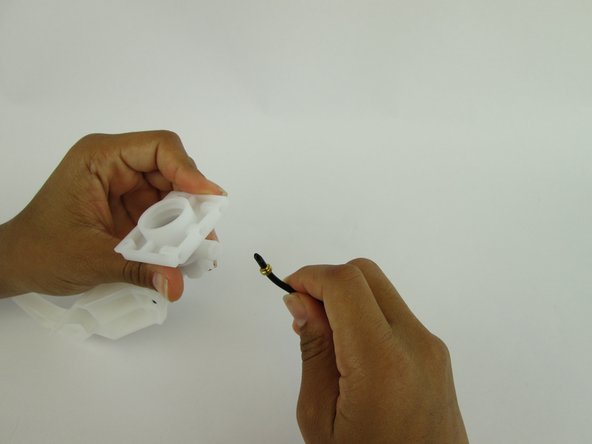
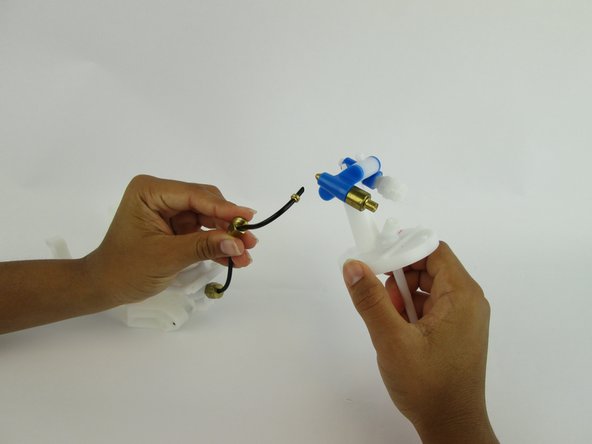
Detach the hose from both sides of the carbonation system.
The plastic piece that the hose goes into (the one your holding in your left hand in pic 2) is broken on mine. Do you know if I can replace this part? Have a part # for it? Thanks for the great tutorial!
Doesn’t appear hose or nuts can be purchased. Thingiverse has the STL to 3D print it. https://www.thingiverse.com/thing:399934... Check your local library, they typically have 3D printers these days.
I ended up with a spare piece - the re-assembly is a little vague going from 18 to 17…
Same here, the Plastic Nut is broken.
Is there maybe a brass replacement available? ...or at least the sizes of the thread (is it 5/16 inch?)
Yes, a brass replacement is available; see my earlier comments on this page for the URL of at least one place that sells them. The thread is 3/8”-28, i.e. BSP.
Fix for broken plastic nut that worked for me
(from Reddit: https://www.reddit.com/r/SodaStream/comm...):
Parts:
Nylon flat washer #6 or similar part. Size #6 was the important part
Rubber Grommet 11/32 x 1/8
1/8 brass pipe cap diameter
Steps:
drill small hole in brass pipe cap. You will want to be able to pass the hose and the brass part in the hose through the drilled hole
cut the washer and grommet and slip it onto the hose. The hole you drilled is smaller than these parts, which is what prevents the hose from slipping through the hole
squeeze the grommet into the drilled hole (I used needle nosed pliers to stuff it into the hole. You're creating a seal around the newly drilled hole - rubber will be on either side of the hole.
screw the pipe back onto the machine. I used a wrench for this, as the grommet makes it difficult to tighten with just your fingers
Dá se sehnat díl kde se šroubuje Bombička co má v levé ruce na kroku 22. Díky za každou radu
-


To reassemble your device, follow these instructions in reverse order.
To reassemble your device, follow these instructions in reverse order.
다른 21명이 해당 안내서를 완성하였습니다.
팀

USF Tampa, Team S1-G4, Leahy Spring 2017 USF Tampa, Team S1-G4, Leahy Spring 2017 회원
USFT-LEAHY-S17S1G4
3 회원들
안내서 40개 작성하였습니다
댓글 65개
Thanks for the guide, but i currently have this issue where the hose needs to be replaced, but no way of sourcing a spare part? Any clues anyone?
Did you ever find the part for your machine?
Where would you get this part
Exactly the same problem on my Source, but I can't find spare parts anywhere.
Has anyone found where to get them from in Australia?
did you ever find a supplier for the air hose replacement?
HI, I'm French and I wrote and called customer service in france, explaining my problem : The nut on the pipe had broken.
I attached the pictures of the pipe problem and they kindly sent me the part for free...
relaxxx -
Hi relaxxx . Did you actually get the hose with two plastic nuts connected to it? I used 3 moths arguing with Swedish customer service and Israeli service, until eventually they accepted to send a new machine. The hose was impossible to get. So, if the French service has them, that is super. Du you have an e-mail to them? Best, JOS
j-spora -
Onde comprar a peça para reposição no Brasil?
Two things: first, before you disassemble your unit, try this: https://m.youtube.com/watch?v=st4d6drjVe...
Second: It would be _extremely_ useful to have some re-assembly photos. There’s one internal part that’s not shown, and it flew out when I took the halves apart. It’s the thing that fits between the two arms that stick out at the top (and provide the upward force for sliding front of the unit). The part in question has rods that fit into holes in each half, and the smooth, curved side faces toward the front of the unit, just behind the blue thing with the brass pieces.
That YouTube link is amazing. I think that is probably the issue everyone here actually has.
Thank you.
Matt Lamon - 답글
What? No; the symptoms of a ruptured/disconnected hose (the topic of this repair) guide are totally different (i.e. the total opposite) than the symptoms of a clog or restriction (the topic of the YouTube video). Presumably everyone here is here because they have the symptoms of a ruptured/disconnected hose.
Like half the comments here, where do you get the hose? The article has links for all the tools but under the 'Parts’ section says None Required! Kinda hard to replace a hose without a replacement!!!
One of the nut on the hose broke (on my machine, this piece is in plastic instead of metal).
Did someone try to stick the hose directly on the hole? If yes, which glue did you used? Epoxy?
Same thing happened to mine. Not even attempting epoxy, as I don’t know anything that would work and seal it due to the compression fitting design. I would simply replace it with what looks like the “update” one with metal tube nuts. The compression fitting is a very small metric one as a 3mm hose and M10x1.0 threads for the nuts
So to reiterate, what’s the P/N for this hose? A replacement guide is useless without being able to get that part.
Has anyone managed to source a replacement nut for the plastic ones mentioned by Tim Spencer above? With a hole for a 3mm hose and M10x1.0 threads? I’m in Toronto Canada and have 2 Sodastream Crystal models with a broken plastic nut! Thanks!
(sorry for posting this twice, but just joined and now realised I can reply directly to a specific post)
Eric -
I bought a replacement part from Esty. Just search ‘SodaStream Nut Replacement’ and you will find multiple sellers. Cannot post the link as it’ll be detected as spam.
Yannan -
People! You really shouldn't rely on 3D-printed threads to secure 145 psi; eventually someone is going to get hurt. And you especially shouldn't rely on 3D-printed threads if you're going to employ the slotted-nut trick to avoid buying a new ferrule; if you're going that route it's insane not to start with a proper metallic one.
To that end, the most recent comments here inspired me to place a new order from the place in the UK that stocks these (see links shared in my previous posts). Thankfully their new website has more reasonable international shipping options (previously it was like $30 to ship a £0.73 part to the USA), so I will soon have ten more nuts and ferrules to sell on to anyone in the USA who needs one (or a complete hose assembly).
Also note that the threads are not M10, they're 3/8”-28, i.e. BSP. So if you're going to ignore my advice and 3D print one, at least make sure you're printing the correct threads!
Same problem here. Can't get the spare part in UK.
I need a new nut to Iceland!
Still no source or modification for the delivery hose?
Anybody find a source for this replacement part?? Plz share info!!
It’s not M10x1, it’s 3/8”-28, i.e. BSP.
And I think I’ve found a marine component from which I can fabricate replacement hoses, but before I spend $30 to ship pennies worth of hardware halfway around the world, would anyone else like to buy a new hose assembly if I import enough parts to fabricate several of them?
Would I need a full hose assembly just to replace the broken plastic nut? Or could I reuse the hose just cutting off the old ferrule and adding the new compression nut (if we were actually to find one)? Not sure how much difference it makes but I've got a sodastream Crystal. I don't really know much about the standards but I've found that a 1/8” FIP thread fits on smoothly to the receiving plastic part the hose connects to. Unfortunately, no luck finding a compression nut with that kind of mouth and an 1/8” OD tube. I'm definitely interested if you've found something to work!
Eric -
Full hose assy vs. just replacing the nut is an open question; I went ahead and ordered two nuts (and I have what I believe to be suitable tubing on hand), but I may try just replacing the nut first. However, this necessitates shortening the existing tube slightly (i.e. cutting off the part with the existing ferrule stuck on it), and I’m afraid it may end up flexing the tube too much and rupturing the tube. (I don’t know the differences between SodaStream models, but if yours doesn’t require the tube to flex every time the machine is used, you may have more flexibility (no pun intended) to just replace the nut.
Be careful with the FIP—if I understand, that’s the female variant of what I’d call NPT and is a tapered thread. So it may appear to fit smoothly for a couple of revolutions and then start chewing up your plastic threads! (I held up a male 3/8”-27 pipe thread fitting side by side with the SodaStream part and their threads did NOT line up perfectly, with SodaStream being slightly finer, i.e. 28 tpi.)
Nice ! I wondered the same about shortening the hose but it seemed to have enough length — we’ll see, you may be right though. I had a female to female 1/8 FIP (NPT) and it screwed on seemingly very smoothly to the sodastream — hope I haven’t inadvertently damaged it, though there was absolutely no resistance so seems ok. Unfortunately, that F-F adapter would force me to use some male adapter with a compression fitting on the end of it and that’s just too long for the tight space in the sodastream. Let me know if things work out for you once your nuts arrive. Out of curiosity, where did you order them and where are you located? Thanks for your insights thus far!
Eric -
Nuts finally arrived, but I was skeptical of the included ferrules, so I tried to re-use the existing one—hose blew out right away, as feared. But I knew there was no way I could tighten the nut down hard enough to sufficiently deform the new ferrules without destroying the machine’s plastic threads, so I first tightened the new nut and ferrule into another fitting, then backed it off and tightened it onto the SodaStream, just tight enough to seal the already-deformed ferrule. This is all with the original hose cut short, by the way—we’ll see if it lasts.
I’m in Seattle. I ordered the parts from asap-supplies.com; what you really need is one of their part 303931 and one of their 303841, but the former was out of stock when I ordered, so I just ordered one of 303500, since it comes with two nuts and two ferrules. But the ferrules it comes with are different (303831) requiring the aforementioned ‘hack’ of using the double-male fitting (which I was going to throw out) as a tool to pre-deform the ferrule.
What I should have said last night is that—assuming my slightly-shortened hose doesn’t fatigue and fail within the next couple of days—I’d be willing to sell the extra nut and ferrule that I have, and the fitting they came with (which needs to be used as a tool to pre-deform the weird chunky ferrule prior to installation on the SodaStream’s plastic fitting).
I also found this: https://www.alliedelec.com/product/rs-pr... But by the time they responded to my inquiry to confirm the correct female threads inside the nut, I’d already ordered the aforementioned parts from the place in the UK. And I don’t know how suitable the included ferrule on this one might be.
There is a missing piece in pictures - it is a pivot on top of the air valve assembly it will fall out in step 18 when the two halves of the frame are split. It has to be installed when the halves are reassembled, not sure how to post a picture here but it caused me to have to disassemble and figure out the exact position.
I fabricated a new internal aeration hose with these components:
++https://www.mscdirect.com/product/detail...
++https://www.mscdirect.com/product/detail...
Use the old ferrules as an adapter between the old fitting and the new ones
In case my earlier comments were insufficiently clear, this is the direct replacement for the failure-prone tube nut: https://www.asap-supplies.com/fittings-v...
So I just read your previous posts where it looks like you are re-use the old hose. What about the ferrules? Do they cone with just the nut or do you they come with that male to male tool as you called it? I devised my solution before I saw your link to the nut/fitting. That may have swayed me but I like where my approach uses a new hose ($.22) and metal fittings that can crimp it properly. The larger brass fitting don’t seem to get in the way and the hose can be a long as it needs to be.
In my case (the lone nut linked in the above post was out of stock), when I bought the male-to-male fitting (which fortuitously became the swaging tool) that came with two nuts, it also came with two ferrules, so that was all I needed. Now that the lone nut is back in stock at that website, I’d recommend buying a more conventional ‘olive’-style ferrule, and maybe it won’t need to be pre-deformed against a metal fitting prior to assembly.
And yeah, I was sort of torn between re-using the hose (shortened ~6 mm) and making a new one with tubing I had on hand. I decided to try the former first because I didn’t have specs on my tubing; looking more closely at my tubing, I’m pretty sure it’s this: https://www.festo.com/us/en/a/567945/?q=... —food-safe pneumatic tubing with a 145 psi pressure rating and 0.25” minimum bend radius—given that the product I bought included two nuts and ferrules, I probably should have just made a new hose!
3d print a copy of the part like I did.
Also in my Sodastream Source the 1/8 "female adapter (plastic) broke, not the one with a 4mm tube but the one with a 3mm tube.
I ordered this in China (PCF4-01 there is only 4 mm ... I thought I would put a 1 mm heat shrink tube on top) .... let's see if it will work ....
https://www.aliexpress.com/item/32998078... searchweb0_0, searchweb201602_, searchweb201603_
Has anyone already used this PCF4-01 adapter?
It works ?
Bob—I feel obligated to recommend AGAINST trying to seal any kind of pneumatic fitting against an undersized tube with heat shrink.
I’m not sure what part you’re referring to (“not the one with a 4mm tube”), but I only recall there being one tube in the SodaStream Source, and it’s definitely 1/3” (~3 mm). So if you’re actually dealing with the same tube nut failure as everyone else with a broken Source, I’d recommend you get the correct part, either from here https://www.asap-supplies.com/fittings-v... along with their 303841 ferrule (with which I’ve successfully repaired two machines) or by taking the nut and ferrule from here https://www.alliedelec.com/product/rs-pr... (untested). You can either re-use the existing tube (after cutting off the end) or buy new tubing here https://www.festo.com/us/en/a/567945/?q=...
Hi! I wanna echo Joe Elliott’s comment on the replacement parts. I’m from Taiwan and have been looking for the right part to replace the broken plastic air hose. The local Sodatream distributor asks for US$80 to replace the whole block and won’t simply offer the replacement nuts. I went ahead and ordered from asap-supplies.com the part ”303535” (combo) and 303841+303931 as backup. The Jet is fixed and been working well. Many thanks to Joe for the helpful tips!
My G100 has the broken nylon nut, so the tube cannot be held down.
Based on the measurements you guys have discussed. I am going to see if this guy works.
https://www.ebay.com/itm/Compression-3mm...
I think this is similar to your “untested” second choice, Joe.
How did you secure the tube to the ferrule?
Just finished the repair using that fitting from ebay. So far it’s working!
Please see ablum
just be careful with the tube when wriggling the compression fitting on. You wouldn’t want to crack it and create another problem :)
Well that’s not quite what I expected—what purpose does the intermediate fitting serve? Would the tube nut not thread directly onto your G100? (I was thinking you’d just use the tube nut and included ferrules, and discard the extra fitting—at least that was the intent with my second [untested] suggestion above.) Is there any kind of sealing surface inside the female end of that extra fitting, or are you just relying on the threads to seal the gas there (which, if it’s the same as the SodaStream Source, they’re not intended to do)?
Nice solution, how did you secure the tube to the ferrule?
BTW Joe, I suspect that the extra intermediate fitting you mention might provide the additional length that was lost cutting the tube so it might be a blessing in disguise?
Probably should have asked “how did you secure the ferrule to the tube?” not “the tube to the ferrule?” technicality but…
The ferrule is designed such that it gets crimped securely to the tube by virtue of tightening the tube nut over it. But because the mating fitting on the SodaStream machines I’ve repaired is plastic, I was a little concerned that tightening the nut down tight enough to properly secure the ferrule might damage the machine’s plastic fitting; so, out of an abundance of caution I slipped the nut and ferrule over the machine’s tube, and tightened it down onto another (metal) male fitting temporarily, to secure the ferrule, before actually reattaching it to the plastic male fitting in the SodaStream. But, depending on the style of ferrule you’re using, that might be unnecessary overkill (e.g. the style of ferrule used originally by the SodaStream factory obviously crimps to the tube just fine when torqued against the plastic fittings, without damaging anything).
In Italy I found this: https://www.ebay.it/itm/Tubicino-collega...
Currently, I have similar problem explained earlier, where do we get the spare part in USA?
See my second post of Jan 29 above for a USA source. (Unfortunately I’ve already sold the extra nut I imported from the UK.)
As I responded above, I couldn’t find the nut procurable anywhere. I. Was able to find the STL (3D printer file) for the nut on Thingiverse, check it out here https://www.thingiverse.com/thing:399934...
You can likely find a 3D printer at your local library these days.
Read the comments above; I posted links to two different sources for the nut, and someone else posted a link to a complete tube + nuts assembly available on eBay. Also: Please DON’T 3D-PRINT A TUBE NUT THAT’S GOING TO BE SUBJECTED TO REPEATED PRESSURE CYCLING or suggest to others on the internet that it’s a safe/reasonable thing to do.
Thanks, I am going to print one of those.
Sodastream are very cute when it comes to spare parts.
Most companies charge an arm and a leg for spare parts, Sodastream just don’t make them available and some critical parts are made of plastic instead of metal so they will at some point fail.
So you have no alternative but to buy a new machine.
How cynical is that! It’s a pity there doesn’t seem to be any competition in this type of product.
Our Soda Stream didn’t have the hose fittings made of bronze like the ones pictured here. I guess it was an improvement made afterwards. Mine are made of plastic and in fact, our just broke off. Does anyone know the size and thread of this couplers so I can try to buy them?
Excellent guide! thank you.
Same threads as the metal version; 3/8”-28 BSP. Buy one of the off-the-shelf metallic tube nuts that I linked above.
In case anybody is still looking, after a lot of reading and research I think I found a pretty good replacement nut made of brass and which allows to reuse the tube. It's on eBay (coming from Germany but ships worldwide, although shipping will be a bit expensive depending), here is it: https://www.ebay.com/itm/313982060732
And here is the reddit page when I also discussed it: https://www.reddit.com/r/SodaStream/comm...
I can recommend this one
Heh; cutting a slot in the nut to allow replacement with the original ferrule in place is pretty clever. But if you own a file and are capable of cutting your own slot, the part that I use to repair these is still a lot less expensive: https://www.asap-supplies.com/products/b...
je suis arrivé jusqu'au tuyau facilement : le mien est cassé. Où puis-je acheter cette pièce détachée? merci à tous
I went ahead and imported (to the USA) another batch of the correct (1/8" BSP) tube nuts and ferrules; if anyone is looking for these parts, it shouldn't be too hard to figure out how to reach me...
My machine is overflowing when i put gas
Elaine Anja - 답글
Does this article apply to the Fizzi too?
When I look at my Fizzi (that I bought secondhand), it does not have any black seal like the one shown in this article.
Greg Harrington - 답글
Parts are not specified - why? You would need a replacement circuit board (PCB, not a "chip")/battery holder assembly, if indeed that has failed.
Malcolm Noble - 답글
IMPORTANT! Don’t use Philips screwdriver size PH1, it’s too small and will damage the screws. The correct size is PH2. This goes for all screws on this machine.
Charles Greneby - 답글