이 버전에는 잘못된 편집 사항이 있을 수 있습니다. 최신 확인된 스냅샷으로 전환하십시오.
필요한 것
-
이 단계는 번역되지 않았습니다. 번역을 도와주십시오
-
Start by using a spudger or plastic opening tool to remove the bottom cover.
-
Once enough of the glue is removed, peel the cover off by hand,
-
-
이 단계는 번역되지 않았습니다. 번역을 도와주십시오
-
Remove the four 7.5mm length Philips head screws under the rubber cover.
-
-
이 단계는 번역되지 않았습니다. 번역을 도와주십시오
-
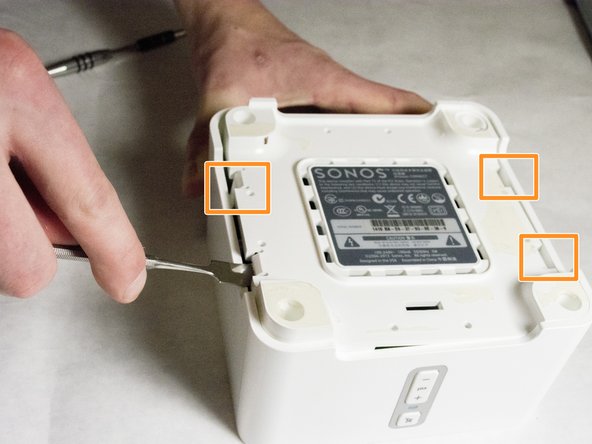
Use a nylon spudger to unsnap the bottom from the sides.
-
Pry until the remaining three points are unsnapped.
-
Once unsnapped, lift the cover.
-
-
이 단계는 번역되지 않았습니다. 번역을 도와주십시오
-
Use a plastic opening tool or spudger to remove the adhesive covering the the WIFI connectors.
-
Gently pull the wires at the connection point to disconnect them from the motherboard.
-
-
-
이 단계는 번역되지 않았습니다. 번역을 도와주십시오
-
Scrape the glued pad underneath the WIFI card to seperate the card from the board.
-
Push apart the two clips holding the WIFI card in the connection.
-
Pull the WIFI card out of the connection.
-
-
이 단계는 번역되지 않았습니다. 번역을 도와주십시오
-
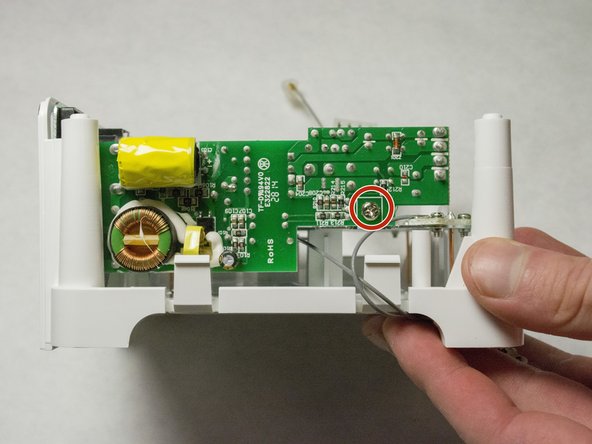
Picture shows the side of the device.
-
Remove the 7mm length Phillips screw from the power supply motherboard.
-
-
이 단계는 번역되지 않았습니다. 번역을 도와주십시오
-
Remove the adhesive backed rear label by using a spudger.
-
Remove the two 8mm length screws as shown.
-


다른 3명이 해당 안내서를 완성하였습니다.
팀

IUPUI, Team 3-2, Baechle Spring 2016 IUPUI, Team 3-2, Baechle Spring 2016 회원
IUPUI-BAECHLE-S16S3G2
4 회원들
안내서 4개 작성하였습니다
댓글 22개
You'd probably just replace the 1800µƒ cap, which you can do without removing the board. Leave the wireless card attached to the top board when you carefully lift it out of the way. 99 times out of 100 if a PSU goes down it's one or more capacitors.
Steve Long - 답글
My Sonos was fried by a thunderstrike recently.
More precisely: 3 parts on the power supply PCB: the fuse, that 1800 uF cap mentioned above and some other part that I'm having a hard time to identify:
It's located pretty close to the fuse on the PCB, there labeled whith "TH1" and according to the symbol it's some kind of varistor or thermistor. With the "TH1" label I'm inclined to bet my money on thermistor, some NTC probably.
From what little is left of its housing (green, round with a diameter of about 8mm) its caption once read "SCK 102"... or something similar. But that's all I could find out.
Could anybody tell me more about this part and its dimensions?
When feeding the 3.3V and 14.V that the power supply PCB normaly provides from some lab power supply to the mainboard of the Sonos it works fine. So wether I'll be able t resurect my Sonos depends on identifying and replacing this one little bugger...
Thanks a lot
Ber
In my case, the 2A fuse and the MB8S Bridge rectifier were broken. Also my 14V output delivers 17.5V. The zener was not broken so I guess there are different versions.
Can you lick up +5 volts from power supply black/red?