주요 콘텐츠로 건너뛰기

Sonos Connect Top Motherboard Replacement

필요한 것

  1. Sonos Connect Top Motherboard Replacement, WIFI Card: 1 단계, 이미지 1/3 Sonos Connect Top Motherboard Replacement, WIFI Card: 1 단계, 이미지 2/3 Sonos Connect Top Motherboard Replacement, WIFI Card: 1 단계, 이미지 3/3
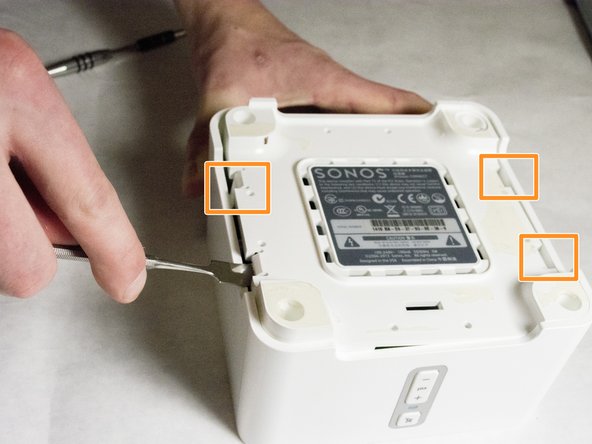
    • Start by using a spudger or plastic opening tool to remove the bottom cover.

    • When working with electronics, it's important to choose a tool that's ESD-safe to avoid accidental damage to the device. The regular black nylon spudger or a plastic opening tool should be used whenever possible.

    • Once enough of the glue is removed, peel the cover off by hand,

  2. Sonos Connect Top Motherboard Replacement: 2 단계, 이미지 1/3 Sonos Connect Top Motherboard Replacement: 2 단계, 이미지 2/3 Sonos Connect Top Motherboard Replacement: 2 단계, 이미지 3/3
    • Remove the four 7.5mm length Philips head screws under the rubber cover.

  3. Sonos Connect Top Motherboard Replacement: 3 단계, 이미지 1/3 Sonos Connect Top Motherboard Replacement: 3 단계, 이미지 2/3 Sonos Connect Top Motherboard Replacement: 3 단계, 이미지 3/3
    • Use a nylon spudger to unsnap the bottom from the sides.

    • Pry until the remaining three points are unsnapped.

    • Once unsnapped, lift the cover.

  4. Sonos Connect Top Motherboard Replacement: 4 단계, 이미지 1/2 Sonos Connect Top Motherboard Replacement: 4 단계, 이미지 2/2
    • Remove the connection for the front buttons to fully remove the cover.

  5. Sonos Connect Top Motherboard Replacement: 5 단계, 이미지 1/2 Sonos Connect Top Motherboard Replacement: 5 단계, 이미지 2/2
    • Use a plastic opening tool or spudger to remove the adhesive covering the the WIFI connectors.

    • Gently pull the wires at the connection point to disconnect them from the motherboard.

  6. Sonos Connect Top Motherboard Replacement: 6 단계, 이미지 1/2 Sonos Connect Top Motherboard Replacement: 6 단계, 이미지 2/2
    • Remove the two pieces of glue holding the WIFI card in place.

  7. Sonos Connect Top Motherboard Replacement: 7 단계, 이미지 1/3 Sonos Connect Top Motherboard Replacement: 7 단계, 이미지 2/3 Sonos Connect Top Motherboard Replacement: 7 단계, 이미지 3/3
    • Scrape the glued pad underneath the WIFI card to seperate the card from the board.

    • Push apart the two clips holding the WIFI card in the connection.

    • Pull the WIFI card out of the connection.

    • When putting the new WIFI card in, put the card in the connector first, then push downward until it clicks.

  8. Sonos Connect Top Motherboard Replacement, Top Motherboard: 8 단계, 이미지 1/1
    • Remove the 7mm length Phillips screw holding the board in place.

  9. Sonos Connect Top Motherboard Replacement: 9 단계, 이미지 1/2 Sonos Connect Top Motherboard Replacement: 9 단계, 이미지 2/2
    • Flip the board over to access the Molex Cable.

  10. Sonos Connect Top Motherboard Replacement: 10 단계, 이미지 1/1
    • Disconnect the Molex Cable from the top motherboard.

결론

To reassemble your device, follow these instructions in reverse order.

다른 2명이 해당 안내서를 완성하였습니다.

Clark Snyder

회원 가입일: 01/21/16

483 평판

안내서 4개 작성하였습니다

IUPUI, Team 3-2, Baechle Spring 2016 IUPUI, Team 3-2, Baechle Spring 2016 회원

IUPUI-BAECHLE-S16S3G2

4 회원들

안내서 4개 작성하였습니다

댓글 0개

댓글 쓰기

조회 통계:

24 시간 전: 1

7일 전: 2

30일 전: 10

전체 시간: 1,868