이 버전에는 잘못된 편집 사항이 있을 수 있습니다. 최신 확인된 스냅샷으로 전환하십시오.
필요한 것
-
이 단계는 번역되지 않았습니다. 번역을 도와주십시오
-
Start by using a spudger or plastic opening tool to remove the bottom cover.
-
Once enough of the glue is removed, peel the cover off by hand,
-
-
이 단계는 번역되지 않았습니다. 번역을 도와주십시오
-
Remove the four 7.5mm length Philips head screws under the rubber cover.
-
-
이 단계는 번역되지 않았습니다. 번역을 도와주십시오
-
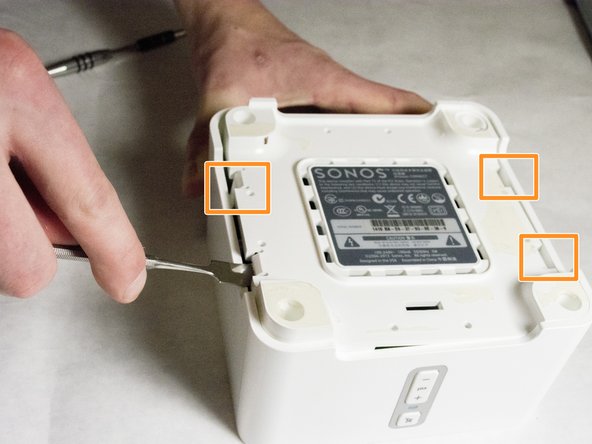
Use a nylon spudger to unsnap the bottom from the sides.
-
Pry until the remaining three points are unsnapped.
-
Once unsnapped, lift the cover.
-
-
-
이 단계는 번역되지 않았습니다. 번역을 도와주십시오
-
Use a plastic opening tool or spudger to remove the adhesive covering the the WIFI connectors.
-
Gently pull the wires at the connection point to disconnect them from the motherboard.
-
-
이 단계는 번역되지 않았습니다. 번역을 도와주십시오
-
Scrape the glued pad underneath the WIFI card to seperate the card from the board.
-
Push apart the two clips holding the WIFI card in the connection.
-
Pull the WIFI card out of the connection.
-


다른 2명이 해당 안내서를 완성하였습니다.
팀

IUPUI, Team 3-2, Baechle Spring 2016 IUPUI, Team 3-2, Baechle Spring 2016 회원
IUPUI-BAECHLE-S16S3G2
4 회원들
안내서 4개 작성하였습니다