이 버전에는 잘못된 편집 사항이 있을 수 있습니다. 최신 확인된 스냅샷으로 전환하십시오.
필요한 것
-
이 단계는 번역되지 않았습니다. 번역을 도와주십시오
-
Slide the notched locking bar on the battery compartment from LOCK to OPEN.
-
-
이 단계는 번역되지 않았습니다. 번역을 도와주십시오
-
Remove the two 1.75mm Phillips #00 screws from inside the battery department.
-
-
이 단계는 번역되지 않았습니다. 번역을 도와주십시오
-
Remove the 1.75mm screw using a Phillips #00 head from underneath the flash.
-
-
이 단계는 번역되지 않았습니다. 번역을 도와주십시오
-
Carefully remove the ribbon of the flash from the socket by using a pair of tweezers.
-
-
이 단계는 번역되지 않았습니다. 번역을 도와주십시오
-
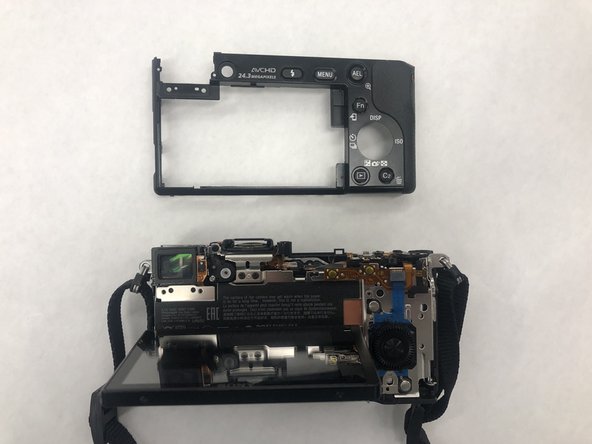
The top of the camera will be free and can be removed.
-
Set the top of the camera to the side.
-
-
-
이 단계는 번역되지 않았습니다. 번역을 도와주십시오
-
Remove the 1.75mm Phillips #00 screw from underneath the SD card cover.
-
-
이 단계는 번역되지 않았습니다. 번역을 도와주십시오
-
Remove the 1.25mm screw from the right side underneath the battery cover.
-
-
이 단계는 번역되지 않았습니다. 번역을 도와주십시오
-
Remove the 1.75mm Phillips #00 screw just to the right of the eye sensor.
-
-
이 단계는 번역되지 않았습니다. 번역을 도와주십시오
-
Remove the two 1.25mm Phillips #00 screws near the top of the camera, just to the left of the eye socket.
-
-
이 단계는 번역되지 않았습니다. 번역을 도와주십시오
-
Remove the two 1.75mm Phillips #00 screws from the bottom of the camera.
-
-
이 단계는 번역되지 않았습니다. 번역을 도와주십시오
-
Remove the three 1.75mm Phillips #00 screws from the right side of the camera.
-
-
이 단계는 번역되지 않았습니다. 번역을 도와주십시오
-
Remove one ribbon that is attached to the selector wheel with a pair of tweezers.
-
-
이 단계는 번역되지 않았습니다. 번역을 도와주십시오
-
lift up the protector plate and remove one ribbon that is attached to the LCD screen with a pair of tweezers.
-
-
이 단계는 번역되지 않았습니다. 번역을 도와주십시오
-
Detach the LCD screen from the back portion of the camera and set it aside.
-
-
이 단계는 번역되지 않았습니다. 번역을 도와주십시오
-
Lift up the black cover to reveal the motherboard and ten ribbons.
-
With a pair of tweezers separate the ribbons from the motherboard by pulling them out of their sockets.
-
-
이 단계는 번역되지 않았습니다. 번역을 도와주십시오
-
Remove the four 1.25mm Phillips #00 screws located on the borders of the motherboard.
-
-
이 단계는 번역되지 않았습니다. 번역을 도와주십시오
-
Remove the power supply at the bottom right hand corner with a pair of tweezers.
-
-
이 단계는 번역되지 않았습니다. 번역을 도와주십시오
-
Lift the motherboard up and remove the last ribbon cable with a pair of tweezers.
-


다른 3명이 해당 안내서를 완성하였습니다.
팀

IUPUI, Team S2-G2, Harley Summer 2019 IUPUI, Team S2-G2, Harley Summer 2019 회원
IUPUI-HARLEY-SU19S2G2
3 회원들
안내서 5개 작성하였습니다
댓글 3개
I have been wondering what path I will take when I replace my battery contacts part and this looks like an ideal guide for how I can do it. I wondered why you don’t discharge the capacitor before removing ribbon cables. When I removed the top block off my nex-6 I did discharge the capacitor as what the service manual suggested before I removed the control dial and flash ribbon cables. Before I did it I found a youtube about using wires to the discharge contacts going to a light bulb to safely discharge the capacitor. The service manual suggests using a short jig R:1 k Ω/1 W but since I don’t have access to an electronics store nearby the youtube did the trick trouble free.
is there a way to fix the hdmi out port without buying a new mother board?