이 버전에는 잘못된 편집 사항이 있을 수 있습니다. 최신 확인된 스냅샷으로 전환하십시오.
필요한 것
-
이 단계는 번역되지 않았습니다. 번역을 도와주십시오
-
Press the battery release button.
-
While pushing the battery button, slide the battery to the left.
-
-
이 단계는 번역되지 않았습니다. 번역을 도와주십시오
-
Open the cassette cover.
-
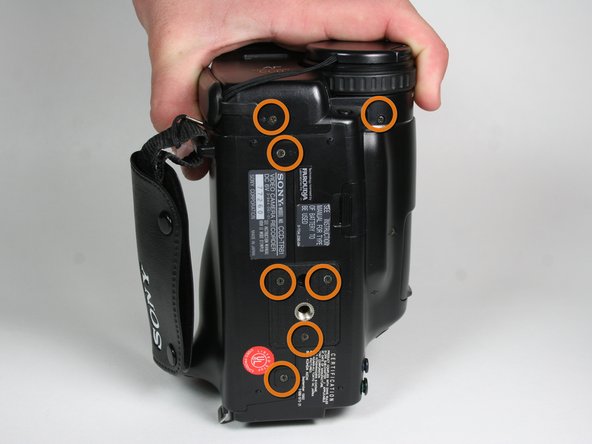
Unscrew 14 screws located on the outer casing. Three are located on the top face 2x6.8mm and 1X4.54mm, three on the left face 1x4.54mm,1x5.3mm and seven on the bottom face 5x4.54mm and 2x6.77mm.
-
-
이 단계는 번역되지 않았습니다. 번역을 도와주십시오
-
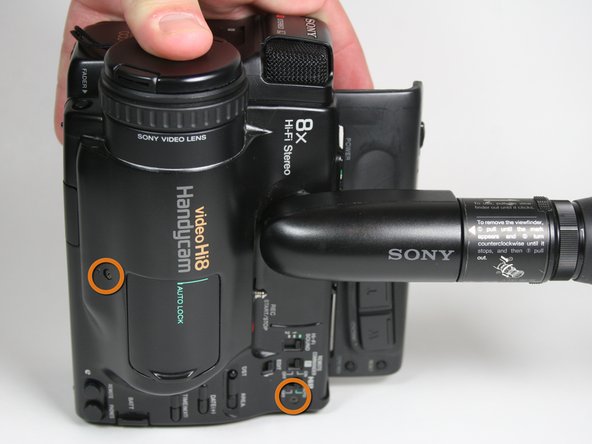
Remove five screws from the right side, from bottom to top, 3x4.54mm 2x5.70mm.
-
Remove the single 4.5 mm screw from the backside.
-
-
-
이 단계는 번역되지 않았습니다. 번역을 도와주십시오
-
Pull off the plastic tape cover by lifting it up and out of the camera base.
-
-
이 단계는 번역되지 않았습니다. 번역을 도와주십시오
-
Remove the three 4.5 mm screws from the right face of the video camera.
-
-
이 단계는 번역되지 않았습니다. 번역을 도와주십시오
-
Remove the single 3.6 mm screw at the front of the video camera on the circuit board.
-
-
이 단계는 번역되지 않았습니다. 번역을 도와주십시오
-
Pull the audio/video inputs underneath the microphone assembly. The inputs should still be connected to the circuit board.
-
-
이 단계는 번역되지 않았습니다. 번역을 도와주십시오
-
Using metal tweezers, pull out the plastic connector box on the front side.
-
Again use metal tweezers to pull out the connection box on the bottom of the camera. The right side of the case can now be removed by pulling it to the right.
-


다른 한 분이 해당 안내서를 완성하였습니다.
팀

Cal Poly, Team 11-25, Maness Winter 2011 Cal Poly, Team 11-25, Maness Winter 2011 회원
CPSU-MANESS-W11S11G25
4 회원들
안내서 5개 작성하였습니다