주요 콘텐츠로 건너뛰기

Sony Cyber-Shot DSC-S90 Battery Door Replacement

필요한 것

  1. Sony Cyber-Shot DSC-S90 Battery Door  Replacement, Batteries: 1 단계, 이미지 2개 중 1개 Sony Cyber-Shot DSC-S90 Battery Door  Replacement, Batteries: 1 단계, 이미지 2개 중 2개
    • Hold down the "open"button (gray oval with arrow pointing upwards) on the battery port door.

    • While holding the button downwards, slide the door upwards to unlock and open the door.

  2. Sony Cyber-Shot DSC-S90 Battery Door  Replacement: 2 단계, 이미지 1개 중 1개
    • Pull open the door and allow the batteries to fall out.

  3. Sony Cyber-Shot DSC-S90 Battery Door  Replacement, Back Case: 3 단계, 이미지 2개 중 1개 Sony Cyber-Shot DSC-S90 Battery Door  Replacement, Back Case: 3 단계, 이미지 2개 중 2개
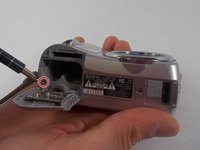
    • Remove the 2mm Phillips #00 screw under the battery port door.

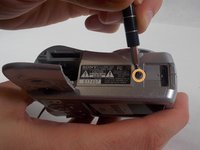
    • Remove the 2mm Phillips #00 screw towards the right of the bottom-side of the camera.

  4. Sony Cyber-Shot DSC-S90 Battery Door  Replacement: 4 단계, 이미지 2개 중 1개 Sony Cyber-Shot DSC-S90 Battery Door  Replacement: 4 단계, 이미지 2개 중 2개
    • Remove the two 2mm Phillips #00 screws (one on each side of the camera).

  5. Sony Cyber-Shot DSC-S90 Battery Door  Replacement: 5 단계, 이미지 2개 중 1개 Sony Cyber-Shot DSC-S90 Battery Door  Replacement: 5 단계, 이미지 2개 중 2개
    • Use an opening tool to unlock the front case from the main body of the camera. Use the tool on the right side and bottom of the camera with the LCD screen facing you.

  6. Sony Cyber-Shot DSC-S90 Battery Door  Replacement: 6 단계, 이미지 1개 중 1개
    • Pull apart the back case from the main body of the camera.

  7. Sony Cyber-Shot DSC-S90 Battery Door  Replacement, Front Case: 7 단계, 이미지 1개 중 1개
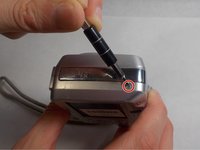
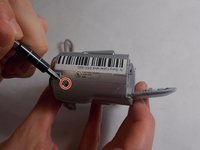
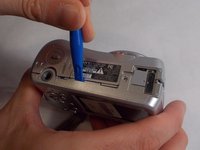
    • Use an opening tool to unlock the front case from the main body of the camera. Use the tool on the top of the camera.

  8. Sony Cyber-Shot DSC-S90 Battery Door  Replacement: 8 단계, 이미지 1개 중 1개
    • Pull apart the front case from the main body of the camera.

  9. Sony Cyber-Shot DSC-S90 Battery Door  Replacement, Battery Door: 9 단계, 이미지 1개 중 1개
    • After the front casing is removed, the battery door hinges off freely.

결론

To reassemble your device, follow these instructions in reverse order.

다른 한 분이 해당 안내서를 완성하였습니다.

작성자

3다른 기여자 명과 함께

Jonathan Arns

회원 가입일: 10/28/19

769 평판

안내서 8개를 작성함

UMass Dartmouth, Team S4-G5, Saloman Fall 2019 UMass Dartmouth, Team S4-G5, Saloman Fall 2019 회원

UMASSD-SALOMAN-F19S4G5

3 회원들

안내서 20개를 작성함

0가이드 댓글

댓글 쓰기

조회 통계:

지난 24시간: 2

지난 7일: 8

지난 30일: 26

전체 시간: 1,160