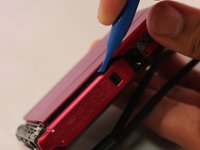
주요 콘텐츠로 건너뛰기

Sony Cyber-Shot DSC-TX30 Outer Shell Replacement

필요한 것

  1. Sony Cyber-Shot DSC-TX30 Outer Shell Replacement, Battery: 1 단계, 이미지 1/2 Sony Cyber-Shot DSC-TX30 Outer Shell Replacement, Battery: 1 단계, 이미지 2/2
    • Using your finger, slide the release catch to unlock the battery/memory card cover.

  2. Sony Cyber-Shot DSC-TX30 Outer Shell Replacement: 2 단계, 이미지 1/2 Sony Cyber-Shot DSC-TX30 Outer Shell Replacement: 2 단계, 이미지 2/2
    • Open the battery/memory card door.

  3. Sony Cyber-Shot DSC-TX30 Outer Shell Replacement: 3 단계, 이미지 1/2 Sony Cyber-Shot DSC-TX30 Outer Shell Replacement: 3 단계, 이미지 2/2
    • Push the battery eject lever to free the battery.

  4. Sony Cyber-Shot DSC-TX30 Outer Shell Replacement: 4 단계, 이미지 1/1
    • Remove the battery from the device.

  5. Sony Cyber-Shot DSC-TX30 Outer Shell Replacement, Outer Shell: 5 단계, 이미지 1/1
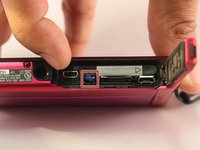
    • Using a Phillips #00 screwdriver, remove one black 2 2/5mm screw that is located next to the wrist band loop.

  6. Sony Cyber-Shot DSC-TX30 Outer Shell Replacement: 6 단계, 이미지 1/1
    • Using the plastic opening tool, separate the edge-casing from the rest of the camera.

  7. Sony Cyber-Shot DSC-TX30 Outer Shell Replacement: 7 단계, 이미지 1/2 Sony Cyber-Shot DSC-TX30 Outer Shell Replacement: 7 단계, 이미지 2/2
    • Pull the edge-casing off of the camera.

  8. Sony Cyber-Shot DSC-TX30 Outer Shell Replacement: 8 단계, 이미지 1/1
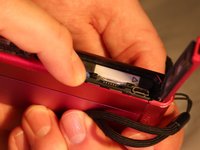
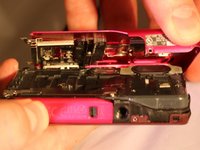
    • Using a Phillips #00 screwdriver, remove one silver 3mm screw located on the front side of the camera.

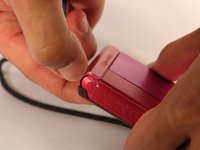
    • Using a Phillips #00 screwdriver, remove one silver 5 2/5mm screw located on the front side of the camera

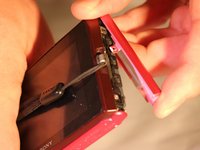
    • Using a Phillips #00 screwdriver, remove one black 2 1/2mm screw located on the front side of the camera.

  9. Sony Cyber-Shot DSC-TX30 Outer Shell Replacement: 9 단계, 이미지 1/1
    • Using a Phillips #00 screwdriver, remove one 2 1/2mm screw located near the wrist strap.

  10. Sony Cyber-Shot DSC-TX30 Outer Shell Replacement: 10 단계, 이미지 1/1
    • Using a Phillips #00 screwdriver remove one black 2 2/5mm screw near the tripod slot on the bottom of the casing.

  11. Sony Cyber-Shot DSC-TX30 Outer Shell Replacement: 11 단계, 이미지 1/1
    • Using a Phillips #00 screwdriver remove the two 2 2/5mm black screws from the side of the camera opposite of the wrist strap

  12. Sony Cyber-Shot DSC-TX30 Outer Shell Replacement: 12 단계, 이미지 1/2 Sony Cyber-Shot DSC-TX30 Outer Shell Replacement: 12 단계, 이미지 2/2
    • Using the plastic opening tool, open the device's outer shell.

  13. Sony Cyber-Shot DSC-TX30 Outer Shell Replacement: 13 단계, 이미지 1/2 Sony Cyber-Shot DSC-TX30 Outer Shell Replacement: 13 단계, 이미지 2/2
    • Remove the front casing of the device.

결론

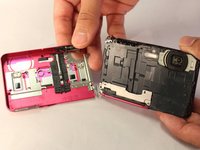
To reassemble your device, follow these instructions in reverse order.

Kellen Fulkerson

회원 가입일: 04/11/17

689 평판

안내서 6개 작성하였습니다

댓글 한 개

hello sir do you have sony tx30 case ? because my battery lock hole loose … please thanks

John Anthony Geronez - 답글

댓글 쓰기

조회 통계:

24 시간 전: 0

7일 전: 0

30일 전: 5

전체 시간: 824