주요 콘텐츠로 건너뛰기
수리 커뮤니티 가입 - 계정 만들기

Sony Cyber-shot DSC-HX300 HDMI/USB port Replacement

필요한 것

    1. Sony Cyber-shot DSC-HX300 HDMI/USB port Replacement, Battery: 1 단계, 이미지 1개 중 1개
      • Make sure the camera is powered off

      • Turn the camera upside down. This is a view of the bottom of the camera.

      댓글 쓰기

    2. Sony Cyber-shot DSC-HX300 HDMI/USB port Replacement: 2 단계, 이미지 1개 중 1개
      • Push battery cover away from the camera.

      댓글 쓰기

    3. Sony Cyber-shot DSC-HX300 HDMI/USB port Replacement: 3 단계, 이미지 1개 중 1개
      • Push the blue tab that secures the battery. The battery will then spring out.

      댓글 쓰기

    4. Sony Cyber-shot DSC-HX300 HDMI/USB port Replacement: 4 단계, 이미지 2개 중 1개 Sony Cyber-shot DSC-HX300 HDMI/USB port Replacement: 4 단계, 이미지 2개 중 2개
      • Remove the battery.

      댓글 쓰기

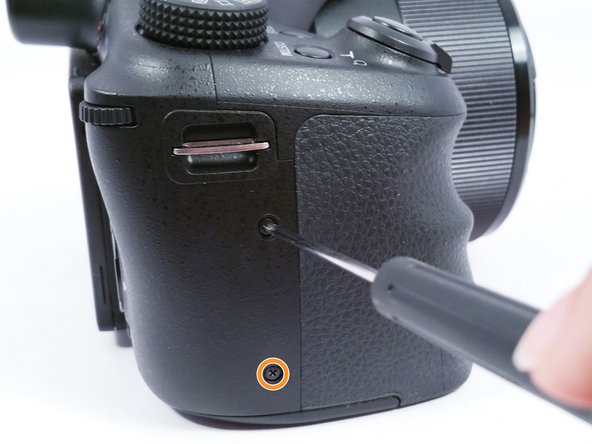
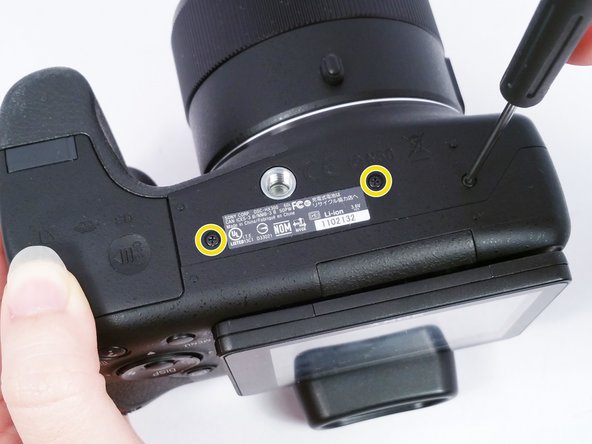
    1. Sony Cyber-shot DSC-HX300 HDMI/USB port Replacement, Motherboard: 5 단계, 이미지 3개 중 1개 Sony Cyber-shot DSC-HX300 HDMI/USB port Replacement, Motherboard: 5 단계, 이미지 3개 중 2개 Sony Cyber-shot DSC-HX300 HDMI/USB port Replacement, Motherboard: 5 단계, 이미지 3개 중 3개
      • Make sure to remove the battery before disassembly to prevent electrocution.

      • Remove the 3 (4 cm) Phillips head screws located on the back of the camera.

      • Remove the 2 (4 cm) Phillips head screws on the right side of the camera.

      • Turn the camera upside down to remove the remaining the 3 (4 cm) Phillips head screws holding the plastic camera housing together.

      댓글 쓰기

    2. Sony Cyber-shot DSC-HX300 HDMI/USB port Replacement: 6 단계, 이미지 2개 중 1개 Sony Cyber-shot DSC-HX300 HDMI/USB port Replacement: 6 단계, 이미지 2개 중 2개
      • Using a plastic opening tool, separate the plastic camera housing.

      댓글 쓰기

    3. Sony Cyber-shot DSC-HX300 HDMI/USB port Replacement: 7 단계, 이미지 1개 중 1개
      • Disconnect the ribbon wire attaching the screen to the camera.

      댓글 쓰기

    4. Sony Cyber-shot DSC-HX300 HDMI/USB port Replacement: 8 단계, 이미지 3개 중 1개 Sony Cyber-shot DSC-HX300 HDMI/USB port Replacement: 8 단계, 이미지 3개 중 2개 Sony Cyber-shot DSC-HX300 HDMI/USB port Replacement: 8 단계, 이미지 3개 중 3개
      • Carefully remove the 7 ribbon wires connected to the mother board.

      • Remove the 2 (5 cm) Phillips head screws on the speaker mounting bracket.

      • Remove the 3 (4 cm) Phillips head screws that secure the motherboard to the camera.

      • Lift up on the speaker mounting bracket to remove it.

      댓글 쓰기

    5. Sony Cyber-shot DSC-HX300 HDMI/USB port Replacement: 9 단계, 이미지 2개 중 1개 Sony Cyber-shot DSC-HX300 HDMI/USB port Replacement: 9 단계, 이미지 2개 중 2개
      • Carefully disconnect the ribbon wire connecting the HDMI port to the Motherboard.

      • Once the Motherboard is removed the replacement can be installed.

      댓글 쓰기

    1. Sony Cyber-shot DSC-HX300 HDMI/USB port Replacement, HDMI/USB port: 10 단계, 이미지 1개 중 1개
      • Remove the 3 (4 cm) Phillips head screws securing a mounting bracket over the HDMI/USB Port.

      댓글 쓰기

    2. Sony Cyber-shot DSC-HX300 HDMI/USB port Replacement: 11 단계, 이미지 1개 중 1개
      • Lift up on the mounting bracket to remove the HDMI/USB Port from the camera.

      댓글 쓰기

    3. Sony Cyber-shot DSC-HX300 HDMI/USB port Replacement: 12 단계, 이미지 1개 중 1개
      • Once the HDMI/USB Port is removed the replacement can be installed.

      댓글 쓰기

결론

To reassemble your device, follow these instructions in reverse order.

취소: 해당 안내서를 완성하지 않았습니다.

다른 3명이 해당 안내서를 완성하였습니다.

작성자

3다른 기여자 명과 함께

Elizabeth Surface

회원 가입일: 08/26/15

1,477 평판

안내서 9개를 작성함

USF Tampa, Team 4-6, Meier Fall 2015 USF Tampa, Team 4-6, Meier Fall 2015 회원

USFT-MEIER-F15S4G6

4 회원들

안내서 108개를 작성함

0가이드 댓글

댓글 쓰기

조회 통계:

지난 24시간: 2

지난 7일: 15

지난 30일: 50

전체 시간: 2,156