주요 콘텐츠로 건너뛰기

Sony Cyber-shot DSC-W5 Motherboard Replacement

필요한 것

  1. Sony Cyber-shot DSC-W5 Motherboard Replacement, Back Cover: 1 단계, 이미지 1/1
    • Remove Memory Stick Pro from the card reader slot on the bottom of the camera.

    • Remove both batteries.

  2. Sony Cyber-shot DSC-W5 Motherboard Replacement: 2 단계, 이미지 1/2 Sony Cyber-shot DSC-W5 Motherboard Replacement: 2 단계, 이미지 2/2
    • Remove the single visible screw from both sides of the camera.

    • Remove the two screws that are adjacent to the warning label, which is on the underside of the camera.

    • Do NOT remove all four screws from the bottom.

  3. Sony Cyber-shot DSC-W5 Motherboard Replacement: 3 단계, 이미지 1/2 Sony Cyber-shot DSC-W5 Motherboard Replacement: 3 단계, 이미지 2/2
    • Gently remove the back cover from the camera.

    • The first time the case is removed, it will be stiff. Be patient and gently rock the cover back and forth until it slides free.

  4. Sony Cyber-shot DSC-W5 Motherboard Replacement, LCD Screen: 4 단계, 이미지 1/2 Sony Cyber-shot DSC-W5 Motherboard Replacement, LCD Screen: 4 단계, 이미지 2/2
    • Remove the two screws holding the circuit board down.

    what to do if i cannot remove the screws

    aarushi salunkhe - 답글

  5. Sony Cyber-shot DSC-W5 Motherboard Replacement: 5 단계, 이미지 1/1
    • Detach the orange cable from the board.

    • Use a thin object, like a paperclip, to gently pry the cable off the connector.

  6. Sony Cyber-shot DSC-W5 Motherboard Replacement: 6 단계, 이미지 1/2 Sony Cyber-shot DSC-W5 Motherboard Replacement: 6 단계, 이미지 2/2
    • The LCD screen sits in two slots; one on the bottom, and one on the left edge.

    • Slide LCD screen from the two slots.

    • Do not attempt to completely remove the screen, as it is still attached to the camera.

  7. Sony Cyber-shot DSC-W5 Motherboard Replacement: 7 단계, 이미지 1/3 Sony Cyber-shot DSC-W5 Motherboard Replacement: 7 단계, 이미지 2/3 Sony Cyber-shot DSC-W5 Motherboard Replacement: 7 단계, 이미지 3/3
    • To remove the LCD screen, detach the orange cable from the board.

    • If needed, replace the LCD screen.

  8. Sony Cyber-shot DSC-W5 Motherboard Replacement, Speaker: 8 단계, 이미지 1/2 Sony Cyber-shot DSC-W5 Motherboard Replacement, Speaker: 8 단계, 이미지 2/2
    • Remove the two screws holding down the steel back plate.

    • Remove steel back plate.

  9. Sony Cyber-shot DSC-W5 Motherboard Replacement: 9 단계, 이미지 1/2 Sony Cyber-shot DSC-W5 Motherboard Replacement: 9 단계, 이미지 2/2
    • Now remove the plastic plate that covers the motherboard.

    Below and to the left of the viewfinder there is a vertical slot in the motherboard with a soldered connection to the flash capacitor on each side. Using a small screwdriver with an INSULATED handle, short these together for several seconds to discharge the potentially dangerous charge.

    Philip Le Riche - 답글

  10. Sony Cyber-shot DSC-W5 Motherboard Replacement: 10 단계, 이미지 1/2 Sony Cyber-shot DSC-W5 Motherboard Replacement: 10 단계, 이미지 2/2
    • Warning: Electric Shock From this point on, hold the camera by the chrome edges ONLY. Capacitors store electric charge even if the batteries are removed.

    • Remove the blue cable.

  11. Sony Cyber-shot DSC-W5 Motherboard Replacement: 11 단계, 이미지 1/2 Sony Cyber-shot DSC-W5 Motherboard Replacement: 11 단계, 이미지 2/2
    • Disconnect the flash cable (black and white wires) before completely removing the front case.

    • Gently start to remove the case.

    • Once the cable is free, set aside the front case.

    If the front doesn't seem to want to come away, maybe the flash cable is caught around its socket.

    Philip Le Riche - 답글

  12. Sony Cyber-shot DSC-W5 Motherboard Replacement: 12 단계, 이미지 1/2 Sony Cyber-shot DSC-W5 Motherboard Replacement: 12 단계, 이미지 2/2
    • The speaker should now be clearly seen on the underside of the camera.

    • Gently unplug the speaker from the motherboard.

    • Replace the speaker.

  13. Sony Cyber-shot DSC-W5 Motherboard Replacement, Battery Terminal: 13 단계, 이미지 1/2 Sony Cyber-shot DSC-W5 Motherboard Replacement, Battery Terminal: 13 단계, 이미지 2/2
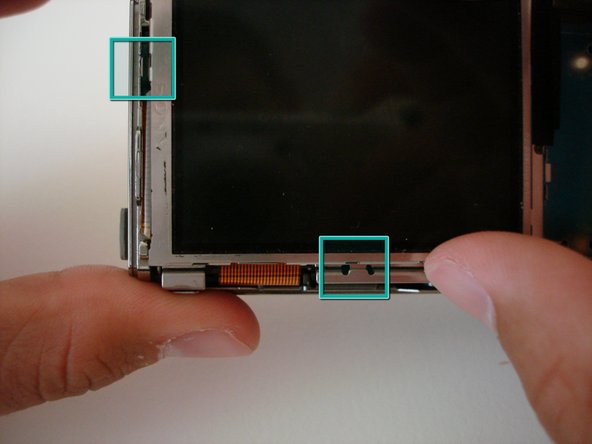
    • Remove the orange cable connecting the battery terminal to the motherboard.

  14. Sony Cyber-shot DSC-W5 Motherboard Replacement: 14 단계, 이미지 1/1
    • The battery terminal is now free from the board and can be slid out.

  15. Sony Cyber-shot DSC-W5 Motherboard Replacement, Lens: 15 단계, 이미지 1/3 Sony Cyber-shot DSC-W5 Motherboard Replacement, Lens: 15 단계, 이미지 2/3 Sony Cyber-shot DSC-W5 Motherboard Replacement, Lens: 15 단계, 이미지 3/3
    • Detach two cables that go from the motherboard to the lens.

    • Remove lens.

  16. Sony Cyber-shot DSC-W5 Motherboard Replacement, Motherboard: 16 단계, 이미지 1/1
    • After the lens is detached, you can replace the motherboard.

결론

To reassemble your device, follow these instructions in reverse order.

다른 2명이 해당 안내서를 완성하였습니다.

Thomas

회원 가입일: 04/14/10

133 평판

안내서 6개 작성하였습니다

Cal Poly, Team 15-50, Garner Spring 2010 Cal Poly, Team 15-50, Garner Spring 2010 회원

CPSU-GARNER-S10S15G50

5 회원들

안내서 12개 작성하였습니다

댓글 한 개

Thank yo very much, Muy agradecido por la información. Good information fireman4792000@yahoo.com

Jorge - 답글

댓글 쓰기

조회 통계:

24 시간 전: 0

7일 전: 2

30일 전: 3

전체 시간: 5,679