이 버전에는 잘못된 편집 사항이 있을 수 있습니다. 최신 확인된 스냅샷으로 전환하십시오.
필요한 것
-
이 단계는 번역되지 않았습니다. 번역을 도와주십시오
-
Remove Memory Stick Pro from the card reader slot on the bottom of the camera.
-
Remove both batteries.
-
-
이 단계는 번역되지 않았습니다. 번역을 도와주십시오
-
Remove the single visible screw from both sides of the camera.
-
Remove the two screws that are adjacent to the warning label, which is on the underside of the camera.
-
-
이 단계는 번역되지 않았습니다. 번역을 도와주십시오
-
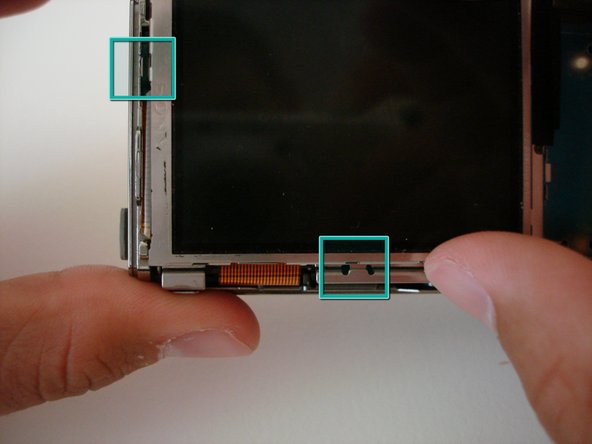
The LCD screen sits in two slots; one on the bottom, and one on the left edge.
-
Slide LCD screen from the two slots.
-
-
-
이 단계는 번역되지 않았습니다. 번역을 도와주십시오
-
To remove the LCD screen, detach the orange cable from the board.
-
If needed, replace the LCD screen.
-
-
이 단계는 번역되지 않았습니다. 번역을 도와주십시오
-
Remove the two screws holding down the steel back plate.
-
Remove steel back plate.
-
-
이 단계는 번역되지 않았습니다. 번역을 도와주십시오
-
Disconnect the flash cable (black and white wires) before completely removing the front case.
-
Gently start to remove the case.
-
Once the cable is free, set aside the front case.
-
-
이 단계는 번역되지 않았습니다. 번역을 도와주십시오
-
The speaker should now be clearly seen on the underside of the camera.
-
Gently unplug the speaker from the motherboard.
-
Replace the speaker.
-
-
이 단계는 번역되지 않았습니다. 번역을 도와주십시오
-
Remove the orange cable connecting the battery terminal to the motherboard.
-
-
이 단계는 번역되지 않았습니다. 번역을 도와주십시오
-
Detach two cables that go from the motherboard to the lens.
-
Remove lens.
-


다른 2명이 해당 안내서를 완성하였습니다.
팀

Cal Poly, Team 15-50, Garner Spring 2010 Cal Poly, Team 15-50, Garner Spring 2010 회원
CPSU-GARNER-S10S15G50
5 회원들
안내서 12개 작성하였습니다