주요 콘텐츠로 건너뛰기

Sony Cyber-shot DSC-W800 Motherboard Replacement

필요한 것

  1. Sony Cyber-shot DSC-W800 Motherboard Replacement, Button Board: 1 단계, 이미지 3개 중 1개 Sony Cyber-shot DSC-W800 Motherboard Replacement, Button Board: 1 단계, 이미지 3개 중 2개 Sony Cyber-shot DSC-W800 Motherboard Replacement, Button Board: 1 단계, 이미지 3개 중 3개
    • Remove the five 4.0 mm Phillips #000 screws on the back panel.

  2. Sony Cyber-shot DSC-W800 Motherboard Replacement: 2 단계, 이미지 2개 중 1개 Sony Cyber-shot DSC-W800 Motherboard Replacement: 2 단계, 이미지 2개 중 2개
    • Using the Spudger, remove the back panel from the device.

    • The loose piece circled in the picture will most likely fall off the camera housing.

  3. Sony Cyber-shot DSC-W800 Motherboard Replacement: 3 단계, 이미지 3개 중 1개 Sony Cyber-shot DSC-W800 Motherboard Replacement: 3 단계, 이미지 3개 중 2개 Sony Cyber-shot DSC-W800 Motherboard Replacement: 3 단계, 이미지 3개 중 3개
    이 단계에 사용된 도구:
    Tweezers
    $4.99
    • Remove the two 2.15mm Phillips #000 screws from the circuit board.

    • Gently pull on the ribbon wire from ZIF connector with the tweezers to remove the button board.

    • Ribbon wires can easily be damaged.

  4. Sony Cyber-shot DSC-W800 Motherboard Replacement, LCD Screen: 4 단계, 이미지 1개 중 1개
    • Remove the four 3.75 mm Phillips #000 screws from the LCD back panel.

  5. Sony Cyber-shot DSC-W800 Motherboard Replacement: 5 단계, 이미지 1개 중 1개
    • Lift the back panel and separate the LCD Screen by prying it up.

    • Remove the back panel.

  6. Sony Cyber-shot DSC-W800 Motherboard Replacement: 6 단계, 이미지 2개 중 1개 Sony Cyber-shot DSC-W800 Motherboard Replacement: 6 단계, 이미지 2개 중 2개
    이 단계에 사용된 도구:
    Tweezers
    $4.99
    • Gently pull on the ribbon wire disconnecting from the ZIF connector (connecting the LCD screen to the motherboard) with the tweezers.

    • Ribbon wires can be easily damaged.

  7. Sony Cyber-shot DSC-W800 Motherboard Replacement, Lens: 7 단계, 이미지 2개 중 1개 Sony Cyber-shot DSC-W800 Motherboard Replacement, Lens: 7 단계, 이미지 2개 중 2개
    • With plastic opening tool, gently pry loose the front panel.

    • Separate front panel from the camera housing.

  8. Sony Cyber-shot DSC-W800 Motherboard Replacement: 8 단계, 이미지 3개 중 1개 Sony Cyber-shot DSC-W800 Motherboard Replacement: 8 단계, 이미지 3개 중 2개 Sony Cyber-shot DSC-W800 Motherboard Replacement: 8 단계, 이미지 3개 중 3개
    이 단계에 사용된 도구:
    Tweezers
    $4.99
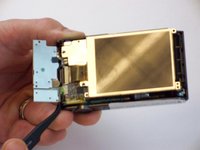
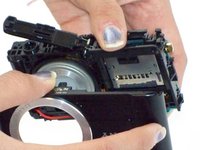
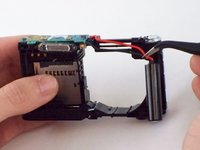
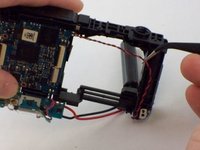
    • Remove the lens housing by pushing it, from the front, through the housing and lifting it out.

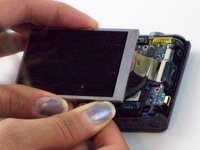
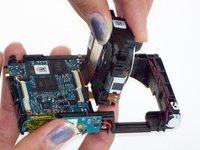
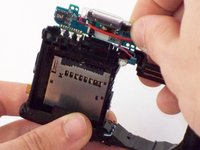
    • Gently pull on the large ribbon wire (connecting the Lens housing to the motherboard via ZIF connector) with the tweezers.

    • Gently pull on the small ribbon wire (connecting the Lens housing to the motherboard) with the tweezers.

    • Be careful not to damage either of the ribbon wires.

  9. Sony Cyber-shot DSC-W800 Motherboard Replacement, Motherboard: 9 단계, 이미지 1개 중 1개
    • Remove the single 3.75 mm Phillips #000 screw from the base of the motherboard.

  10. Sony Cyber-shot DSC-W800 Motherboard Replacement: 10 단계, 이미지 1개 중 1개
    • Remove the two 3.5 mm Phillips #000 screws from the secondary board that is attached to the flash bulb.

  11. Sony Cyber-shot DSC-W800 Motherboard Replacement: 11 단계, 이미지 3개 중 1개 Sony Cyber-shot DSC-W800 Motherboard Replacement: 11 단계, 이미지 3개 중 2개 Sony Cyber-shot DSC-W800 Motherboard Replacement: 11 단계, 이미지 3개 중 3개
    이 단계에 사용된 도구:
    Tweezers
    $4.99
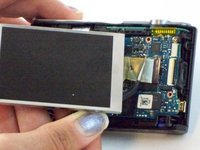
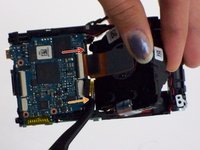
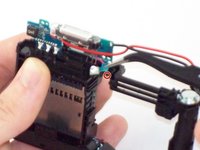
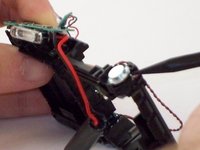
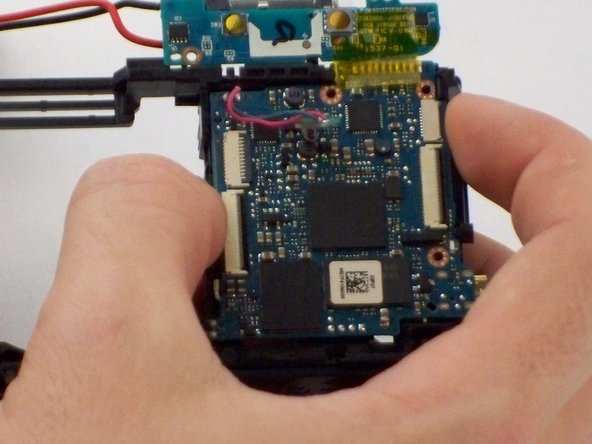
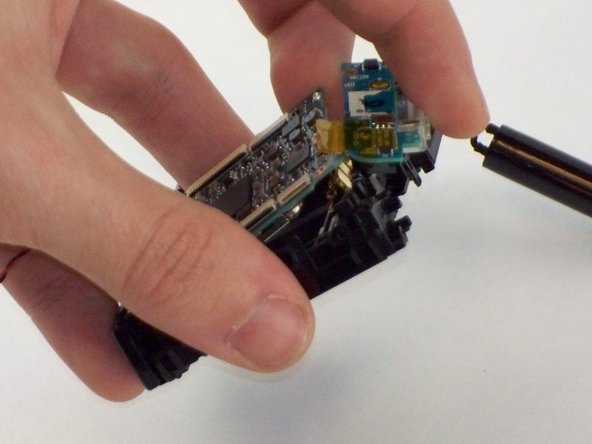
    • Use the tweezers. Move the thick red cable, attached to the secondary board, outside of its place in the camera housing.

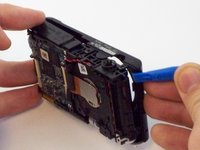
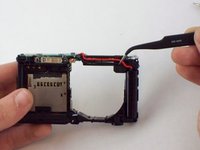
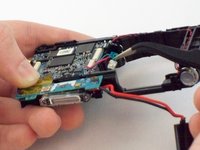
    • Gently pull on the red/black wire in order to free the photo lens cylinder from the housing.

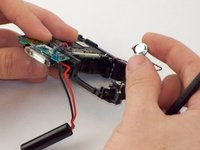
    • Remove the secondary board from its position and move it upward, out of the way.

    • From this point on, do not damage the connection between the motherboard and the secondary board.

  12. Sony Cyber-shot DSC-W800 Motherboard Replacement: 12 단계, 이미지 2개 중 1개 Sony Cyber-shot DSC-W800 Motherboard Replacement: 12 단계, 이미지 2개 중 2개
    • Using the tweezers, pull the indicator bulb out , freeing it from its position on the housing.

    • Thread the indicator bulb under and through the secondary boards position.

  13. Sony Cyber-shot DSC-W800 Motherboard Replacement: 13 단계, 이미지 3개 중 1개 Sony Cyber-shot DSC-W800 Motherboard Replacement: 13 단계, 이미지 3개 중 2개 Sony Cyber-shot DSC-W800 Motherboard Replacement: 13 단계, 이미지 3개 중 3개
    • Using the tweezers, remove the black/red speaker wire from camera housing.

    • Pry loose and remove the speaker from the camera housing.

    • The speaker is attached with adhesive and must be removed with the spudger and moderate force.

  14. Sony Cyber-shot DSC-W800 Motherboard Replacement: 14 단계, 이미지 2개 중 1개 Sony Cyber-shot DSC-W800 Motherboard Replacement: 14 단계, 이미지 2개 중 2개
    • Using the spudger, remove the mini speaker from the housing.

  15. Sony Cyber-shot DSC-W800 Motherboard Replacement: 15 단계, 이미지 3개 중 1개 Sony Cyber-shot DSC-W800 Motherboard Replacement: 15 단계, 이미지 3개 중 2개 Sony Cyber-shot DSC-W800 Motherboard Replacement: 15 단계, 이미지 3개 중 3개
    • Pull up on the bottom-half of the motherboard, slightly removing it from its position in the housing.

    • With enough force, pull up on the top right of the motherboard, pulling it entirely from its position in the housing.

    • Once again, be sure to keep the motherboard and secondary board connection intact.

  16. Sony Cyber-shot DSC-W800 Motherboard Replacement: 16 단계, 이미지 1개 중 1개
    • Once apart, completely separate motherboard from the housing.

결론

To reassemble your device, follow these instructions in reverse order.

다른 2명이 해당 안내서를 완성하였습니다.

작성자

4다른 기여자 명과 함께

Thomas Campo

회원 가입일: 02/09/16

827 평판

안내서 4개를 작성함

USF Tampa, Team 17-5, Blackwell Winter 2016 USF Tampa, Team 17-5, Blackwell Winter 2016 회원

USFT-BLACKWELL-W16S17G5

5 회원들

안내서 5개를 작성함

댓글 0개

댓글 쓰기

조회 통계:

지난 24시간: 5

지난 7일: 15

지난 30일: 33

전체 시간: 1,422