주요 콘텐츠로 건너뛰기

Sony HDR-PJ410 Lens Replacement

필요한 것

  1. Sony HDR-PJ410 Lens Replacement, Remove The Battery: 1 단계, 이미지 1/3 Sony HDR-PJ410 Lens Replacement, Remove The Battery: 1 단계, 이미지 2/3 Sony HDR-PJ410 Lens Replacement, Remove The Battery: 1 단계, 이미지 3/3
    • Pull the battery cover outwards to unlock it.

    • Then, push the small blue tab outwards to unlock the battery.

    • Finally, pull the battery out.

    • Pull the battery up and outwards to "unhook" it from the camera body.

  2. Sony HDR-PJ410 Lens Replacement, Remove the screws on the bottom: 3 단계, 이미지 1/1
    • Remove the 4x #000 Philips screws from the bottom of the camera.

  3. Sony HDR-PJ410 Lens Replacement, Remove the screws from the right panel: 4 단계, 이미지 1/1
    • Remove the 2x #000 Philips screws from the right side of the camera.

  4. Sony HDR-PJ410 Lens Replacement, Remove the left side screw: 5 단계, 이미지 1/1
    • Flip open the LCD screen.

    • Remove the #000 Philips screw from top left side of the camera.

  5. Sony HDR-PJ410 Lens Replacement, Remove the screw next to the LCD: 6 단계, 이미지 1/1
    • Remove the #000 Philips screw next to the top right corner of the LCD.

  6. Sony HDR-PJ410 Lens Replacement, Remove the small back plastic panel: 7 단계, 이미지 1/3 Sony HDR-PJ410 Lens Replacement, Remove the small back plastic panel: 7 단계, 이미지 2/3 Sony HDR-PJ410 Lens Replacement, Remove the small back plastic panel: 7 단계, 이미지 3/3
    • Use the Opening Tool to remove the small plastic panel from the back of the camera.

  7. Sony HDR-PJ410 Lens Replacement, Remove the top back screw: 8 단계, 이미지 1/1
    • Remove #000 Philips screw from the top back of the camera, under the panel we removed on step 7.

  8. Sony HDR-PJ410 Lens Replacement, Remove front hinge cover: 9 단계, 이미지 1/1
    • Use a guitar pick or an opening tool to remove the plastic cover of the hinge that holds the LCD screen.

  9. Sony HDR-PJ410 Lens Replacement, Remove top and right side panel: 10 단계, 이미지 1/2 Sony HDR-PJ410 Lens Replacement, Remove top and right side panel: 10 단계, 이미지 2/2
    • Use guitar picks to pry off the entire top and right panel of the camera (they are one piece).

    • It might be difficult to remove at first. Do not try to remove the panel forcefully or you will break the plastic clips that hold it down.

  10. Sony HDR-PJ410 Lens Replacement, Remove the outer lens cover: 11 단계, 이미지 1/1
    • Remove the silver colored outer lens cover using a guitar pick or an opening tool.

  11. Sony HDR-PJ410 Lens Replacement, Remove the inner lens cover screw: 12 단계, 이미지 1/1
    • Remove the screw at the front of the camera on the bottom right corner, that holds the inner lens cover in place.

  12. Sony HDR-PJ410 Lens Replacement, Remove the inner lens cover: 13 단계, 이미지 1/1
    • Very carefully remove the inner lens cover by pulling it outwards.

    • The microphone is glued on the inner lens cover and connected via a ribbon cable to the board. If the lens cover is pulled too hard the microphone ribbon cable can break, rendering the microphone of the camera useless. Pull the lens cover very carefully.

  13. Sony HDR-PJ410 Lens Replacement, Disconnect microphone ribbon cable: 14 단계, 이미지 1/2 Sony HDR-PJ410 Lens Replacement, Disconnect microphone ribbon cable: 14 단계, 이미지 2/2
    이 단계에 사용된 도구:
    Tweezers
    $4.99
    구매
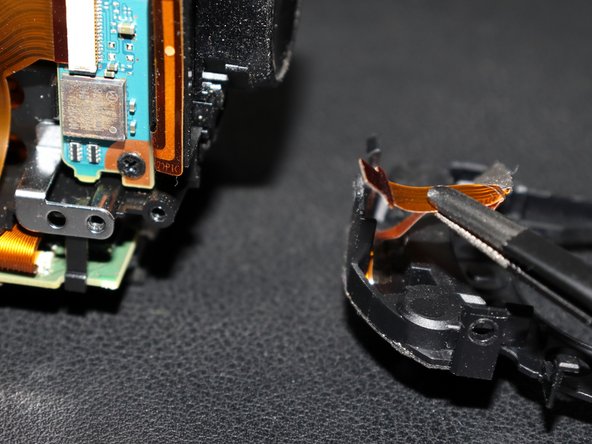
    • Disconnect the ribbon cable of the microphone from the board carefully using a pair of tweezers.

    • When disconnecting ribbon cables, always pull the end of the cable, the connector, and never pull the cable itself. Ribbon cables, especially small ones like this are very fragile.

  14. Sony HDR-PJ410 Lens Replacement, Replace the lens: 15 단계, 이미지 1/2 Sony HDR-PJ410 Lens Replacement, Replace the lens: 15 단계, 이미지 2/2
    • Remove the 3x #000 Philips screws that hold the lens in place.

    • Then, carefully pull the old lens out.

    • Then follow this step in reverse to install the new lens. Put the lens in place and then screw the 3 screws again.

    • Avoid touching the replacement lens. It's a good idea to clean the new lens with a microfiber cloth before putting it in place to remove any fingerprints or dust.

결론

To reassemble your device, follow these instructions in reverse order.

Stratos Thivaios

회원 가입일: 02/27/23

1,227 평판

안내서 5개 작성하였습니다

댓글 0개

댓글 쓰기

조회 통계:

24 시간 전: 0

7일 전: 4

30일 전: 8

전체 시간: 25