주요 콘텐츠로 건너뛰기

Sony Handycam HDR-CX580V Motherboard Replacement

필요한 것

  1. Sony Handycam HDR-CX580V Motherboard Replacement, Battery: 1 단계, 이미지 1/1
    • Locate the slider labeled "BATT" and pull it back from the battery with your thumb.

  2. Sony Handycam HDR-CX580V Motherboard Replacement: 2 단계, 이미지 1/1
    • At this point, you should be able to remove the battery by simply lifting it from the camera.

    • The camera provided for guide-creation did not include a battery. However, the battery position should be the same.

  3. Sony Handycam HDR-CX580V Motherboard Replacement, Recording Button: 3 단계, 이미지 1/3 Sony Handycam HDR-CX580V Motherboard Replacement, Recording Button: 3 단계, 이미지 2/3 Sony Handycam HDR-CX580V Motherboard Replacement, Recording Button: 3 단계, 이미지 3/3
    • Use the Phillips #00 head to remove the following 5.5mm screws on the left-hand side.

  4. Sony Handycam HDR-CX580V Motherboard Replacement: 4 단계, 이미지 1/1
    • Use the Phillips #00 head to remove the following 5.5mm screws on the empty battery socket.

  5. Sony Handycam HDR-CX580V Motherboard Replacement: 5 단계, 이미지 1/1
    • Use the Phillips #00 head to remove the following 5.5mm screws on the bottom.

  6. Sony Handycam HDR-CX580V Motherboard Replacement: 6 단계, 이미지 1/1
    • Fold back the hinging panel on the top of the camera located near the lens.

    • Use the Phillips #00 head to remove the following 5.5mm screws on the top under the hinging panel.

  7. Sony Handycam HDR-CX580V Motherboard Replacement: 7 단계, 이미지 1/2 Sony Handycam HDR-CX580V Motherboard Replacement: 7 단계, 이미지 2/2
    • Slide back the cover for the DC and A/V ports on the right-hand side.

    • Use the Phillips #00 head to remove the following 5.5mm screws underneath the cover and on the right-hand side.

  8. Sony Handycam HDR-CX580V Motherboard Replacement: 8 단계, 이미지 1/1
    • Use the plastic opener tool to loosen the casing on the bottom and the right-hand side.

    • At this point, the right-hand side should simply come off, although it will still be connected with internal wiring.

    • Be delicate with the wiring still attached to the side casing until you have access to removing them later.

  9. Sony Handycam HDR-CX580V Motherboard Replacement: 9 단계, 이미지 1/3 Sony Handycam HDR-CX580V Motherboard Replacement: 9 단계, 이미지 2/3 Sony Handycam HDR-CX580V Motherboard Replacement: 9 단계, 이미지 3/3
    • Carefully remove the bottom casing with your fingers.

    • Be careful not to loose the small metal stand-mount pieces that lay underneath the casing.

  10. Sony Handycam HDR-CX580V Motherboard Replacement: 10 단계, 이미지 1/1
    • Look at the right side of the camera (the side with the recording button) while holding back the detached casing.

    • Use the Phillips #00 head to remove the following 5.5mm screws near the recording button.

  11. Sony Handycam HDR-CX580V Motherboard Replacement: 11 단계, 이미지 1/1
    • Use the curved tweezers to carefully detach the blue ribbon cable connector from the body of the camera.

    • The recording button and its blue ribbon cable connector should become detached from the body, but remain connected to the top casing.

  12. Sony Handycam HDR-CX580V Motherboard Replacement: 12 단계, 이미지 1/2 Sony Handycam HDR-CX580V Motherboard Replacement: 12 단계, 이미지 2/2
    • Pull off the top casing by lightly grabbing either side and pulling towards the back of the camera.

  13. Sony Handycam HDR-CX580V Motherboard Replacement: 13 단계, 이미지 1/1
    • Use the Phillips #00 head to remove the following 5.5mm screws on the inside of the top casing.

  14. Sony Handycam HDR-CX580V Motherboard Replacement: 14 단계, 이미지 1/1
    • Carefully remove the metal frame from the top casing.

  15. Sony Handycam HDR-CX580V Motherboard Replacement: 15 단계, 이미지 1/1
    • You are now free to remove the recording button, as well as its connection strip.

  16. Sony Handycam HDR-CX580V Motherboard Replacement, Lens: 16 단계, 이미지 1/1
    • Use the Phillips #00 head to remove the following 5.5mm screws on the right-hand side near the lens.

  17. Sony Handycam HDR-CX580V Motherboard Replacement: 17 단계, 이미지 1/1
    • Use the Phillips #00 head to remove the following 5.5mm screws on the top near the lens.

  18. Sony Handycam HDR-CX580V Motherboard Replacement: 18 단계, 이미지 1/1
    • Carefully pop off the casing strip on the camera's left-hand side near the lens.

  19. Sony Handycam HDR-CX580V Motherboard Replacement: 19 단계, 이미지 1/1
    • Use the Phillips #00 head to remove the following 5.5mm screws underneath the casing strip.

  20. Sony Handycam HDR-CX580V Motherboard Replacement: 20 단계, 이미지 1/2 Sony Handycam HDR-CX580V Motherboard Replacement: 20 단계, 이미지 2/2
    • Carefully pull the lens cover and shutter assembly off of the front of the camera.

    • Do not pull the the wires out too strongly. Be sure to remove them from their base where they attach to the camera's body.

  21. Sony Handycam HDR-CX580V Motherboard Replacement: 21 단계, 이미지 1/1
    • Use the Phillips #00 head to remove the following 5.5mm screws on the lens shell.

  22. Sony Handycam HDR-CX580V Motherboard Replacement: 22 단계, 이미지 1/2 Sony Handycam HDR-CX580V Motherboard Replacement: 22 단계, 이미지 2/2
    • Carefully remove the lens from the body of the camera.

    • Make sure to avoid touching the lens itself directly in order to prevent scratches or dirtying.

  23. Sony Handycam HDR-CX580V Motherboard Replacement, Motherboard: 23 단계, 이미지 1/3 Sony Handycam HDR-CX580V Motherboard Replacement, Motherboard: 23 단계, 이미지 2/3 Sony Handycam HDR-CX580V Motherboard Replacement, Motherboard: 23 단계, 이미지 3/3
    • To begin removing the metal casing, use the Phillips #00 head to remove the following 5.5mm screws.

  24. Sony Handycam HDR-CX580V Motherboard Replacement: 24 단계, 이미지 1/3 Sony Handycam HDR-CX580V Motherboard Replacement: 24 단계, 이미지 2/3 Sony Handycam HDR-CX580V Motherboard Replacement: 24 단계, 이미지 3/3
    • Hold the camera so you can see the motherboard on its bottom.

    • With a pair of straight tweezers, carefully remove the hanging panel by the following bundled cable connectors and ribbon cable connector attached to the motherboard.

    • At this point, the side panel that has been hanging should now be removed and placed to the side.

  25. Sony Handycam HDR-CX580V Motherboard Replacement: 25 단계, 이미지 1/2 Sony Handycam HDR-CX580V Motherboard Replacement: 25 단계, 이미지 2/2
    • The camcorder's chip and part of the motherboard should naturally fall off at this point and should carefully be removed and placed to the side.

  26. Sony Handycam HDR-CX580V Motherboard Replacement: 26 단계, 이미지 1/1
    • Use the Phillips #00 head to remove the following 5.5mm screws from the side of the motherboard.

  27. Sony Handycam HDR-CX580V Motherboard Replacement: 27 단계, 이미지 1/2 Sony Handycam HDR-CX580V Motherboard Replacement: 27 단계, 이미지 2/2
    • Use the Phillips #00 head to remove the following 5.5mm screws and remove the lens compartment by carefully pulling it out of the metal casing.

    • Do not pull the lens compartment too hard.

  28. Sony Handycam HDR-CX580V Motherboard Replacement: 28 단계, 이미지 1/1
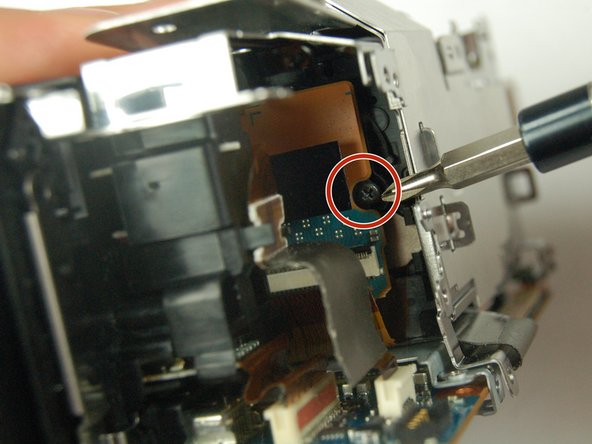
    • Use the Phillips #00 head to remove the 5.5mm screw inside the metal casing.

    • This screw may be hidden under the black strip inside the camera's body. If so, carefully move it aside with the pair of straight tweezers.

  29. Sony Handycam HDR-CX580V Motherboard Replacement: 29 단계, 이미지 1/1
    • Using a pair of tweezers, remove the ribbon cable connector attached to the metal casing and the motherboard.

  30. Sony Handycam HDR-CX580V Motherboard Replacement: 30 단계, 이미지 1/2 Sony Handycam HDR-CX580V Motherboard Replacement: 30 단계, 이미지 2/2
    • Using a pair of tweezers, remove the following ribbon cable connectors to remove the motherboard from the camcorder.

  31. Sony Handycam HDR-CX580V Motherboard Replacement: 31 단계, 이미지 1/1
    • Carefully remove the motherboard by hand.

    • It should be relatively easy to remove if everything is removed properly.

결승점

다른 한 분이 해당 안내서를 완성하였습니다.

Joyelle Woodson

회원 가입일: 03/21/17

270 평판

안내서 2개 작성하였습니다

Texas Tech, Team S46-G5, Bennett Spring 2017 Texas Tech, Team S46-G5, Bennett Spring 2017 회원

TTU-BENNETT-S17S46G5

4 회원들

안내서 10개 작성하였습니다

댓글 0개

댓글 쓰기

조회 통계:

24 시간 전: 0

7일 전: 4

30일 전: 11

전체 시간: 714