소개
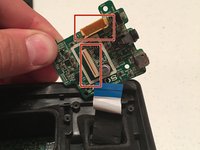
The guide will demonstrate the steps necessary to replace a bad battery charging port with a new one. The speaker will be disassembled from a fully assembled condition by following the necessary steps listed in this guide to replace the faulty charging port. For this repair guide only a Phillips screwdriver and the replacement board are necessary. This replacement is very straight forward and very simple for a beginner.
필요한 것


To reassemble your device, follow these instructions in reverse order.
다른 6명이 해당 안내서를 완성하였습니다.
팀

Western Carolina University, Team 1-4, Virtue Spring 2017 Western Carolina University, Team 1-4, Virtue Spring 2017 회원
WCU-VIRTUE-S17S1G4
4 회원들
안내서 5개를 작성함
12가이드 댓글
Bradley, this is a SONY 40BKB537U-CNF2G board….where can I get one? The mini charge port is bad on mine and v difficult to replace.
Thanks
Where can I buy the whole circuit board to replace the Charging port
Sony Mini speaker SRS - X3
40BKB537U - CNF2G
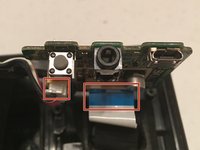
charging port
Morgan -
Where can I buy circuit board To replace charging port Sony Mini speaker SRS - X3
40BKB537U-CNF2G
Morgan -
Hi Michael, did you find a replacement board? I need to replace mine as well.
I have all the part of this speaker. Email me to negotiate! Kennyportillo99@gmail.com