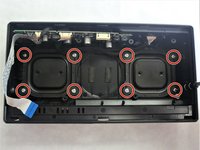
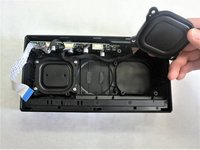
주요 콘텐츠로 건너뛰기

Sony SRS-X55 Speaker Reverberator Replacement

필요한 것

  1. Sony SRS-X55 Speaker Reverberator Replacement, Speaker Reverberator: 1 단계, 이미지 1/1
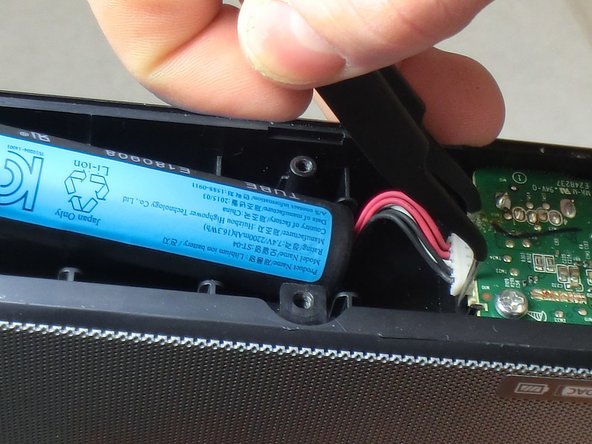
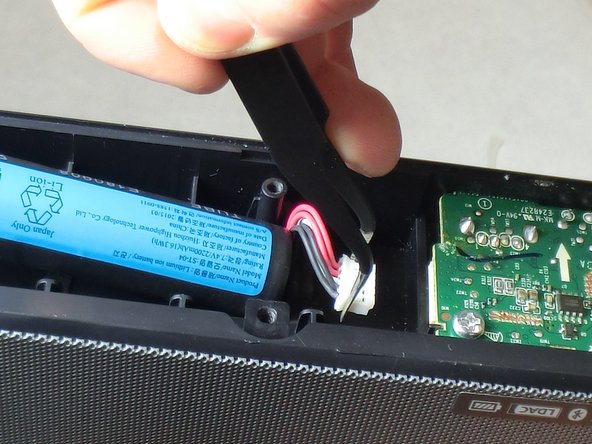
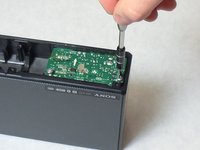
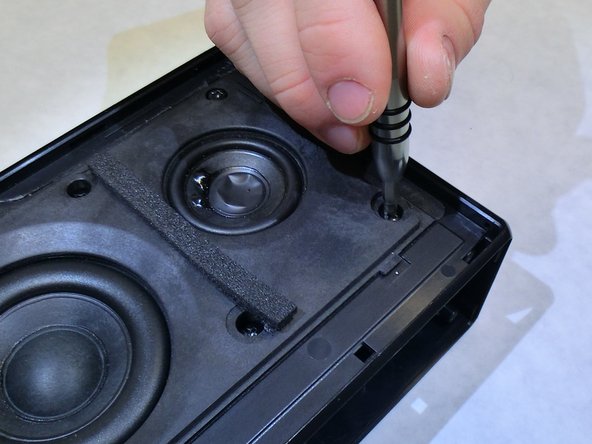
    • Locate the six 9 mm screws on the bottom of the speaker and remove them using Phillips head #2.

  2. Sony SRS-X55 Speaker Reverberator Replacement: 2 단계, 이미지 1/2 Sony SRS-X55 Speaker Reverberator Replacement: 2 단계, 이미지 2/2
    • Insert a plastic spudger into the seam on the bottom panel and lift it away from the rest of the speaker.

  3. Sony SRS-X55 Speaker Reverberator Replacement: 3 단계, 이미지 1/3 Sony SRS-X55 Speaker Reverberator Replacement: 3 단계, 이미지 2/3 Sony SRS-X55 Speaker Reverberator Replacement: 3 단계, 이미지 3/3
    이 단계에 사용된 도구:
    Tweezers
    $4.99
    구매
    • Locate the battery connection and unplug it using a pair of metal tweezers.

  4. Sony SRS-X55 Speaker Reverberator Replacement: 4 단계, 이미지 1/2 Sony SRS-X55 Speaker Reverberator Replacement: 4 단계, 이미지 2/2
    • Locate the remaining two 3.5 mm screws on the bottom of the I/O board and remove them using a Phillips head #2 screwdriver.

  5. Sony SRS-X55 Speaker Reverberator Replacement: 5 단계, 이미지 1/1
    • Remove the I/O board from the rest of the speaker. A plastic spudger can aid in this process if it is inserted into the edge as shown and gently pried.

  6. Sony SRS-X55 Speaker Reverberator Replacement: 6 단계, 이미지 1/2 Sony SRS-X55 Speaker Reverberator Replacement: 6 단계, 이미지 2/2
    • Insert a plastic spudger into the seam where the forward facing metal speaker cover meets the speaker body and gently pry it upward until it releases.

  7. Sony SRS-X55 Speaker Reverberator Replacement: 7 단계, 이미지 1/2 Sony SRS-X55 Speaker Reverberator Replacement: 7 단계, 이미지 2/2
    • Locate the eight 8.9 mm screws on the face of the speaker assembly and remove them using a Phillips head #2 screwdriver.

  8. Sony SRS-X55 Speaker Reverberator Replacement: 8 단계, 이미지 1/2 Sony SRS-X55 Speaker Reverberator Replacement: 8 단계, 이미지 2/2
    • Insert a plastic spudger underneath one of the tabs on the front of the speaker assembly and gently raise it.

    • Continue to the next step before attempting to lift the speaker assembly entirely away from the rest of the speaker to avoid damaging internal wire connections.

  9. Sony SRS-X55 Speaker Reverberator Replacement: 9 단계, 이미지 1/3 Sony SRS-X55 Speaker Reverberator Replacement: 9 단계, 이미지 2/3 Sony SRS-X55 Speaker Reverberator Replacement: 9 단계, 이미지 3/3
    • Locate the two wire connections as shown underneath of the speaker assembly and unplug them using a pair of tweezers.

    • Lift the speaker assembly away.

  10. Sony SRS-X55 Speaker Reverberator Replacement: 10 단계, 이미지 1/2 Sony SRS-X55 Speaker Reverberator Replacement: 10 단계, 이미지 2/2
    • Locate the eight 7.5 mm screws across both of the speaker reverberators and remove them using a Phillips head #2 screwdriver.

    • Lift the speaker reverberators away and replace them.

결론

To reassemble your device, follow these instructions in reverse order.

다른 2명이 해당 안내서를 완성하였습니다.

Eric Coletto

회원 가입일: 01/26/17

113 평판

안내서 1개 작성함

IUPUI, Team 2-3, Baechle Spring 2017 IUPUI, Team 2-3, Baechle Spring 2017 회원

IUPUI-BAECHLE-S17S2G3

3 회원들

안내서 3개 작성하였습니다

댓글 한 개

Nice Guide, but do you know the exact speaker size and/or type?

I can not find the exact speakers.

THX

Elduderino79

El Duderino - 답글

댓글 쓰기

조회 통계:

24 시간 전: 1

7일 전: 6

30일 전: 19

전체 시간: 1,507