주요 콘텐츠로 건너뛰기

Sony Vaio Fit 13A SVF13NA1EL Fan Replacement

필요한 것

  1. Sony Vaio Fit 13A SVF13NA1EL Fan Replacement, Fan: 1 단계, 이미지 1/1
    • Begin by laying the laptop top-down on a flat surface.

    • Use a JIS #1 screwdriver to remove the 4 screws circled in red from the back cover.

    • Use a JIS #0 screwdriver to remove the 8 screws circled in orange.

    • Many of these screws are located underneath rubber pads on the device.

    • Keep track of the locations of the screws removed for ease of reassembly.

  2. Sony Vaio Fit 13A SVF13NA1EL Fan Replacement: 2 단계, 이미지 1/1
    • Use the plastic opening tool to carefully remove the back cover from the laptop.

    • Be careful when around the ports and headphone jack to avoid causing damage to these components.

  3. Sony Vaio Fit 13A SVF13NA1EL Fan Replacement: 3 단계, 이미지 1/2 Sony Vaio Fit 13A SVF13NA1EL Fan Replacement: 3 단계, 이미지 2/2
    • Lift up the back cover to access internal components of the laptop.

  4. Sony Vaio Fit 13A SVF13NA1EL Fan Replacement: 4 단계, 이미지 1/1
    • Dab isopropyl alcohol on a microfiber cloth and gently clean the fan blades and vents.

    • Follow steps one through three in reverse order to reassemble and test if the problem is solved.

    • If the problem is not resolved repeat steps one through three and continue on to step six.

  5. Sony Vaio Fit 13A SVF13NA1EL Fan Replacement: 6 단계, 이미지 1/1
    • Pull back the pieces of tape, and remove the 3 screws around the fan (red).

    • Remove the 3 screws surrounding the attached heat sink (orange) with the screwdriver.

  6. Sony Vaio Fit 13A SVF13NA1EL Fan Replacement: 7 단계, 이미지 1/2 Sony Vaio Fit 13A SVF13NA1EL Fan Replacement: 7 단계, 이미지 2/2
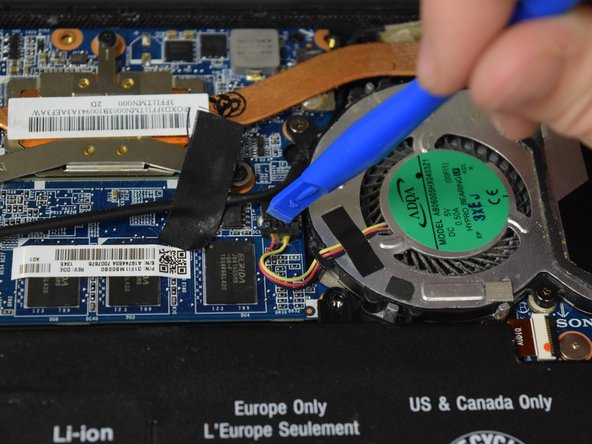
    • With the aid of a the opening tool, carefully unplug the fan connector.

    • Carefully lift out the old fan.

결론

To reassemble your device, follow these instructions in reverse order.

다른 한 분이 해당 안내서를 완성하였습니다.

Olivia

회원 가입일: 09/08/17

605 평판

안내서 5개 작성하였습니다

댓글 0개

댓글 쓰기

조회 통계:

24 시간 전: 0

7일 전: 3

30일 전: 22

전체 시간: 2,716