주요 콘텐츠로 건너뛰기

Sony Vaio PCG-4121GL Battery Replacement

필요한 것

  1. Sony Vaio PCG-4121GL Battery Replacement, Battery: 1 단계, 이미지 1/2 Sony Vaio PCG-4121GL Battery Replacement, Battery: 1 단계, 이미지 2/2
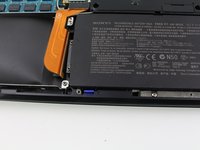
    • Remove the two 3mm Phillips #0 screws on the bottom of the computer that secure the plastic backing.

  2. Sony Vaio PCG-4121GL Battery Replacement: 2 단계, 이미지 1/3 Sony Vaio PCG-4121GL Battery Replacement: 2 단계, 이미지 2/3 Sony Vaio PCG-4121GL Battery Replacement: 2 단계, 이미지 3/3
    • Pull the bottom plate towards yourself until it unhinges fully.

    • Once the plate is free from the backing remove it completely.

  3. Sony Vaio PCG-4121GL Battery Replacement: 3 단계, 이미지 1/1
    • Look for the blue tab that is located to the bottom left of the battery.

  4. Sony Vaio PCG-4121GL Battery Replacement: 4 단계, 이미지 1/3 Sony Vaio PCG-4121GL Battery Replacement: 4 단계, 이미지 2/3 Sony Vaio PCG-4121GL Battery Replacement: 4 단계, 이미지 3/3
    • Pull the blue tab towards yourself until you hear a click.

    • Once the blue tab is released, pull up on the battery.

    • Once the battery can move freely, take it out completely.

    • It may be helpful to have a spudger to make it easier to release the blue tab.

결론

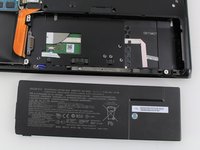
To reassemble your device, follow these instructions in reverse order.

다른 한 분이 해당 안내서를 완성하였습니다.

McKinley Hubred

회원 가입일: 01/24/19

127 평판

안내서 1개 작성함

Cal Poly, Team S2-G2, White Winter 2019 Cal Poly, Team S2-G2, White Winter 2019 회원

CPSU-WHITE-W19S2G2

4 회원들

안내서 10개 작성하였습니다

댓글 0개

댓글 쓰기

조회 통계:

24 시간 전: 4

7일 전: 16

30일 전: 49

전체 시간: 2,680