주요 콘텐츠로 건너뛰기

Sony Vaio PCG-4121GL Keyboard Replacement

필요한 것

  1. Sony Vaio PCG-4121GL Keyboard Replacement, Battery: 1 단계, 이미지 1/2 Sony Vaio PCG-4121GL Keyboard Replacement, Battery: 1 단계, 이미지 2/2
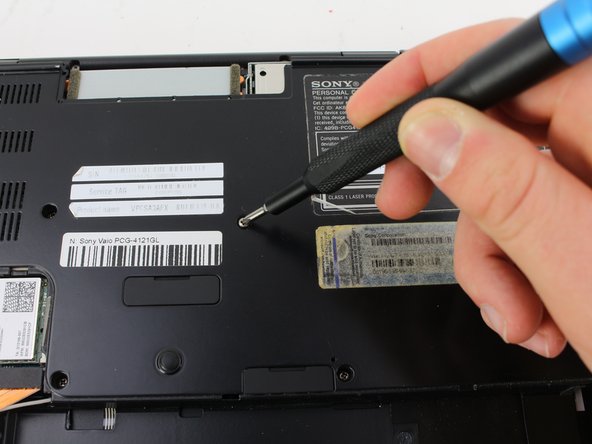
    • Remove the two 3mm Phillips #0 screws on the bottom of the computer that secure the plastic backing.

  2. Sony Vaio PCG-4121GL Keyboard Replacement: 2 단계, 이미지 1/3 Sony Vaio PCG-4121GL Keyboard Replacement: 2 단계, 이미지 2/3 Sony Vaio PCG-4121GL Keyboard Replacement: 2 단계, 이미지 3/3
    • Pull the bottom plate towards yourself until it unhinges fully.

    • Once the plate is free from the backing remove it completely.

  3. Sony Vaio PCG-4121GL Keyboard Replacement: 3 단계, 이미지 1/1
    • Look for the blue tab that is located to the bottom left of the battery.

  4. Sony Vaio PCG-4121GL Keyboard Replacement: 4 단계, 이미지 1/3 Sony Vaio PCG-4121GL Keyboard Replacement: 4 단계, 이미지 2/3 Sony Vaio PCG-4121GL Keyboard Replacement: 4 단계, 이미지 3/3
    • Pull the blue tab towards yourself until you hear a click.

    • Once the blue tab is released, pull up on the battery.

    • Once the battery can move freely, take it out completely.

    • It may be helpful to have a spudger to make it easier to release the blue tab.

  5. Sony Vaio PCG-4121GL Keyboard Replacement, Keyboard: 5 단계, 이미지 1/2 Sony Vaio PCG-4121GL Keyboard Replacement, Keyboard: 5 단계, 이미지 2/2
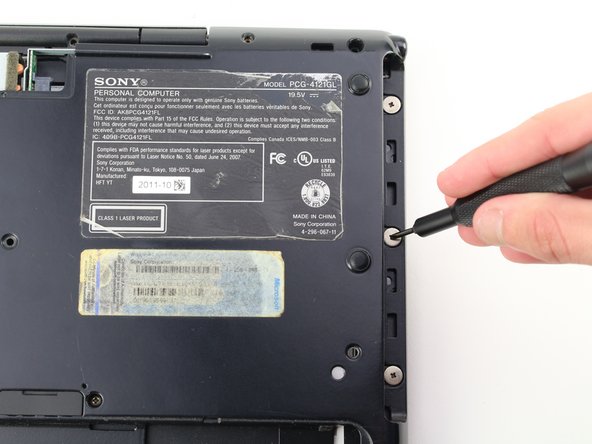
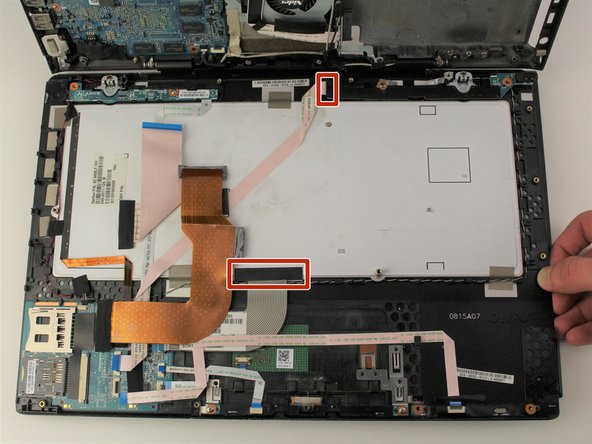
    • Remove seven 3mm Phillips #0 screws from the bottom of the computer.

    • Remove eight 5mm Phillips #0 screws.

  6. Sony Vaio PCG-4121GL Keyboard Replacement: 6 단계, 이미지 1/3 Sony Vaio PCG-4121GL Keyboard Replacement: 6 단계, 이미지 2/3 Sony Vaio PCG-4121GL Keyboard Replacement: 6 단계, 이미지 3/3
    • Carefully remove the disk drive from its compartment.

  7. Sony Vaio PCG-4121GL Keyboard Replacement: 7 단계, 이미지 1/2 Sony Vaio PCG-4121GL Keyboard Replacement: 7 단계, 이미지 2/2
    • Remove the three 2mm Phillips #00 screws located on the top right edge.

  8. Sony Vaio PCG-4121GL Keyboard Replacement: 8 단계, 이미지 1/3 Sony Vaio PCG-4121GL Keyboard Replacement: 8 단계, 이미지 2/3 Sony Vaio PCG-4121GL Keyboard Replacement: 8 단계, 이미지 3/3
    • Gently pull apart the top and bottom plastic bodies.

    • Carefully lift up tabs to detach cable connectors.

    • Slowly detach bottom component to avoid tearing wires/connectors.

  9. Sony Vaio PCG-4121GL Keyboard Replacement: 9 단계, 이미지 1/3 Sony Vaio PCG-4121GL Keyboard Replacement: 9 단계, 이미지 2/3 Sony Vaio PCG-4121GL Keyboard Replacement: 9 단계, 이미지 3/3
    • Remove the tape strips along the edge of the keyboard.

    • Once the keyboard is disconnected, slowly poke out keys one-by-one.

    • When the keyboard is free to move, remove it completely.

    • The keyboard is held in place with glue, once it is removed it is likely that it will not go back in the same way.

결론

To reassemble your device, follow these instructions in reverse order.

다른 2명이 해당 안내서를 완성하였습니다.

Miguel Camarena

회원 가입일: 01/24/19

367 평판

안내서 3개 작성하였습니다

Cal Poly, Team S2-G2, White Winter 2019 Cal Poly, Team S2-G2, White Winter 2019 회원

CPSU-WHITE-W19S2G2

4 회원들

안내서 10개 작성하였습니다

댓글 한 개

Im having trouble putting the keyboard cables back

Ishaan Patel - 답글

댓글 쓰기

조회 통계:

24 시간 전: 0

7일 전: 7

30일 전: 13

전체 시간: 1,645