주요 콘텐츠로 건너뛰기

Sony Vaio PCG-4G1L Plastic Casing Replacement

필요한 것

  1. Sony Vaio PCG-4G1L Plastic Casing Replacement, Battery: 1 단계, 이미지 1/1
    • Turn off the computer and disconnect the charging cable.

    • Failing to unplug the cable can result in electric shock.

  2. Sony Vaio PCG-4G1L Plastic Casing Replacement: 2 단계, 이미지 1/2 Sony Vaio PCG-4G1L Plastic Casing Replacement: 2 단계, 이미지 2/2
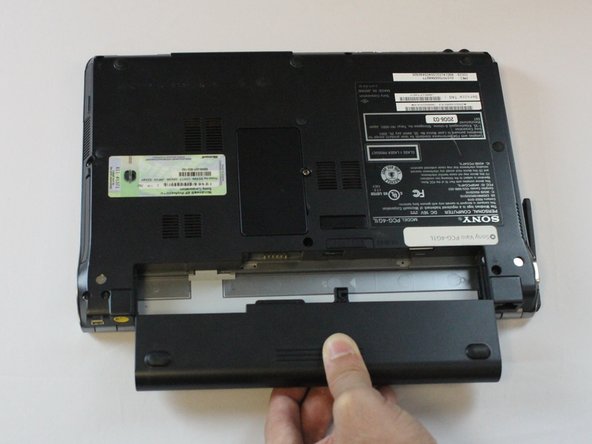
    • Slide battery release toggle switch towards the "RELEASE" print.

  3. Sony Vaio PCG-4G1L Plastic Casing Replacement: 3 단계, 이미지 1/3 Sony Vaio PCG-4G1L Plastic Casing Replacement: 3 단계, 이미지 2/3 Sony Vaio PCG-4G1L Plastic Casing Replacement: 3 단계, 이미지 3/3
    • Apply pressure with your thumb on the grip.

    • Pull the battery out while simultaneously holding the battery release toggle switch in the release position.

  4. Sony Vaio PCG-4G1L Plastic Casing Replacement, Keyboard: 4 단계, 이미지 1/2 Sony Vaio PCG-4G1L Plastic Casing Replacement, Keyboard: 4 단계, 이미지 2/2
    • Remove one 5 mm Phillips #1 pan head screw, in the middle of the laptop, using a Bit Driver with Phillips PH1 bit.

  5. Sony Vaio PCG-4G1L Plastic Casing Replacement: 5 단계, 이미지 1/2 Sony Vaio PCG-4G1L Plastic Casing Replacement: 5 단계, 이미지 2/2
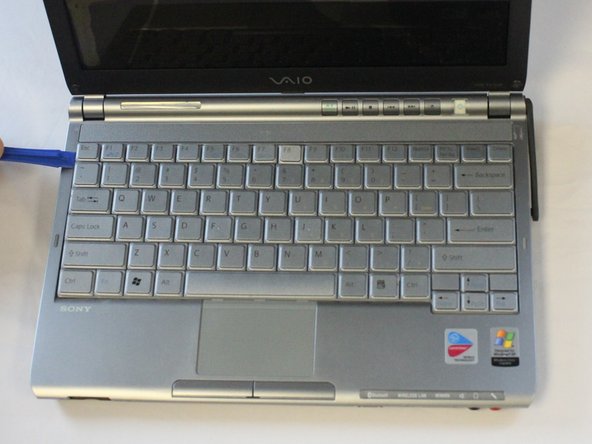
    • Be sure to pry the plastic opening tool under the keyboard, rather than under the keys. Otherwise, some keys could get harmed.

    • While using a plastic opening tool, carefully lift the keyboard by inserting the tool under the edge.

  6. Sony Vaio PCG-4G1L Plastic Casing Replacement: 6 단계, 이미지 1/3 Sony Vaio PCG-4G1L Plastic Casing Replacement: 6 단계, 이미지 2/3 Sony Vaio PCG-4G1L Plastic Casing Replacement: 6 단계, 이미지 3/3
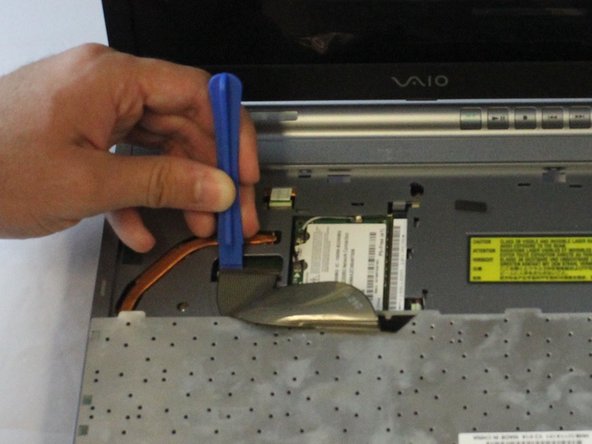
    • Do not pull the keyboard too far away, as a ribbon cable is still attached. Failing to do so can cause damage to the ribbon cable or the connector.

    • Use the plastic opening tool to release the clamp.

    • Using slight pressure, remove the ribbon cable with your fingers.

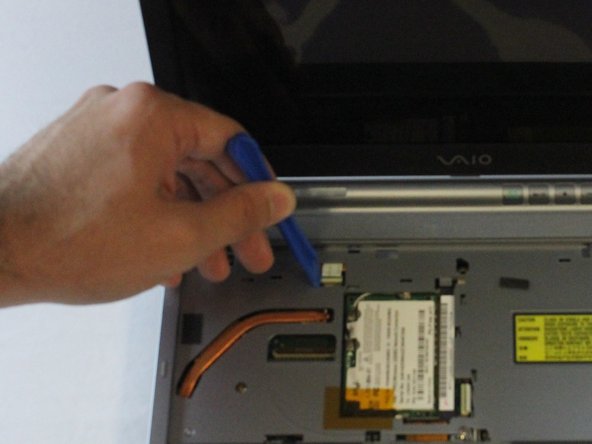
  7. Sony Vaio PCG-4G1L Plastic Casing Replacement, Network Antenna: 7 단계, 이미지 1/1
    • Swivel the Network Antenna up so that it points upward.

  8. Sony Vaio PCG-4G1L Plastic Casing Replacement: 8 단계, 이미지 1/2 Sony Vaio PCG-4G1L Plastic Casing Replacement: 8 단계, 이미지 2/2
    • Pinch thumb and index finger at the Network Antenna's base.

    • Make sure not to bend the Network Antenna. Failing to do so can cause damage to the antenna.

    • Pull the Network Antenna off.

  9. Sony Vaio PCG-4G1L Plastic Casing Replacement, Plastic Casing: 9 단계, 이미지 1/2 Sony Vaio PCG-4G1L Plastic Casing Replacement, Plastic Casing: 9 단계, 이미지 2/2
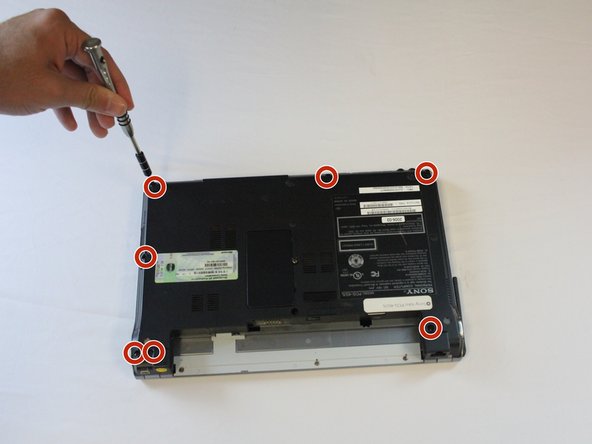
    • Remove seven 5 mm Phillips #1 pan head screws with a Bit Driver, using a Phillips PH1 bit.

  10. Sony Vaio PCG-4G1L Plastic Casing Replacement: 10 단계, 이미지 1/2 Sony Vaio PCG-4G1L Plastic Casing Replacement: 10 단계, 이미지 2/2
    • Remove one 7 mm Phillips #1 Pan Head Screw by using a Bit Driver with Phillips PH1 bit.

  11. Sony Vaio PCG-4G1L Plastic Casing Replacement: 11 단계, 이미지 1/2 Sony Vaio PCG-4G1L Plastic Casing Replacement: 11 단계, 이미지 2/2
    • Disconnect the cable by using the precision tweezers.

    • Slowly pry out the ribbon cable by using the plastic opening tool.

  12. Sony Vaio PCG-4G1L Plastic Casing Replacement: 12 단계, 이미지 1/1
    • Do not pull the plastic cover too far away, as a ribbon cable is still attached. Failing to do so can cause damage to ribbon cable or the connector.

    • Remove the plastic cover by inserting the plastic opening tool around the edge.

  13. Sony Vaio PCG-4G1L Plastic Casing Replacement: 13 단계, 이미지 1/2 Sony Vaio PCG-4G1L Plastic Casing Replacement: 13 단계, 이미지 2/2
    • Disconnect the ribbon cable by pulling straight up with your fingers.

결론

To reassemble your device, follow these instructions in reverse order.

다른 한 분이 해당 안내서를 완성하였습니다.

Cole Collins

회원 가입일: 10/04/16

175 평판

안내서 4개 작성하였습니다

USF Tampa, Team 2-3, Cagle Fall 2016 USF Tampa, Team 2-3, Cagle Fall 2016 회원

USFT-CAGLE-F16S2G3

5 회원들

안내서 12개 작성하였습니다

댓글 0개

댓글 쓰기

조회 통계:

24 시간 전: 0

7일 전: 2

30일 전: 10

전체 시간: 830