주요 콘텐츠로 건너뛰기

Sony Vaio VGN-NW240F (PCG-7184L) Processor Replacement

필요한 것

  1. Sony Vaio VGN-NW240F (PCG-7184L) Processor Replacement, Battery: 1 단계, 이미지 1/1
    • Power off the laptop.

    • Unplug the charging cable and any other cables plugged into the laptop.

    • Failure to remove or unplug any cables could result in electric shock.

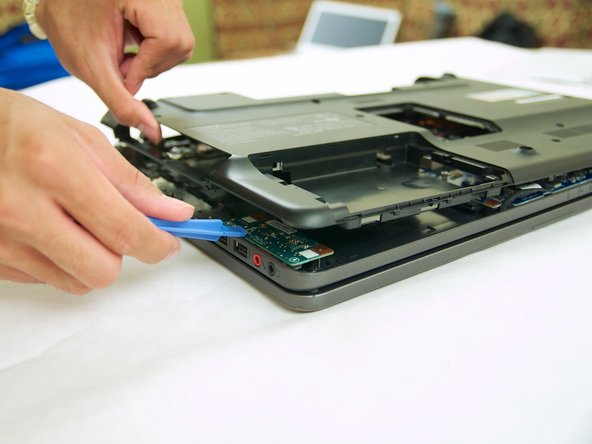
    • Turn the laptop over so that the back panel is facing upwards.

  2. Sony Vaio VGN-NW240F (PCG-7184L) Processor Replacement: 2 단계, 이미지 1/1
    • Locate two switches above the battery that lock it into place.

    • Push the left-hand switch, that says "lock" above it, so that it is unlocked.

  3. Sony Vaio VGN-NW240F (PCG-7184L) Processor Replacement: 3 단계, 이미지 1/1
    • Push and hold the right-hand switch, which says "release" above it, and lift the battery up out of its place.

  4. Sony Vaio VGN-NW240F (PCG-7184L) Processor Replacement, Optical Drive: 4 단계, 이미지 1/1
    • Locate and unscrew the two highlighted 8 mm Phillips #1 screws.

    • There will be three dots next to the desired screws

  5. Sony Vaio VGN-NW240F (PCG-7184L) Processor Replacement: 5 단계, 이미지 1/1
    • Grip the cover of the optical drive and slide it out.

    • If it does not come out, do not force it. Double check to make sure the screws are entirely removed.

  6. Sony Vaio VGN-NW240F (PCG-7184L) Processor Replacement, Back Panel: 6 단계, 이미지 1/3 Sony Vaio VGN-NW240F (PCG-7184L) Processor Replacement, Back Panel: 6 단계, 이미지 2/3 Sony Vaio VGN-NW240F (PCG-7184L) Processor Replacement, Back Panel: 6 단계, 이미지 3/3
    • Remove all the 8mm Phillips #1 screws on the backside of the laptop.

    • There are three 3mm and two 5.3mm screws under the battery that also need to be taken out.

    • There are three 3mm screws under the optical drives that also need to be taken out.

    • Remove the RAM panel in addition to the other screws. For further instructions, refer to the RAM replacement guide.

  7. Sony Vaio VGN-NW240F (PCG-7184L) Processor Replacement: 7 단계, 이미지 1/3 Sony Vaio VGN-NW240F (PCG-7184L) Processor Replacement: 7 단계, 이미지 2/3 Sony Vaio VGN-NW240F (PCG-7184L) Processor Replacement: 7 단계, 이미지 3/3
    • Pry along the edges of the back panel using the spudger.

    • If you are struggling to remove the back panel with a moderate amount of force, do NOT apply any additional force, instead double check to make sure all the screws were removed before attempting again.

  8. Sony Vaio VGN-NW240F (PCG-7184L) Processor Replacement, Fan: 8 단계, 이미지 1/1
    • Locate and remove three 5.3 mm Phillips #1 screws on the bottom of the fan.

    • Locate and remove the four 5.3 mm Phillips #1 screws on the top of the fan.

  9. Sony Vaio VGN-NW240F (PCG-7184L) Processor Replacement: 9 단계, 이미지 1/1
    • Locate and remove the four 3mm Phillips #1 screws above the processor and attached to the bronze heat-pipes.

    • Gently lift up the fan and heatsink from the the laptop.

    • If the fan and heatsink will not lift up with ease, do NOT apply any additional force. Check again to see if all necessary screws are removed.

  10. Sony Vaio VGN-NW240F (PCG-7184L) Processor Replacement: 10 단계, 이미지 1/1
    • The fan attached onto the heat sink with electrical tape. Removing the electrical tape allows you to replace the fan.

  11. Sony Vaio VGN-NW240F (PCG-7184L) Processor Replacement, Processor: 11 단계, 이미지 1/1
    • Locate the locking mechanism for the processor.

    • Using a flathead screwdriver, rotate the mechanism to the unlocked position.

    • When reassembling, remember to re-lock the mechanism.

  12. Sony Vaio VGN-NW240F (PCG-7184L) Processor Replacement: 12 단계, 이미지 1/1
    • Gently lift up the processor with two fingers on each end.

    • The pins on the bottom of the processor are very sensitive. Handle the processor with care!

    • When re-installing the processor, make sure the the processor is line up correctly. Make note the missing pins on a corner of the missing pin and match it up with the socket.

결론

To reassemble your device, follow these instructions in reverse order. In addition, please remember to remove and replace the old thermal paste. For instructions, please refer to this guide.

다른 4명이 해당 안내서를 완성하였습니다.

Kevin McGowan

회원 가입일: 04/22/14

619 평판

안내서 4개 작성하였습니다

Cal Poly, Team 9-17, Regan Spring 2014 Cal Poly, Team 9-17, Regan Spring 2014 회원

CPSU-REGAN-S14S9G17

4 회원들

안내서 18개 작성하였습니다

댓글 0개

댓글 쓰기

조회 통계:

24 시간 전: 0

7일 전: 7

30일 전: 61

전체 시간: 5,340